How to Record Vertical Video on PC (Windows and Mac)
In recent years, vertical video has become increasingly prevalent, driven by the rise of social media platforms and mobile viewing habits. So, if you intend to create content for online sharing, knowing how to record vertical video on your computer can greatly enhance your storytelling capabilities. In this article, we will guide you through the process of recording vertical video on your personal computer, including Windows and Mac. With the mentioned screen recording tools and the attached step-by-step instructions, you will be well-equipped to unleash your creativity and produce visually engaging recordings tailored for mobile screens and social media platforms.
📌Windows–WorkinTool Capture Screen Recorder
📌Mac–iMovie
📌Windows/Mac–OBS Studio
🙋🏻♀️With your newfound skills, you are able to tell captivating stories, share your experiences and connect with your audience in a visually immersive way. However, if you are a Windows user, please pay particular attention to WorkinTool Capture Screen Recorder. It is user-friendly, easy to use, reliable and highly multi-functional to do more than vertical video recording.
🙋🏻♂️Now, please start your reading to learn about specific solutions and experience all of them by yourself.
How to Record Vertical Video on PC (Windows and Mac) in 2024
In recent years, vertical video has become increasingly prevalent, driven by the rise of social media platforms and mobile viewing habits. So, if you intend to create content for online sharing, knowing how to record vertical video on your computer can greatly enhance your storytelling capabilities. In this article, we will guide you through the process of recording vertical video on your personal computer, including Windows and Mac. With the mentioned screen recording tools and the attached step-by-step instructions, you will be well-equipped to unleash your creativity and produce visually engaging recordings tailored for mobile screens and social media platforms.
| 💻Windows | 📍WorkinTool Capture Screen Recorder [🔥Recommended] |
| 💻Mac | 📍iMovie |
| 💻Windows/Mac | 📍OBS Studio |
Now, let’s dive in and discover the art of recording vertical video on your PC.
Before Your Vertical Video Recording
📌What is a vertical video?
A vertical video refers to a video with a vertical orientation, meaning the height of the video is greater than its width. To put it simply, the video is taller than it is wide, sharing the same portrait orientation with a smartphone or tablet screen. Vertical videos are typically made for users to view on mobile devices held upright. The normal aspect ratios are 9:16, 3:4 and more.
📌Why do you need to record a vertical video?
Vertical videos are pretty useful in modern society. Here are the main reasons for recording a vertical video.
Therefore, by understanding how to record vertical video, users can effectively make use of this format’s unique advantages to engage their audience and tell their stories more compellingly. Please read on to learn about specific solutions.
How to Record Vertical Video on Windows
To capture a vertical video easily on Windows, you’d better use a handy screen recording app. Here, it is strongly advisable to try WorkinTool Capture Screen Recorder.
✅WorkinTool Capture Screen Recorder
Capture Screen Recorder is an important feature in the WorkinTool VidClipper Video Editor, a super multi-functional tool with the following (but not limited to) features:
Therefore, it saves you the trouble of finding and installing them individually, which is time-saving and efficiency-boosting.
Capture Screen Recorder is a practical and convenient screen recording app for everyone. Its simple and intuitive interface enables beginners to complete their recordings within one page, helping them skip the cumbersome process of hitting “Next.” Professionals can rely on its advanced features, including screencast settings, drawing toolbar and auto-stop, to export a more custom recording.
To capture a vertical video, users can select Recording Selection to activate a recording frame and drag the cursor to pinpoint a vertical recording area and get a vertical recording. The recording area can be easily customizable.
(📃More info: WorkinTool Capture Screen Recorder Review.)
💡How to Record Vertical Video Using WorkinTool Capture Screen Recorder?
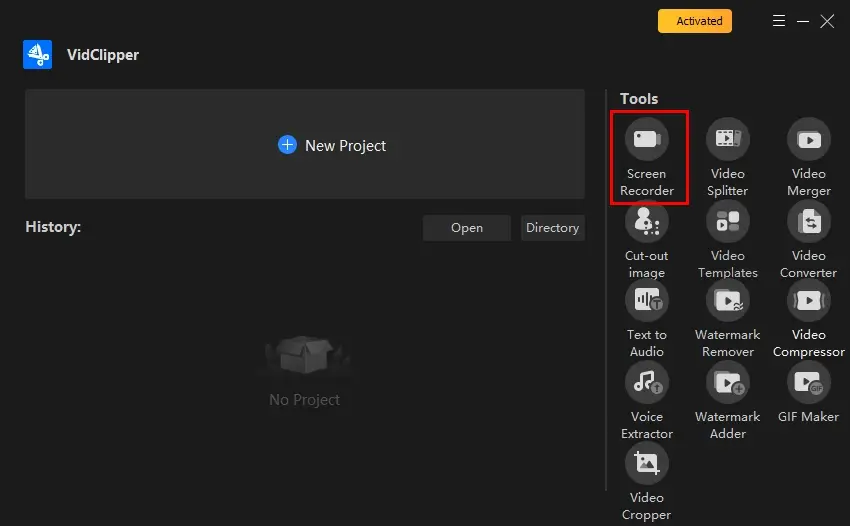
Step 1. Launch WorkinTool VidClipper and then click Screen Recorder on the right menu.
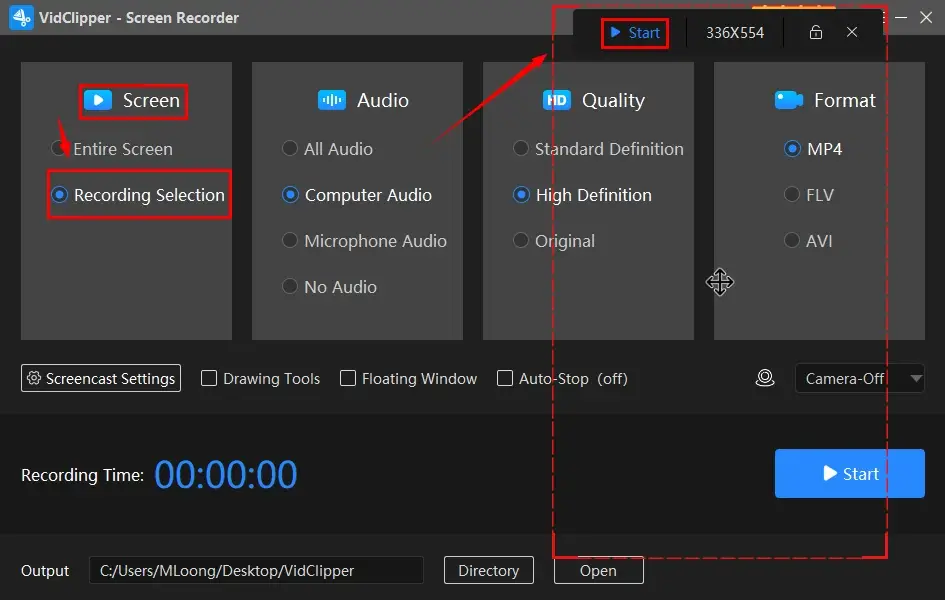
Step 2. Choose Recording Selection, confirm other options (Audio, Quality and Format), adjust the settings if needed and then hit Start (Alt + F1).
Step 3. Drag your cursor to determine the recording area and then press Start.
Step 4. Activate the drawing toolbar and/or auto-stop feature if necessary.
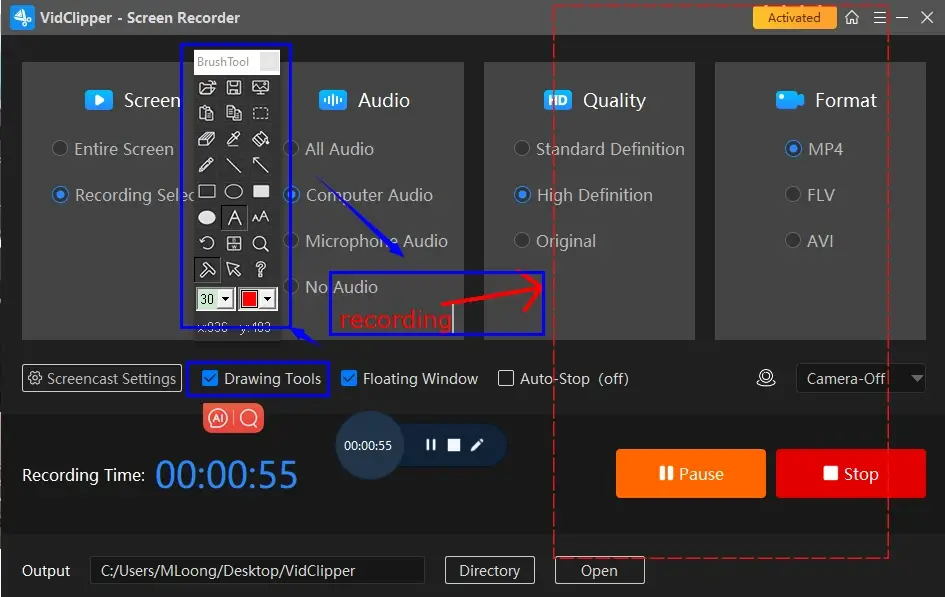
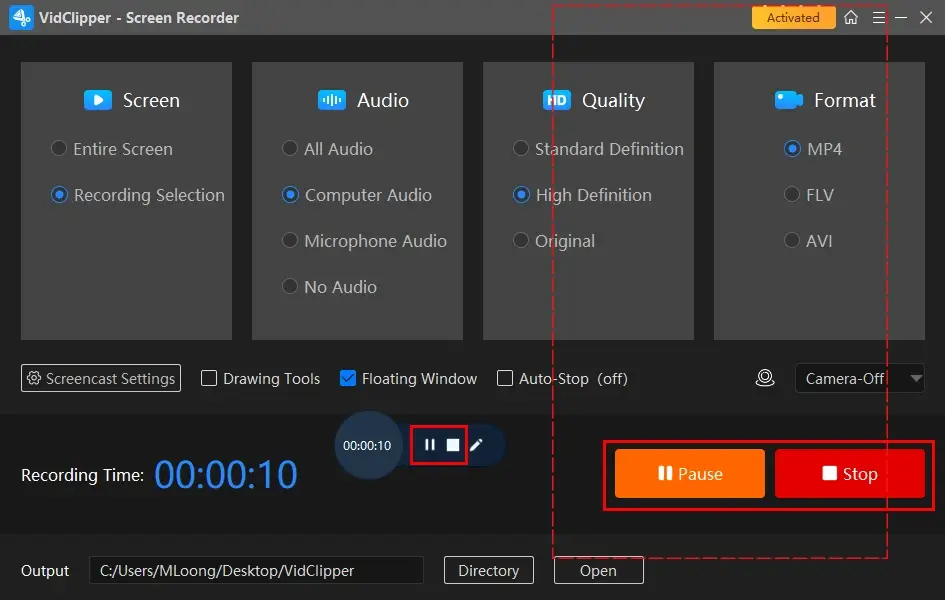
Step 5. Hit the Pause (Alt + F1) or Stop (Alt + F2) button on the floating window or the recording page to suspend or end and save your recording.
Step 6. Make your next move.
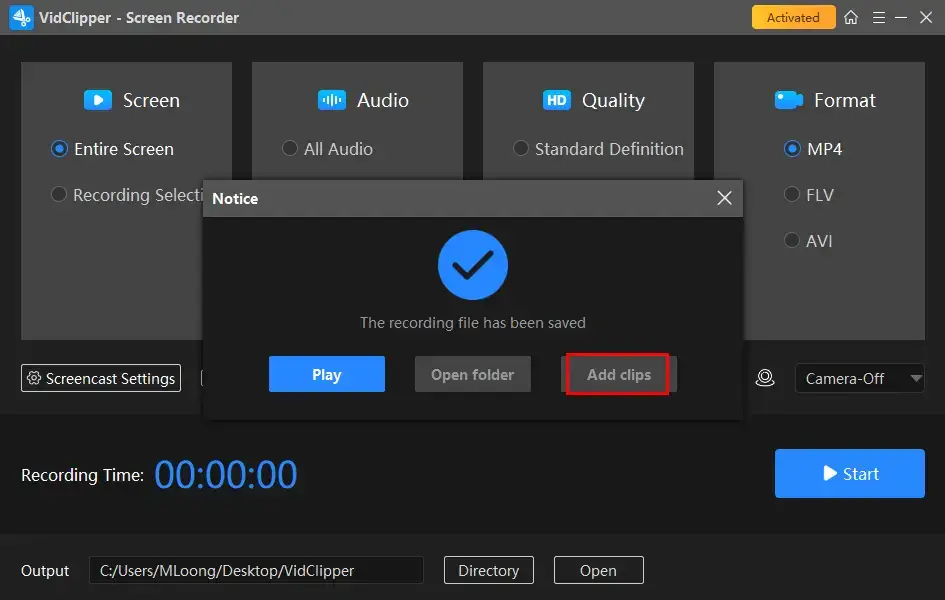
📣PS: Add clips is a useful feature that helps users move their recordings to the VidClipper video editor. Then, they can be further edited there, including:
✨Our Advice
📜You May Also Like
How to Record Vertical Video on Mac
To achieve this goal on Mac, the easiest way is to depend on the built-in app–QuickTime Player.
✅QuickTime Player
QuickTime Player is the default multimedia player pre-installed on every Apple device. It is known for its powerful playback and basic editing features. While it fails to have as extensive features as a professional video editing program does, it offers sufficient essential functionality to edit videos or audio files for personal use.
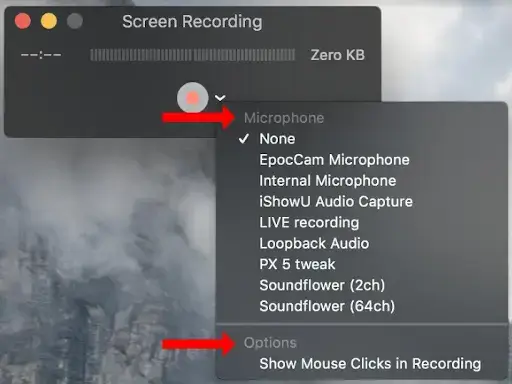
A screen recorder is equipped in this app, allowing users to capture any content on their computer screens. They can use it to locate a recording area vertically and begin their recording. However, if you plan to record the microphone sound, a plugin–Soundflower is required.
💡How to Screen Record Vertically in QuickTime Player?
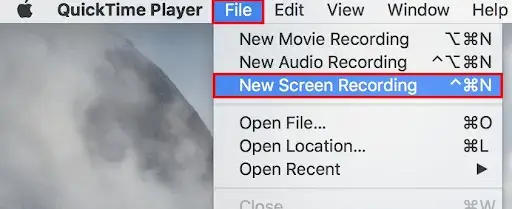
1. Open QuickTime Player and then go to File > New File Recording.
2. Click the small arrow icon in the pop-up window to confirm your settings.
3. Drag the cursor to create a vertical recording area and then hit the red Record button.
4. Press the Stop button to end your recording.

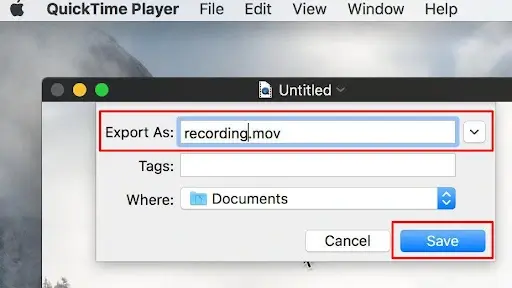
5. Select the format and then click Save.
✨Our Advice
How to Record Vertical Video on Windows and Mac
Is there a way to record a vertical video on both operating systems? Yes. OBS Studio is a valuable tool helpful for realizing this objective.
✅OBS Studio
OBS Studio, short for Open Broadcaster Software, is a free and open-source app designed for video recording and live streaming. It boasts strong cross-platform compatibility, including Windows, macOS and Linux, and its professional recording features. For its screen recording function, OBS provides users with various modes to meet their different needs, such as gameplay, operating window, entire screen, browser content and more.
Additionally, OBS offers extensive customization options, letting users configure hotkeys, transitions and scene transitions. Meanwhile, OBS supports plugin integration, enabling them to enhance the software’s functionality with third-party plugins. Therefore, OBS is widely popular among content creators, gamers and professionals who want to broadcast their content to various platforms, including Twitch, YouTube, Facebook Live, etc.
💡How to Record Vertical Video on OBS?
Step 1. Launch OBS and then go to Sources > + > the desired mode.
(Suggestion: Browser for an online source, Window Capture for a desktop app, Game Capture for gameplay recording and Display Capture for the entire screen recording.)
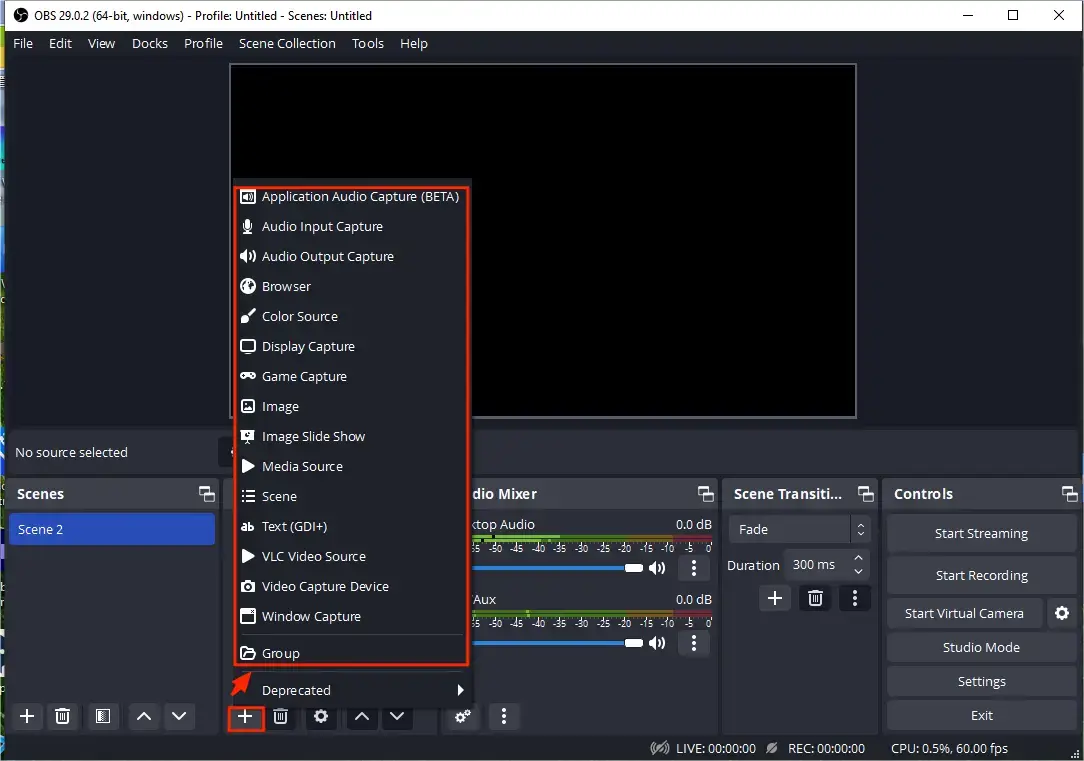
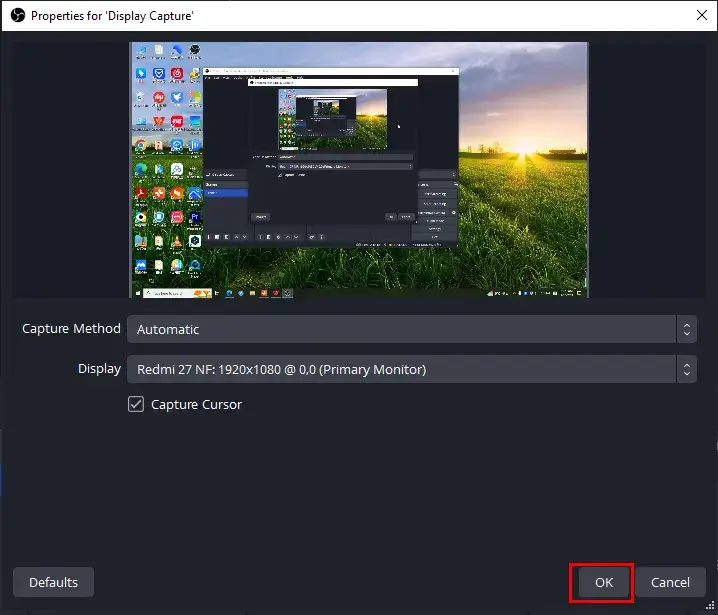
Step 2. Take Display Capture as an example: Name your project and then hit OK in the pop-up window.
Step 3. Check the recording content on the monitor and then press OK.
Step 4. Navigate to File > Settings.
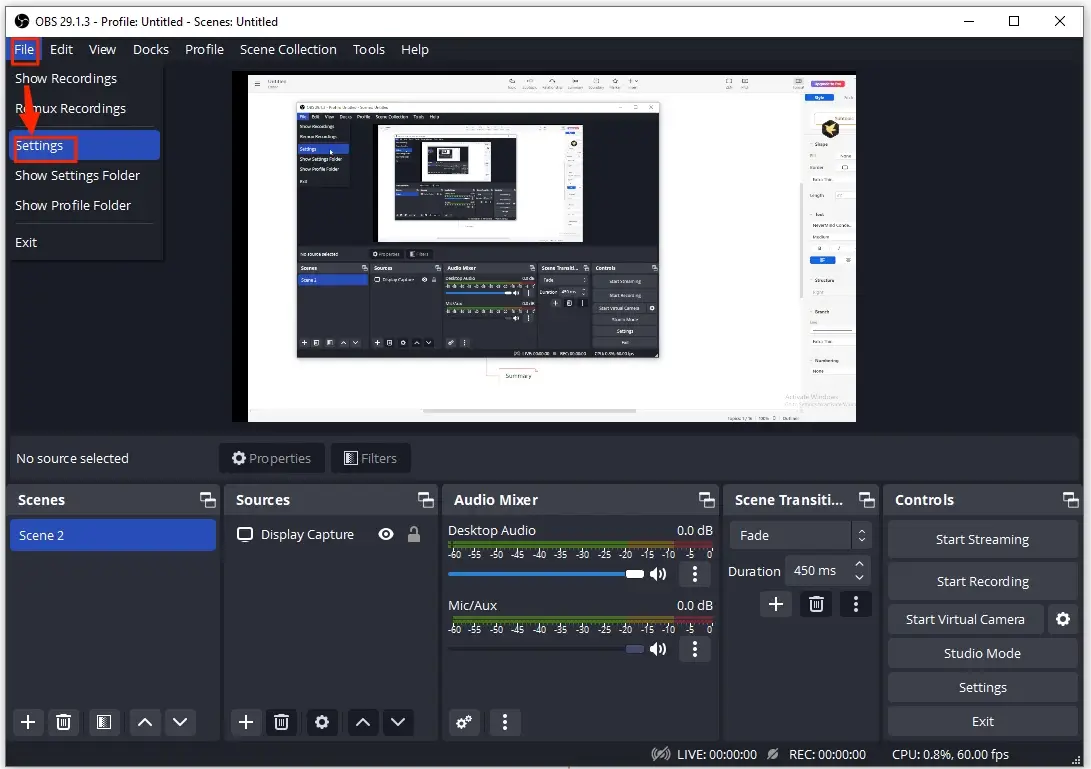
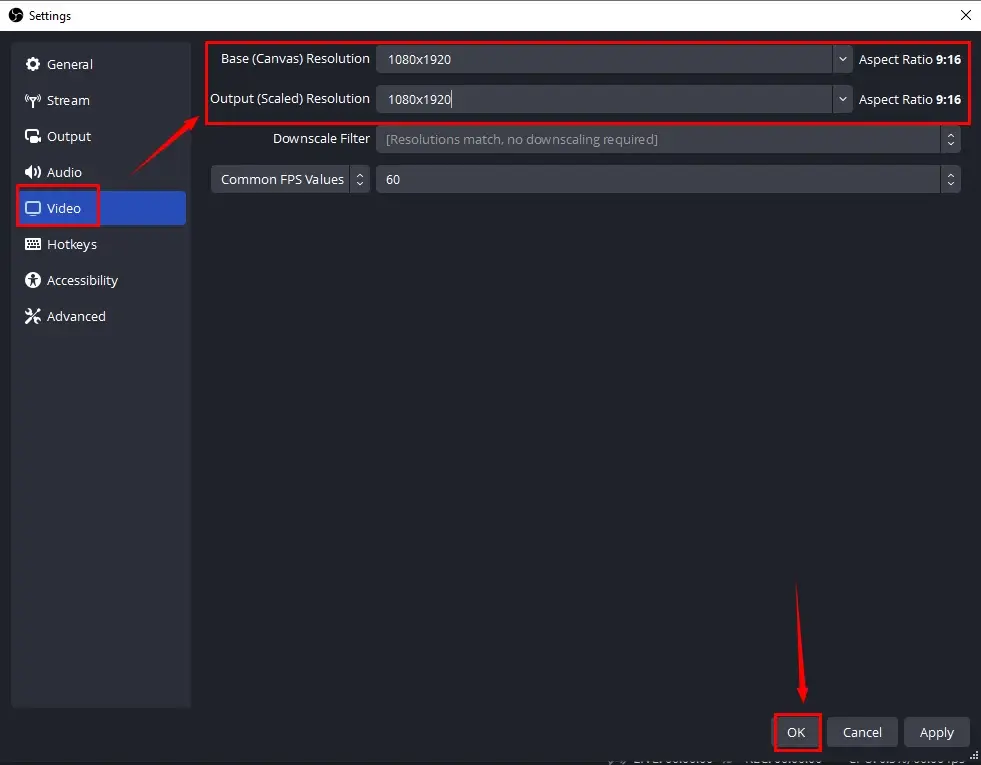
Step 5. Find Video > Base Resolution and Output Resolution, input a resolution representing vertical orientation like 1080 X 1920 to change the aspect ratios of canvas and output to a vertical one (9:16) and then hit OK.
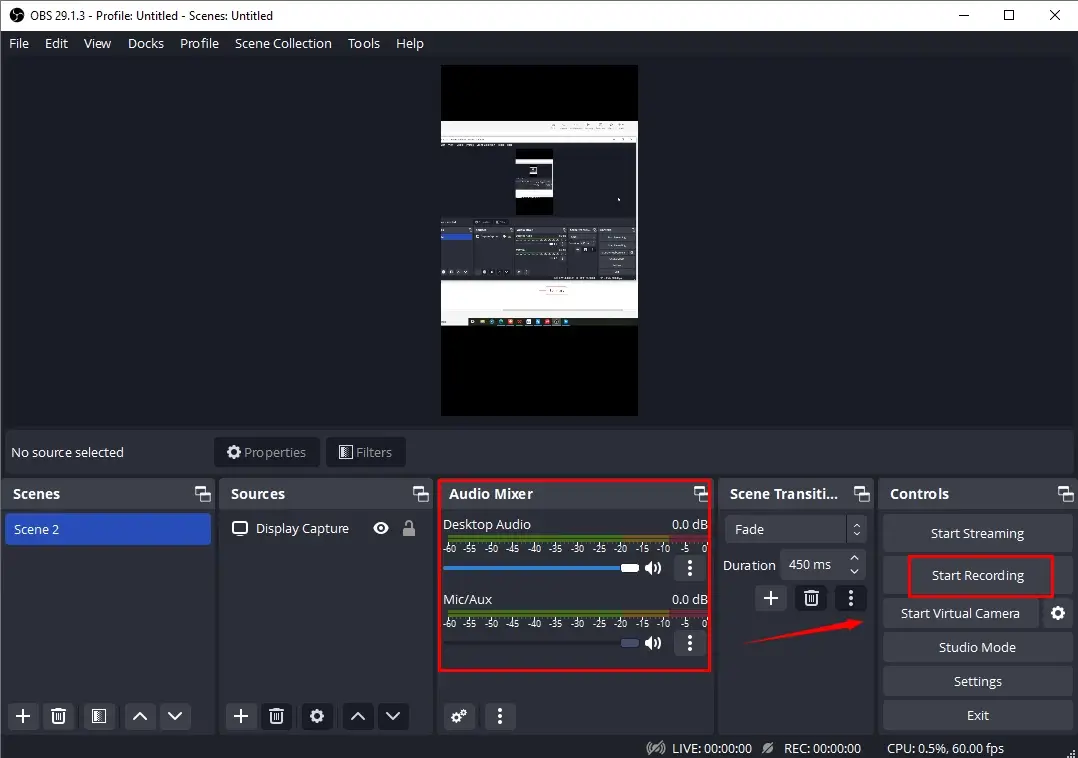
Step 6. Select your audio source to record in the Audio Mixer and then click Start Recording.
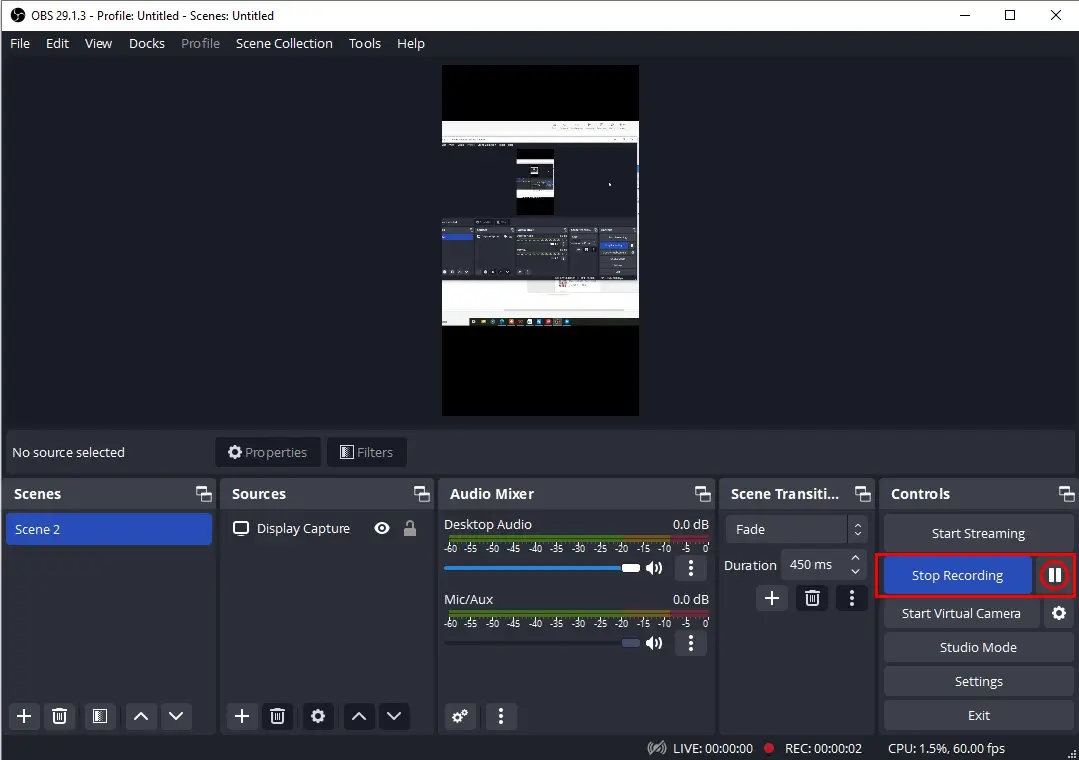
Step 7. Hit Stop Recording to end and save your recording.
(Hit the small pause icon to temporarily stop your recording.)
📢Note: To view your recorded vertical video, simply go to File > Show Recordings.
✨Our Advice
More to Share
🎯Can I turn my horizontal recording into a vertical one directly?
Yes. You can rely on the Rotate feature of a video editor to solve this problem.
- Windows: WorkinTool VidClipper allows you to convert landscape video to portrait without hassle after you complete your recording.
- Mac: iMovie can help you with this request. You should go to the top menu > the Crop icon > two rotate buttons.
🎯Should you record videos vertical or horizontal?
Actually, there is no definitive answer to whether it is better to record videos vertical or horizontal. The decision to record videos in a vertical or horizontal orientation depends on several factors, including the intended platform, content, audience preferences and context requirements. Here are some considerations to help you decide:
In summary, evaluating these factors will help you decide on the most appropriate orientation for your videos.
Wrapping up
This chapter concludes our discussion on how to record vertical video on your computer. Capturing videos vertically on your PC opens up the possibility of keeping and sharing compelling content tailored for mobile screens and mainstream social media platforms. With the assistance of the step-by-step instructions in this article, you can gain valuable insights and techniques to master the art of vertical video recording.
With your newfound skills, you are able to tell captivating stories, share your experiences and connect with your audience in a visually immersive way. However, if you are a Windows user, please pay particular attention to WorkinTool Capture Screen Recorder. It is user-friendly, easy to use, reliable and highly multi-functional to do more than vertical video recording.
Now, please get ready to use the tools to record your vertical videos and make an impact with them in the ever-evolving digital landscape.


