How to Record on Spectrum on Windows/Mac/Online in 2024
Many users wonder whether the programs on Spectrum TV can be recorded. Well, the answer is affirmative. Today, we will show you how to record on Spectrum with(out) its cloud DVR. All methods in this post prove to be simple and practical.
💡Built-in Feature–Spectrum Cloud DVR
💡Third-Party Tools: Windows–WorkinTool VidClipper, Mac–OBS Studio and Online–Screen Capture
I am sure that you will find this problem less challenging after reading it. The inbuilt Cloud DVR on Spectrum TV lets you record movies, shows and series on its website, Roku, Apple TV, Xbox smartphones, etc. However, a third-party tool can help you record any program or on-demand videos on your computer. For instance, WorkinTool VidClipper is a perfect choice to help you get a recorded Spectrum TV show on a Windows PC/laptop without time limit. In addition to that, it is user-friendly, easy to use and super multi-functional.
🙋♂️Now, please start your reading to learn about specific solutions and experience all of them by yourself.
How to Record on Spectrum on Windows/Mac/Online in 2024 | 4 Ways
Spectrum TV is a streaming television service provided by Charter Communications. The service offers access to live TV channels, on-demand content and premium networks such as HBO and Showtime, which can be enjoyed on various devices, including smartphones, tablets, smart TVs and gaming consoles. Many users wonder whether the programs on Spectrum TV can be recorded. Well, the answer is affirmative. Today, we will show you how to record on Spectrum with(out) its cloud DVR. All methods in this post prove to be simple and practical.
| 💻Built-in Feature | 📍Spectrum Cloud DVR |
| 💻Third-Party Tools | 📍Windows–WorkinTool VidClipper [🔥Recommended] |
| 📍Mac–OBS Studio | |
| 📍Online–Screen Capture |
Now, please follow us on this journey.
How to Record on Spectrum with Its Cloud DVR
Spectrum provides a cloud DVR to help you record a program or series and watch them remotely from your device. This service is not free, so you need to pay a monthly fee to enjoy it. With its help, you can achieve real-time or scheduled recordings of your chosen TV shows.
✅How to Use Spectrum Cloud DVR?
🎯How to schedule a recording?
- Open Spectrum TV and then locate the program you intend to record.
- Click it to get to the information page.
- Select Record.
(The recording schedule will be successful when a confirmation message and a red recording button appear.)
🎯How to record a series?
1. Open Spectrum TV and then find the series you want to capture.
2. Choose the program to see the information page.
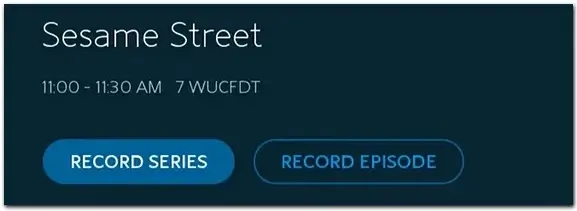
3. Click RECORD SERIES or RECORD EPISODE and then confirm your choices, including episodes (all episodes or new episodes), start and end time and storage duration (keep until).
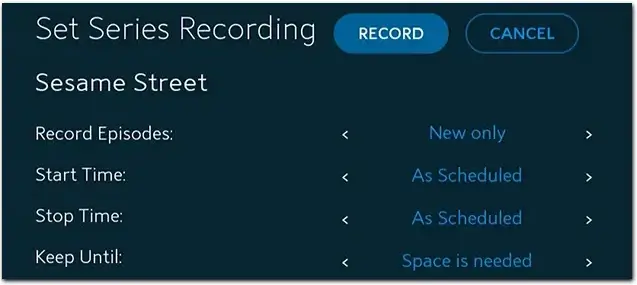
4. Hit RECORD or Confirm to begin your recording.
✨For Your Reference
FAQs for Spectrum Cloud DVR
Up to 50 shows can be recorded with cDVR concurrently, while up to 100 ones can be captured with cDVR Plus in batches.
- For cDVR, your recordings can be kept for up to 90 days,
- For cDVR Plus, they can be stored for up to one year.
How to Record on Spectrum Without Cloud DVR
Can I capture TV shows or programs on Spectrum without its cloud DVR? Yes. This chapter will inform you how to achieve this goal on different PC platforms.
For Windows users, you’d better resort to a handy screen recorder if you want high-quality and custom Spectrum TV show recordings. Here, it is advisable to try a quality screen recording tool–WorkinTool VidClipper.
✅WorkinTool VidClipper
WorkinTool VidClipper was initially developed as a video editor. However, intending to present a practical program for everyone, its designers have upgraded it to a multi-functional tool that meets users’ different needs. Therefore, by installing it on your computer, you will gain access to the following tools:
Hence, this app will allow you to enjoy an all-in-one editing experience without downloading each tool individually. Besides, it won’t overwhelm beginners due to its simple and clear interface, along with its quick editing features on its opening menu. Moreover, the operations of each tool prove to be easy, quick and convenient.
It is also an ideal program for professionals since they can rely on its editing console to create professional-looking or movie-like videos with the assistance of the features like text, subtitles, filters, transitions, effects, music, sound effects, color correction, pixelating and more.
When it comes to screen recording, you can customize your recording area (even recording video from Webcam) and capture your screen with(out) your system and microphone audio. Additionally, you can use its drawing toolbar and/or auto-stop feature to help you with your recording. Here are some more reasons for selecting VidClipper:

|
💡How to Use WorkinTool VidClipper?
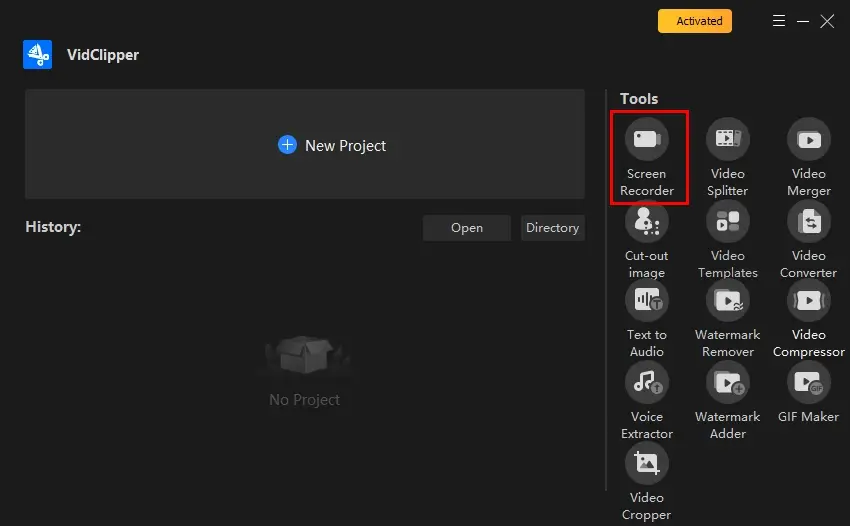
Step 1. Launch the tool and then click Screen Recorder on the right menu.
Step 2. Start recording your Spectrum TV show.
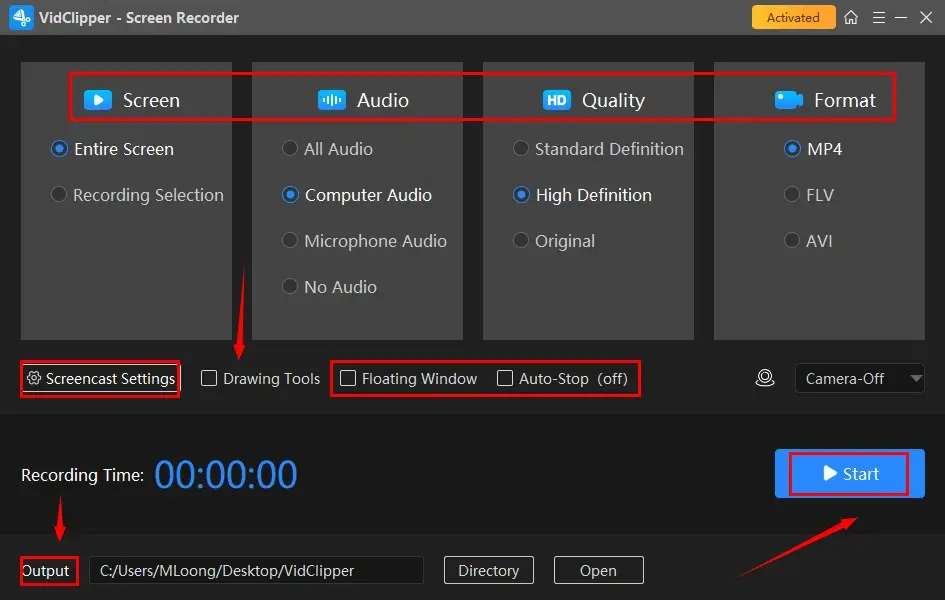
- Confirm your recording choices–recording area, audio, quality and format.
(Recording recommendation: recording area+computer audio+HD+MP4) - (Not necessary) Adjust the screencast settings at your will and activate the drawing toolbar and/or Auto-Stop.
- Decide on your output directory.
- Hit Start (shortcut key–Alt+F1) to begin your recording.
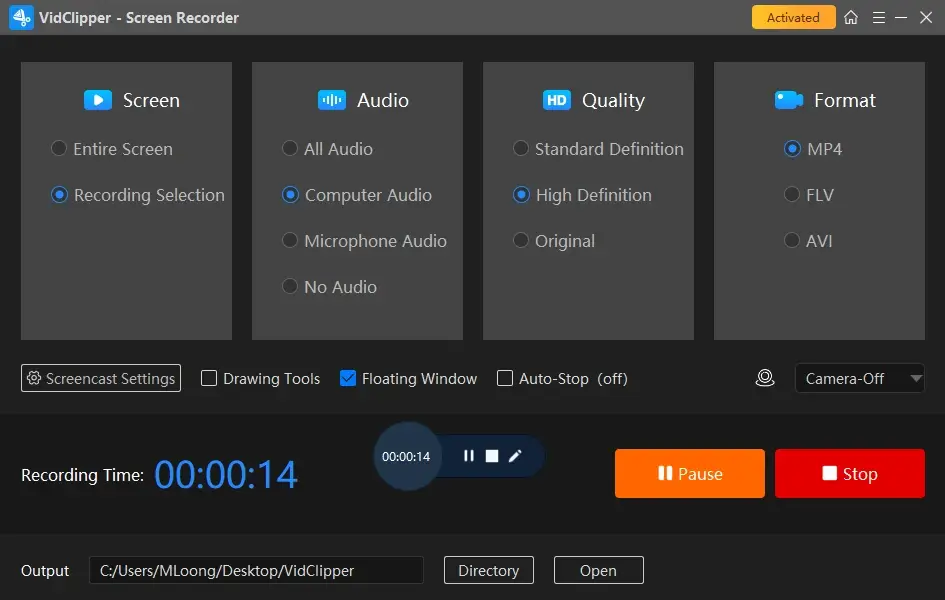
Step 3. Click on the Pause or Stop icon on the floating window or the recording page to suspend or end and save your recording.
(Shortcut key: Pause/Resume–Alt+F1, Stop–Alt+F2)
Step 4. Choose your next move.
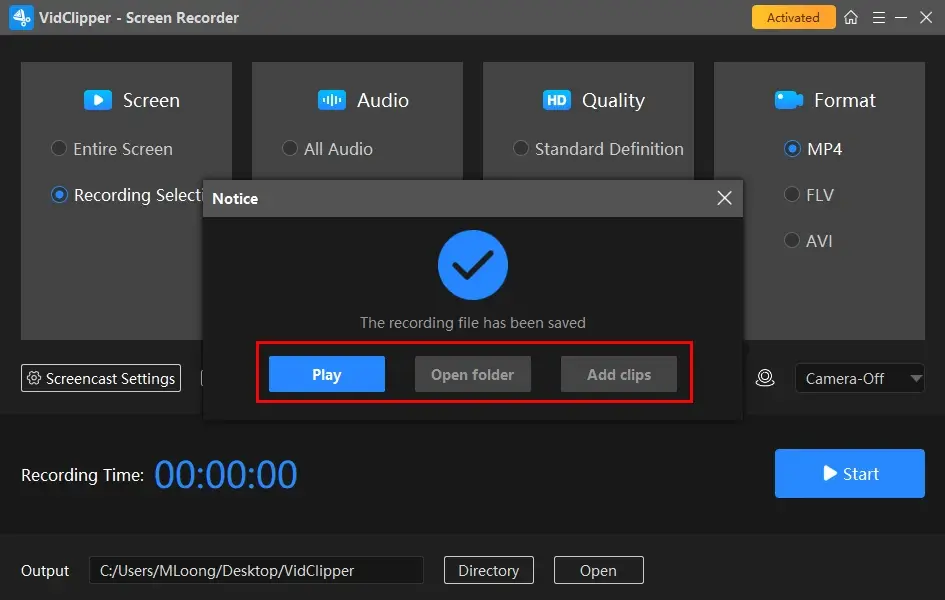
*Add clips is quite useful as it helps you add your recording to VidClipper’s editing console for further editing, including brightening, sharpening, mirroring, freezing frame and more.
🌈More to Share About WorkinTool VidClipper
🎯Inside the Screencast Settings
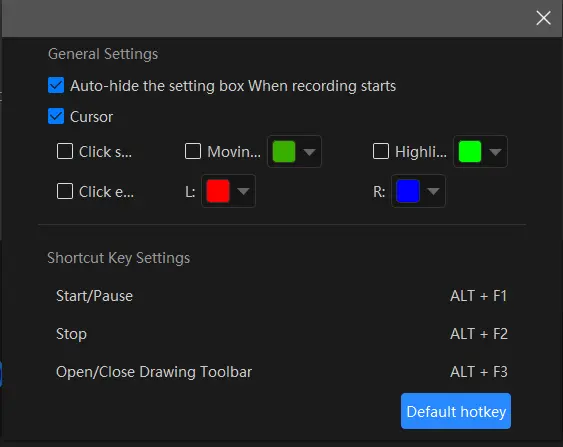
- Auto-Hide: Tick this choice to hide the settings box when your recording starts.
- Cursor: Mark this option to individualize the color of several operations like Moving track, Highlight and Click effect (left and right click).
- Click Sound: Activate or mute the sound of every click.
- Click Effect: “Colorize” your cursor, both left and right.
🎯Drawing Toolbar
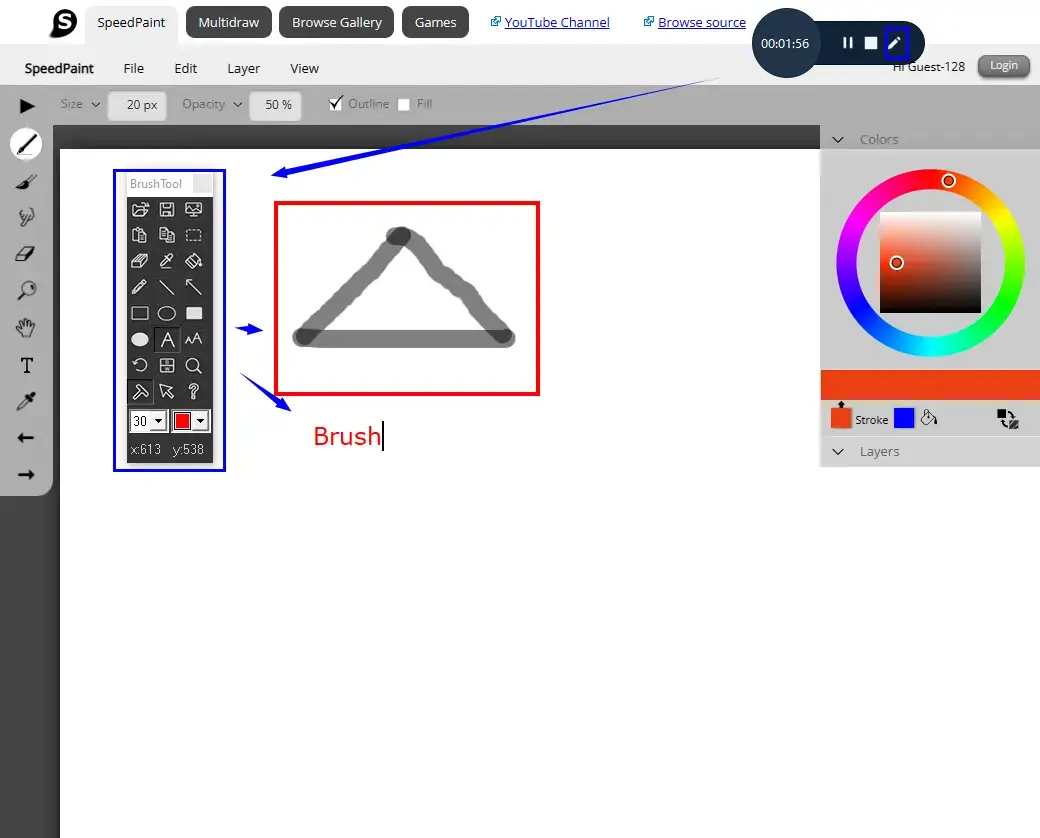
A drawing toolbar is at your disposal to draw lines or shapes and type text on your recording directly. Therefore, you save the cumbersome process of having to complete the relevant operations after your recording. You can activate it by
- Clicking the pen-like icon on the floating windows,
- Ticking the option–Drawing Tools on the recording page,
- Using the shortcut key–Alt+F3.
🎯Auto-Stop Feature
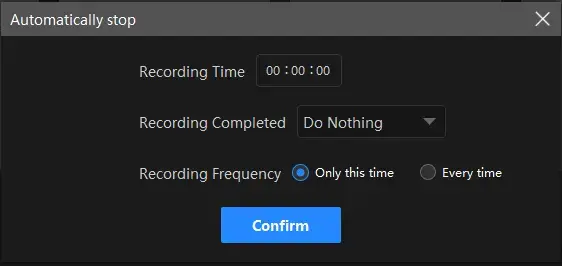
The auto-stop feature is equipped to end your recording automatically after you confirm the recording length. For instance, you can use it to record last 30 seconds on PC. Hence, you don’t have to worry about your recording, even when being away from your computer.
- Recording Time: Set your full recording length in advance to stop your recording automatically.
- After Recording: Personalize the post-recording operation when your recording comes to an end, including Do nothing, Exit program, Sleep and Shut down your PC.
- Recording Frequency: Decide how often your auto-stop settings are active, such as One time and Every time.
🎯What else can WorkinTool VidClipper do as a screen recorder?
| TV | Hulu Live | Philo TV | Sling TV |
| Videos | Dailymotion videos | Vimeo videos | Vevo videos |
| Social Media | Facebook Live Videos | Instagram Live | YouTube Live Stream |
✨For Your Reference
For Mac users, you can also depend on a useful screen recorder–OBS Studio to achieve this goal.
✅OBS Studio
OBS Studio (Open Broadcaster Software) is a free, open-source screen recording tool with strong compatibility, such as Windows, Mac and even Linux. As one of the most prevalent screen recorders, it captures users’ minds with its powerful screen-capturing ability. For example, it offers multiple recording modes, including gameplay capture, display, window, browser, etc. You can also determine the audio to record and customize your output with its additional settings. Besides, multiple video formats are supported in OBS.
💡How to Use OBS Studio?
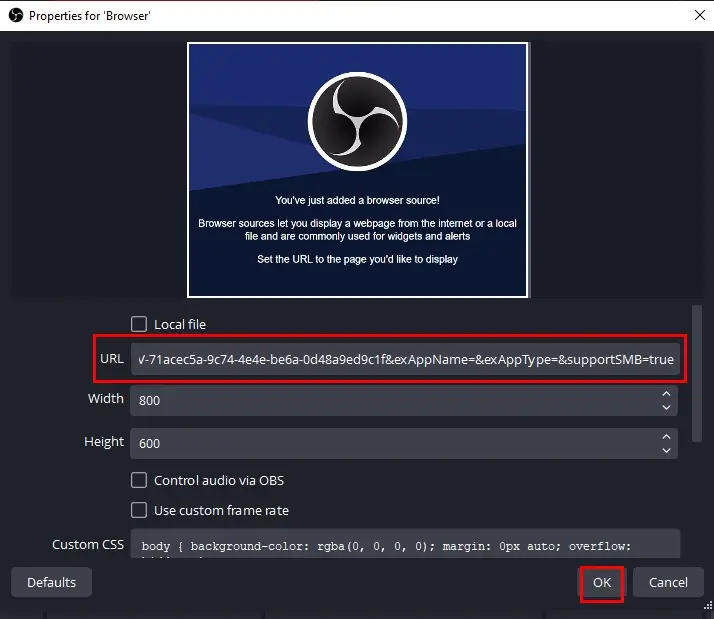
1. Open OBS and then find Sources > + icon > Window Capture (Spectrum TV app) or Browser (Spectrum website).
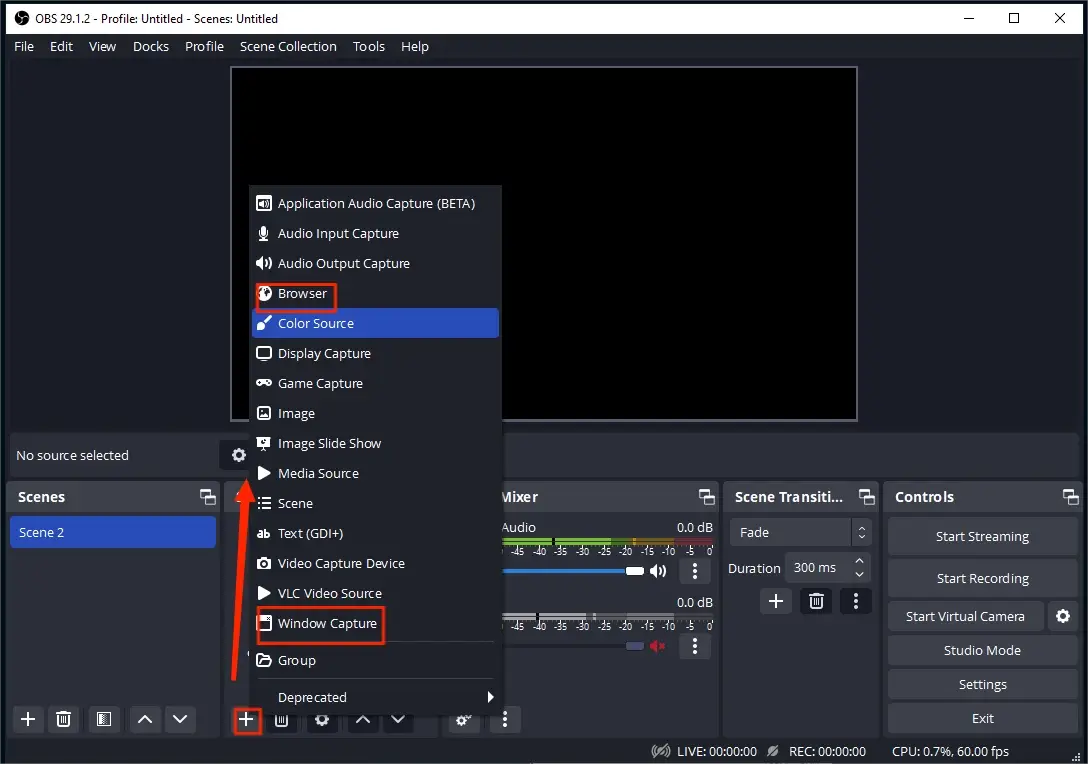
2. Choose your recording mode.
- Window Capture: Name your project, select your Spectrum TV app from the drop-down box and then hit OK.
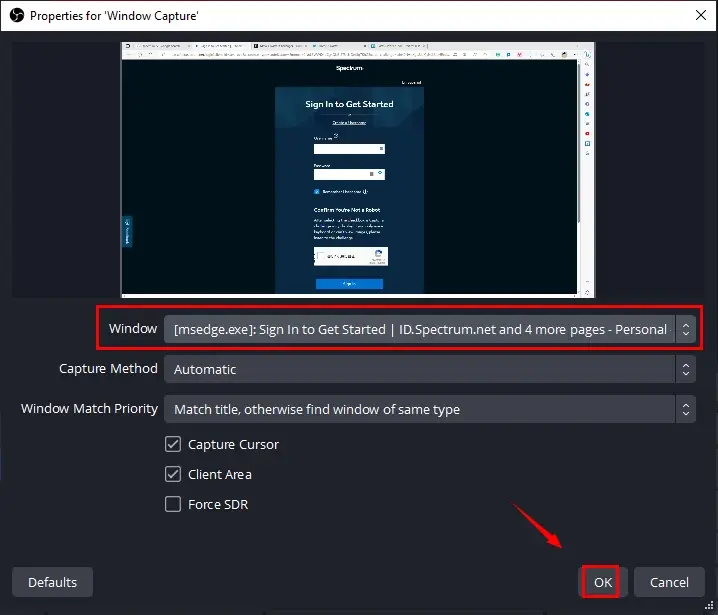 Browser: Name your project, copy the URL of the Spectrum TV show, paste it into the column highlighted and then press OK.
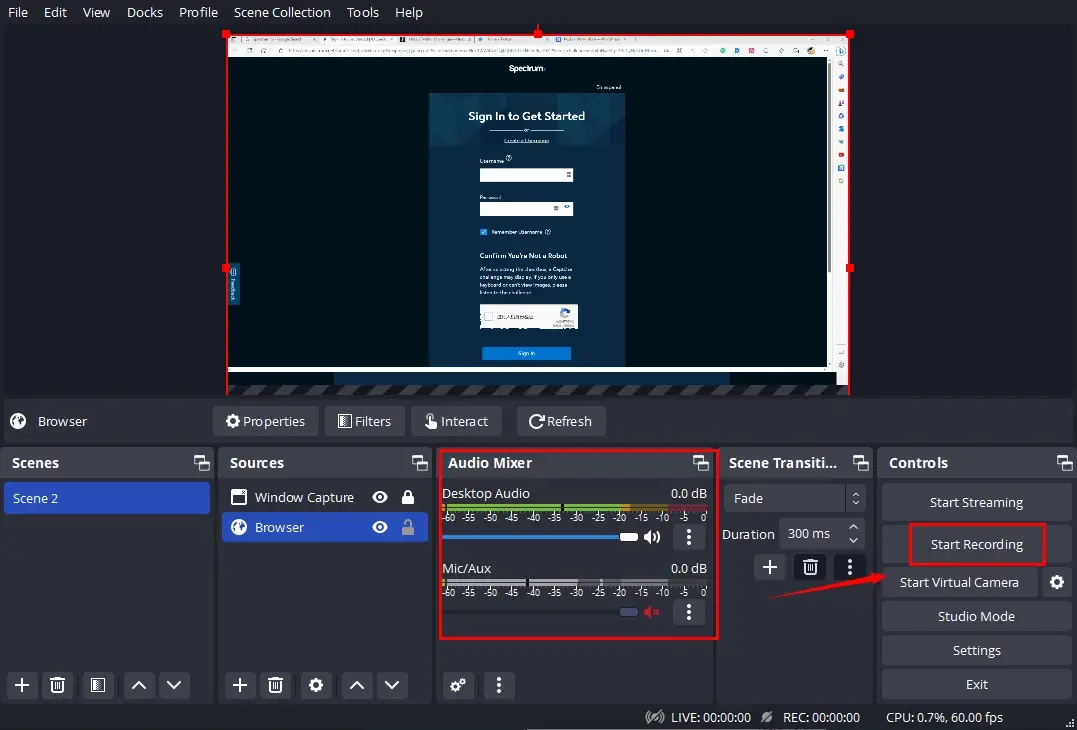
3. Determine your recording audio in the section-Audio Mixer and then hit Start Recording.
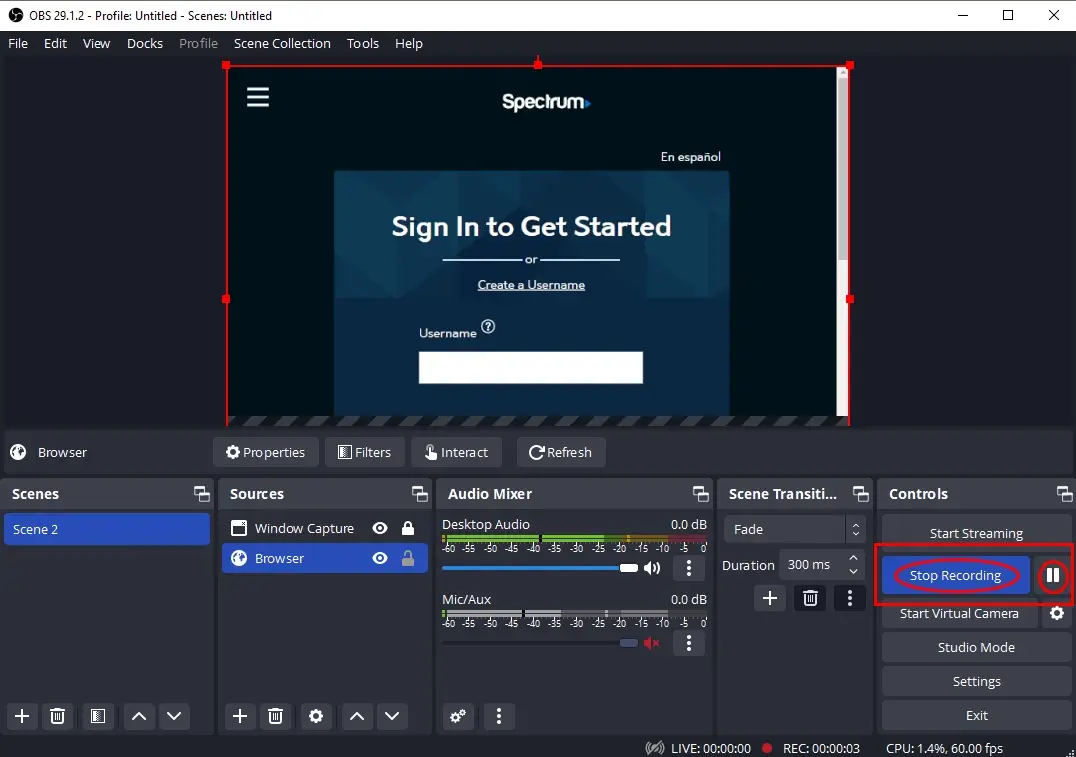
4. Click on the small pause icon or Stop Recording to temporarily or permanently end your recording.
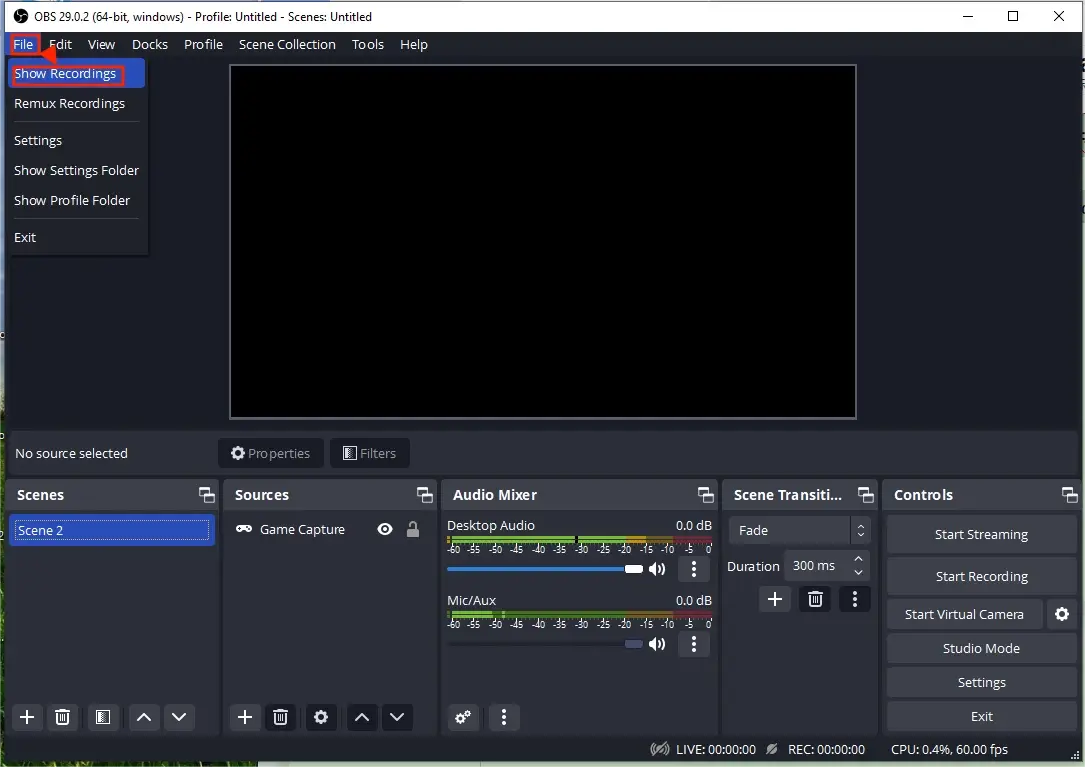
(Your recordings will be automatically stored in the default save path. You can change it by clicking File > Settings > Output > Recording Path.)
📕PS: You can view your recording by going to File > Show Recordings.
✨For Your Reference
If it truly bothers you to use any desktop software, you can seek assistance from a free online screen recorder. Here, we will introduce you to Screen Capture.
✅Screen Capture
Screen Capture is a free, web-based screen recording service platform. Since it is totally operated online, you don’t need to worry about compatibility and download any software. Also, it appeals to users with its super simple interface and you can begin your recording within a few clicks. Meanwhile, you can record your computer screen and Webcam with or without audio in multiple modes–entire screen, tab and window. However, if you use its free version, a watermark will be inserted into your recording.
💡How to Use Screen Capture?
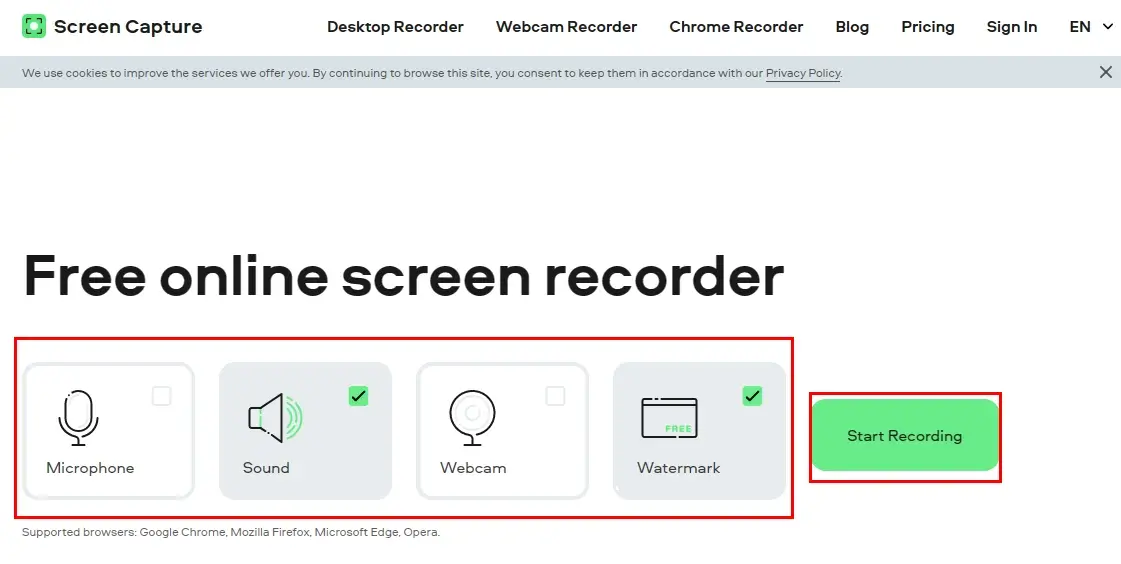
1). Open Screen Capture and then make your choices.
2). Hit Start Recording.
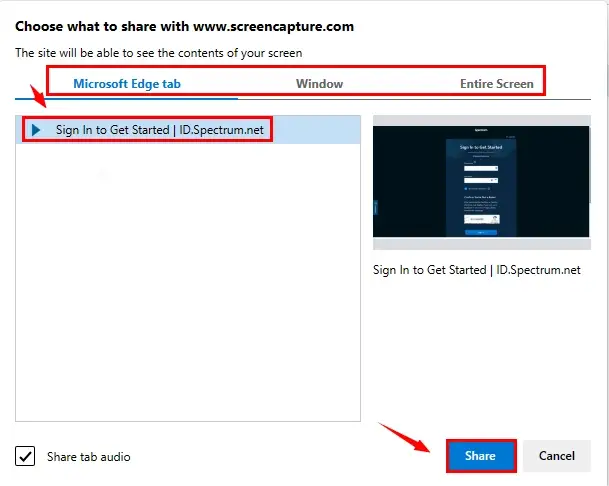
3). Determine the content to share with Screen Capture, select the option representing the Spectrum app and then click Share.
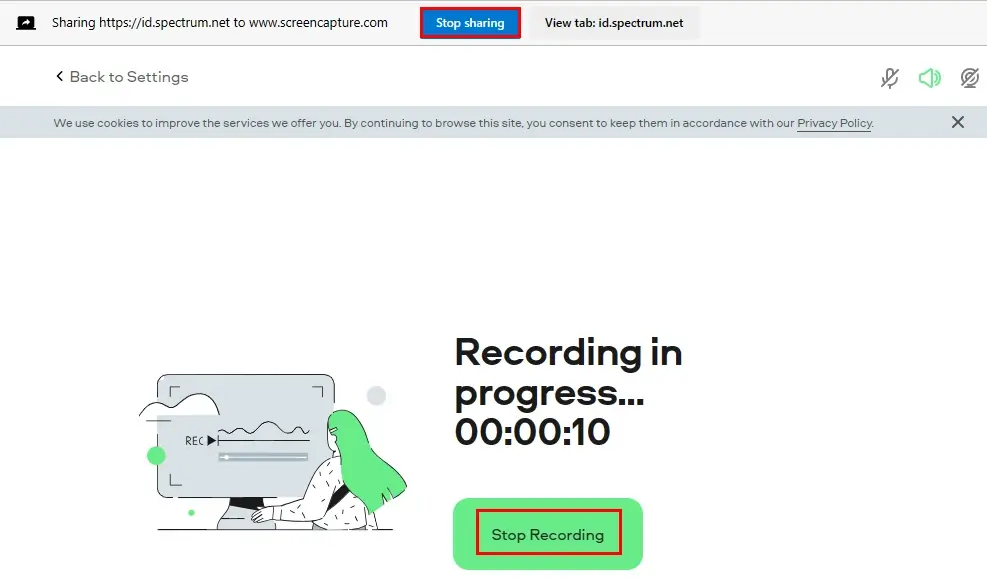
4). Press Stop Recording or Stop sharing at the top of the targeted or recording page.
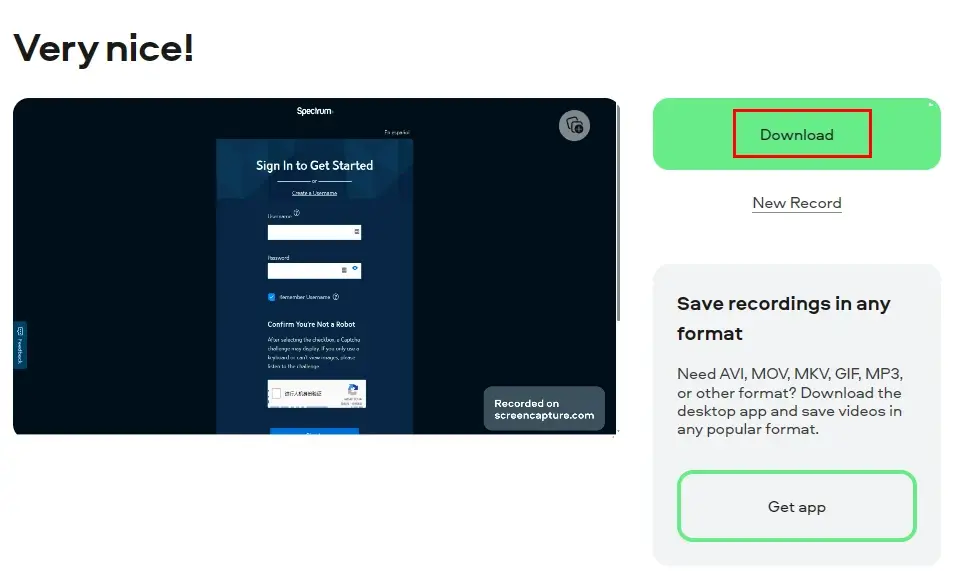
5). Click Download to get your Spectrum TV show recording.
✨For Your Reference
Additional Words
To view your recorded Spectrum shows, please follow these steps depending on your device:
- For SpectrumTV.com and Android/iOS devices, navigate to DVR > My Recordings.
- For Roku and Apple TV, go to My Library > Recordings.
Then locate your desired program and press the Play button to start watching.
Yes. You can record HD Spectrum TV programs on multiple platforms with the built-in cloud DVR. Meanwhile, a third-party screen recorder will help you fulfill this purpose. For example, you can make use of WorkinTool VidClipper to record your favorite shows in HD by marking the option–High Definition.
On-demand programs on Spectrum can usually not be recorded through its cloud DVR. Hence, you need a third-party screen recorder to realize this goal. If you are a Windows user, you can resort to WorkinTool VidClipper. Just find the desired Spectrum program and then follow the instructions mentioned in the third chapter to capture and save it to your computer.
Final Words
This article illustrates how to record on Spectrum on different platforms. I am sure that you will find this problem less challenging after reading it. The inbuilt Cloud DVR on Spectrum TV lets you record movies, shows and series on its website, Roku, Apple TV, Xbox smartphones, etc. However, a third-party tool can help you record any program or on-demand videos on your computer. For instance, WorkinTool VidClipper is a perfect choice to help you get a recorded Spectrum TV show on a Windows PC/laptop without a time limit. In addition to that, it is user-friendly, easy to use and super multi-functional.
Now, please select the suitable tool to get your favorite Spectrum TV shows recorded.

