How to Record a Vevo Video on Windows/Mac/Online in 2024
VEVO is a music hosting service known for its exclusive premieres and live performances, so you have to get it from this platform if you intend to be the first to keep it for offline watching or as the material for your video creation. Since some of the videos are not downloadable, what can you do? Please worry not. Today, we will show you how to record a Vevo video on multiple PC platforms.
📌Windows–WorkinTool VidClipper
📌Mac–QuickTime Player
📌Online–Clipchamp
A practical screen recording tool will be highly helpful to achieve this goal effortlessly. Hence, you can try all the aforementioned solutions based on your needs. However, if you are using a Windows computer, please take a closer look at WorkinTool VidClipper since it is user-friendly, easy to use and super multi-functional to solve many of your problems. Now, please start your reading to learn about specific solutions and experience all of them by yourself.
How to Record a Vevo Video on Windows/Mac/Online in 2024
VEVO is a music video hosting service launched in 2009 as a joint venture between some of the world’s largest record companies, including Universal Music Group, Sony Music Entertainment, and Warner Music Group. The service features music videos with multiple genres (pop, rock, hip-hop, R&B, etc.) and original content, such as interviews, documentaries, and music-themed shows. Besides, it is known for its exclusive premieres and live performances, so you have to get it from this platform if you intend to be the first to keep it for offline watching or as the material for your video creation. Since some of the videos are not downloadable, what can you do? Please worry not. Today, we will show you how to record a Vevo video on multiple PC platforms.
| 💻Windows | 📍WorkinTool VidClipper [🔥Recommended] |
| 💻Mac | 📍QuickTime Player |
| 💻Online | 📍Clipchamp |
Now, let’s embark on our journey.
How to Record a Vevo Video on Windows
Since all Vevo videos are now uploaded to YouTube, recording a Vevo video is quite close to recording a YouTube video. There are a variety of offline ways to screen record with audio on Windows. Hence, you must have no idea of which one to select at first. To save time, I will introduce you to a handy and quality screen recording tool–WorkinTool VidClipper.
WorkinTool VidClipper was initially designed as a video editor. Carefully listening to users’ voices, our designers have upgraded it to a multi-functional tool equipped with a range of valuable features, including:
Therefore, installing it on your computer saves you the trouble of finding and downloading them individually. Besides, the VidClipper video editor is quite friendly for beginners as it possesses a simple and clear interface and the operations of each tool prove to be easy and convenient. Moreover, it is also an ideal choice for professionals. They can rely on VidClipper’s editing console to create professional-looking or movie-like videos that could go viral on social media like TikTok, YouTube, Instagram and more.
When it comes to screen recording, WorkinTool VidClipper allows you to personalize your recording area with(out) Webcam, audio, quality and output format. Besides, other useful tools are at your disposal to help you customize your recording. Here is a summary of the reasons for picking it as a screen recorder:

|
✅How to Record a Vevo Video Using WorkinTool VidClipper?
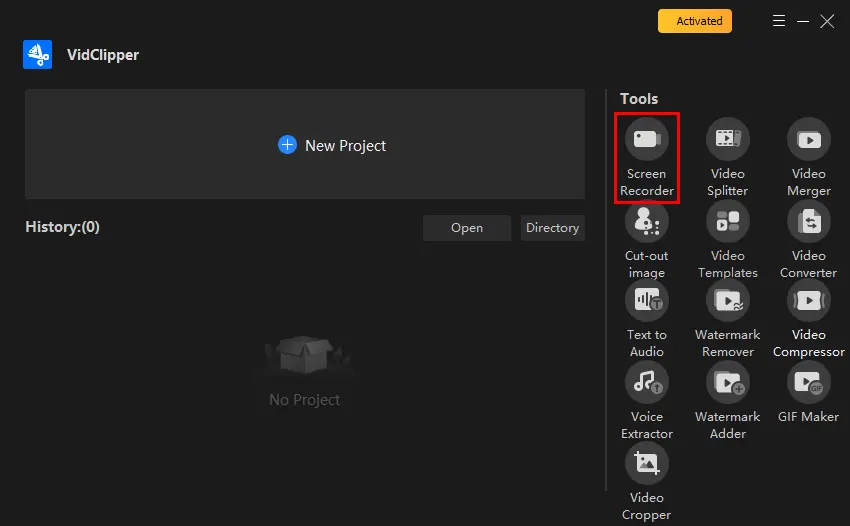
Step 1. Launch the tool and then click Screen Recorder on the opening interface (right).
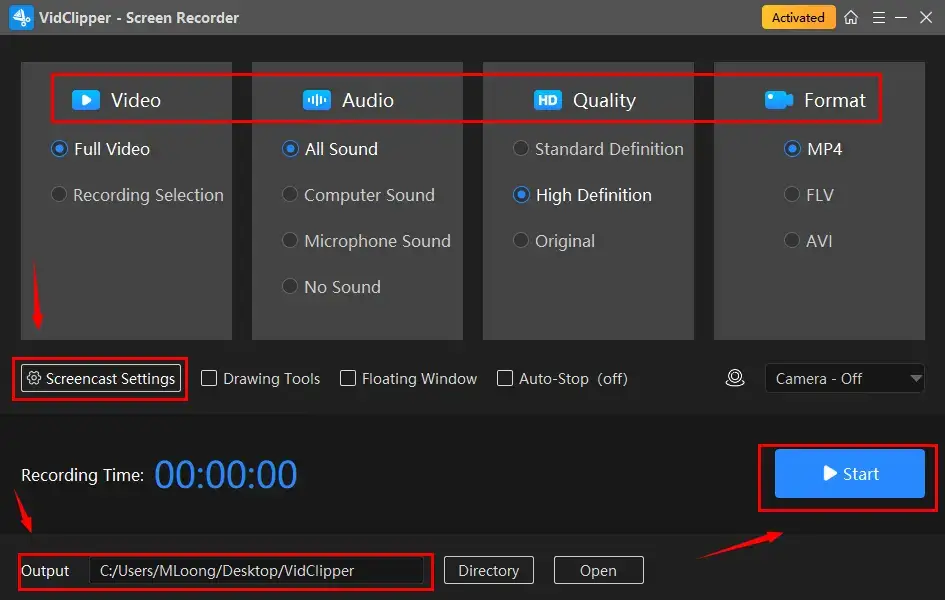
Step 2. Confirm your choices of recording area, audio, quality and formats, adjust your settings (at your will), set your save path and then hit Start (shortcut key–Alt+F1).
(Recommendation: Recording Selection+Computer Audio+HD+MP4)
📝Inside the Screencast Settings
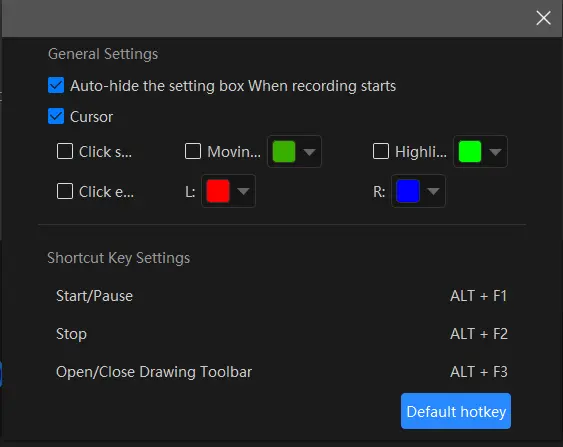
- Auto-Hide: Mark this choice to hide the settings box when your recording starts.
- Cursor: Tick this option to individualize the color of several operations like Moving track, Highlight and Click effect (left and right click).
- Click Sound: Activate or mute the sound of every click.
- Click Effect: “Colorize” your cursor, both left and right.
Step 3. Use the drawing tool and/or auto-stop feature to help you with your recording.
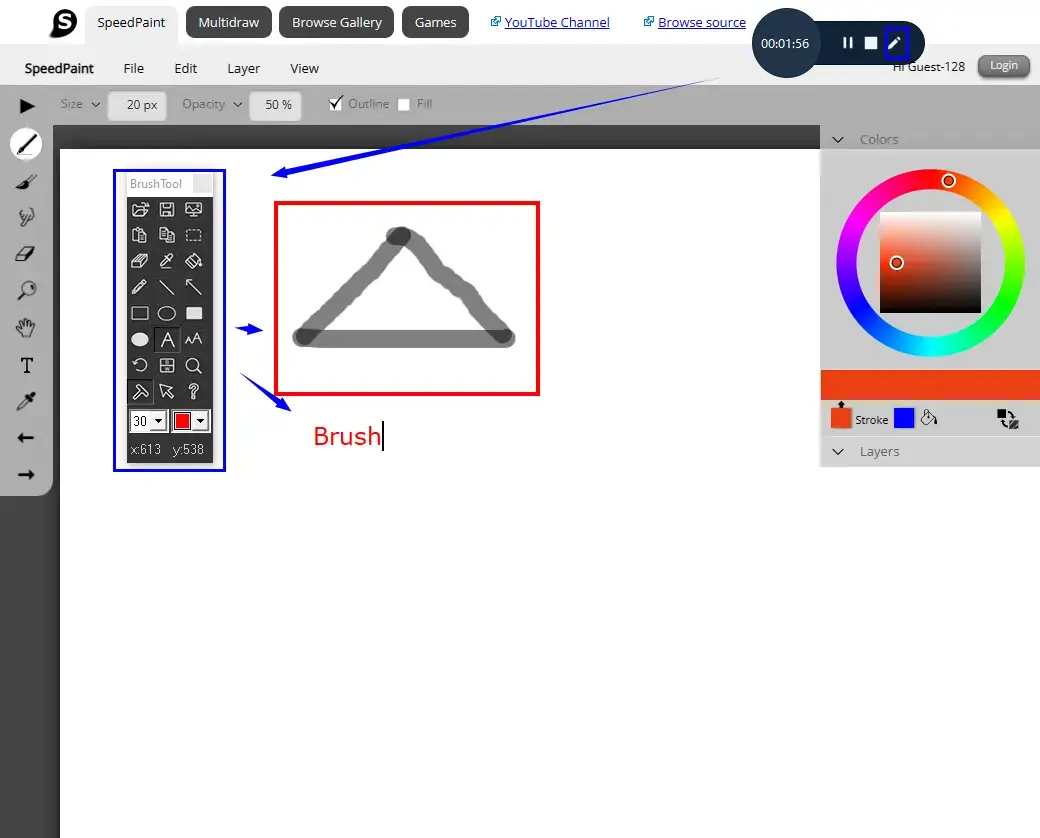 |
A drawing toolbar is available to help you draw lines or shapes and type text on your recording directly. Therefore, you save the cumbersome process of having to complete the relevant operations after your recording. You can activate it by
|
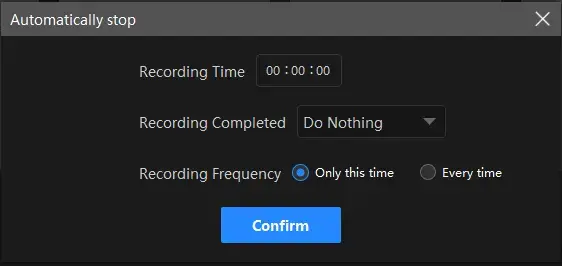 |
The auto-stop feature is designed to end your recording automatically after the full recording length is set. Therefore, you don’t have to worry about your recording, even when being away from your computer.
|
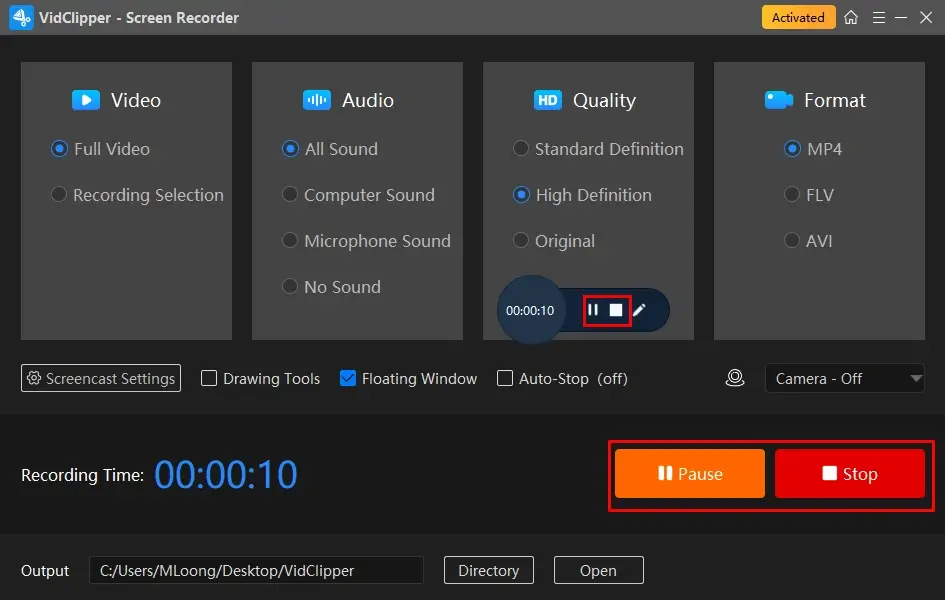
Step 4. Press the Pause icon (Alt+F1) or the Stop button (Alt+F2) on the floating window or the recording page to suspend or end/save your recording.
Step 5. Choose your next move.
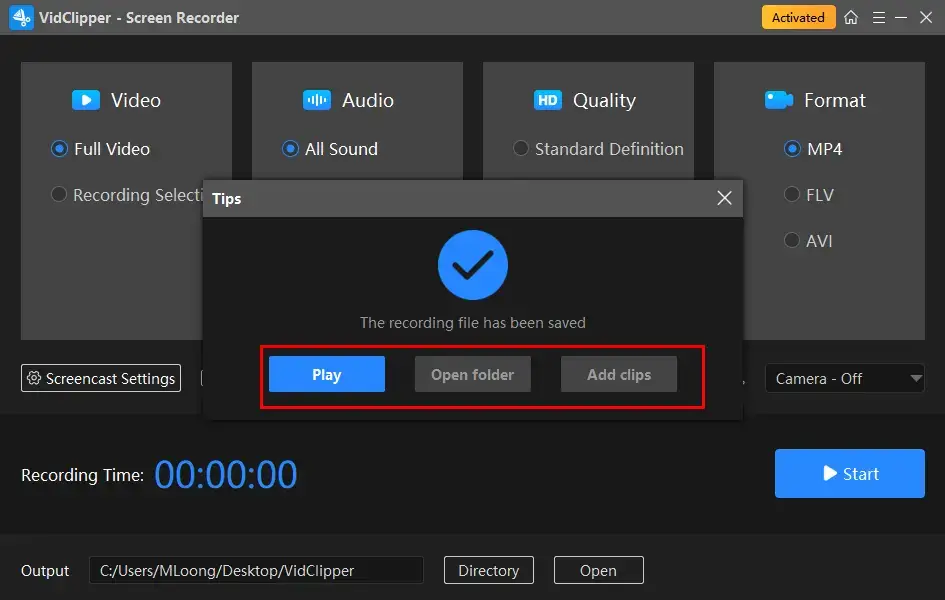
If you want to edit your recording further, please select the feature–Add clips. Your recording will be moved to VidClipper’s editing console and you are free to edit it there, including adding text, putting a filter, adding transitions, effects and animations, removing background noise, pixelating, color correcting and more.
🧐Bonus Information
💡What other videos can WorkinTool VidClipper capture?
| Dailymotion videos | Vimeo videos | Instagram Videos, Stories and Reels |
| Facebook Live Videos | Instagram Live | YouTube Live Stream |
| Philo TV | Sling TV | Live Stream |
✨Useful Information
How to Capture a Vevo Video on Mac?
If you are a Mac user, the easiest and most effective way should be using its built-in program–QuickTime Player.
QuickTime Player is the default multimedia player on every Apple device. More than just an audio/video player, it can be used as a video/audio editor and a basic screen recorder. For its screen recording feature, you can choose your recording area and audio source. Besides, this app boasts a simple recording process and unlimited recording length. However, the default recording format is MOV.
✅How to Capture a Vevo Video with QuickTime Player?
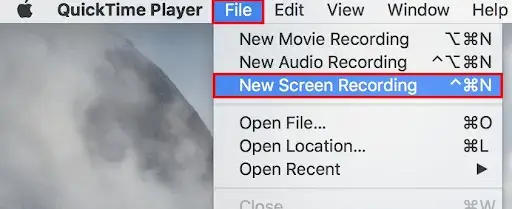
1). Open QuickTime Player and then navigate to File > New Screen Recording.
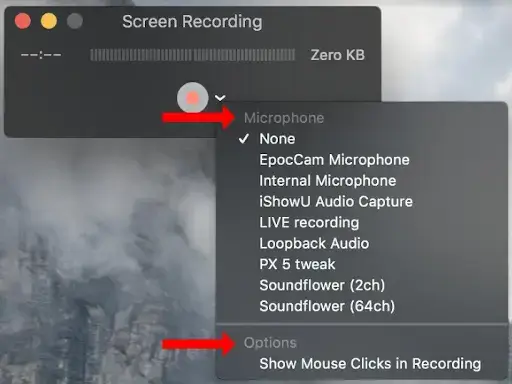
2). Change the settings (microphone on/off and mouse click on/off) and then hit the red Record button in the pop-up window.
- Click anywhere on your computer to record the entire screen.
- Alternatively, drag the cursor to pinpoint the recording area and then press Start Recording.
3). Press the Stop button (Command+Control+Esc) when you plan to stop recording.
 4). Then, go to File > Save to export your recording.
✨Useful Information
How to Record a Vevo Video Online
If you don’t have sufficient space for a third-party program on your computer or feel like using any desktop software, you can resort to a free online screen recorder. Here, we recommend Clipchamp.
Clipchamp is a web-based video making and editing platform that aims at creation of professional-quality videos easily and quickly. Besides, it offers a wide range of features, including a screen recorder, in addition to other video editing tools. You are allowed to customize your recording area, including the entire screen, operating window, web browser and even webcam as well as audio source(s). No watermark will be added to your output, which differentiates it from most free online screen recorders. Meanwhile, you can also depend on Clipchamp’s editing page to further edit your recorded clip. However, sign-in is required (with your Microsoft or Google account) and the maximum recording length will be 30 minutes only.
✅How to Use Clipchamp as a Screen Recorder?
1. Open Clipchamp and then sign in to your account.
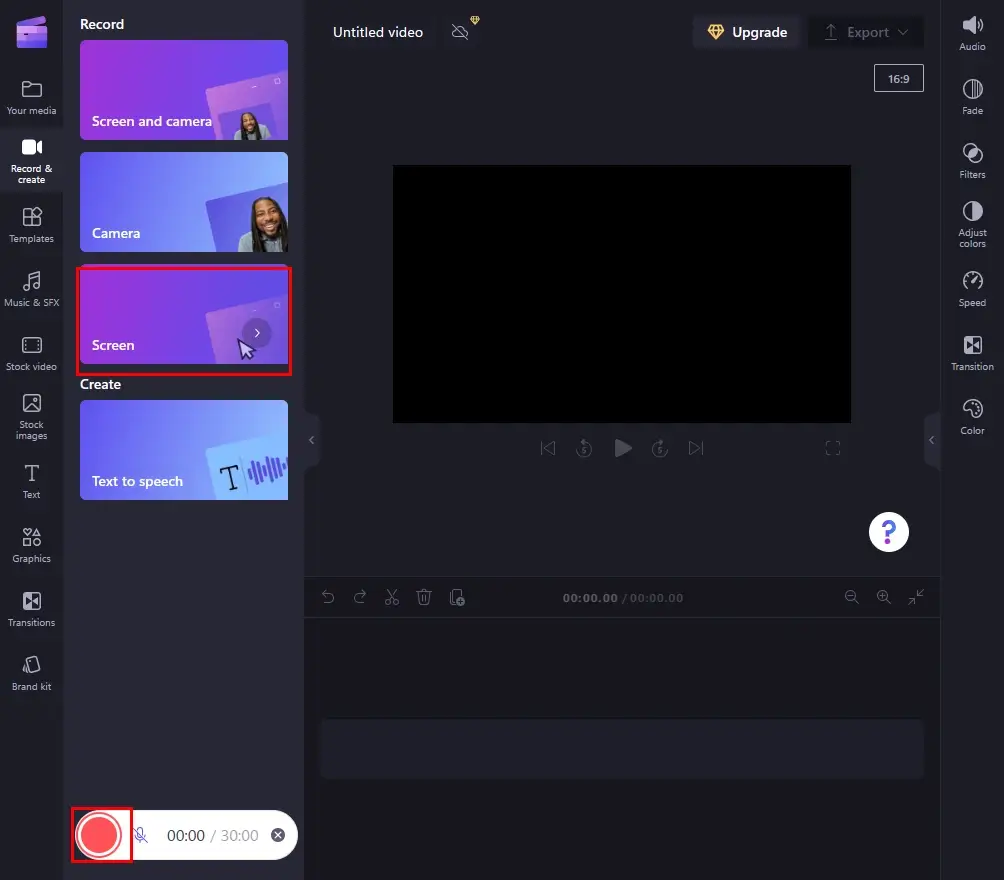
2. Select Recording Something.

3. Choose the recording mode and then hit the red recording button on a floating window activated by your choice.
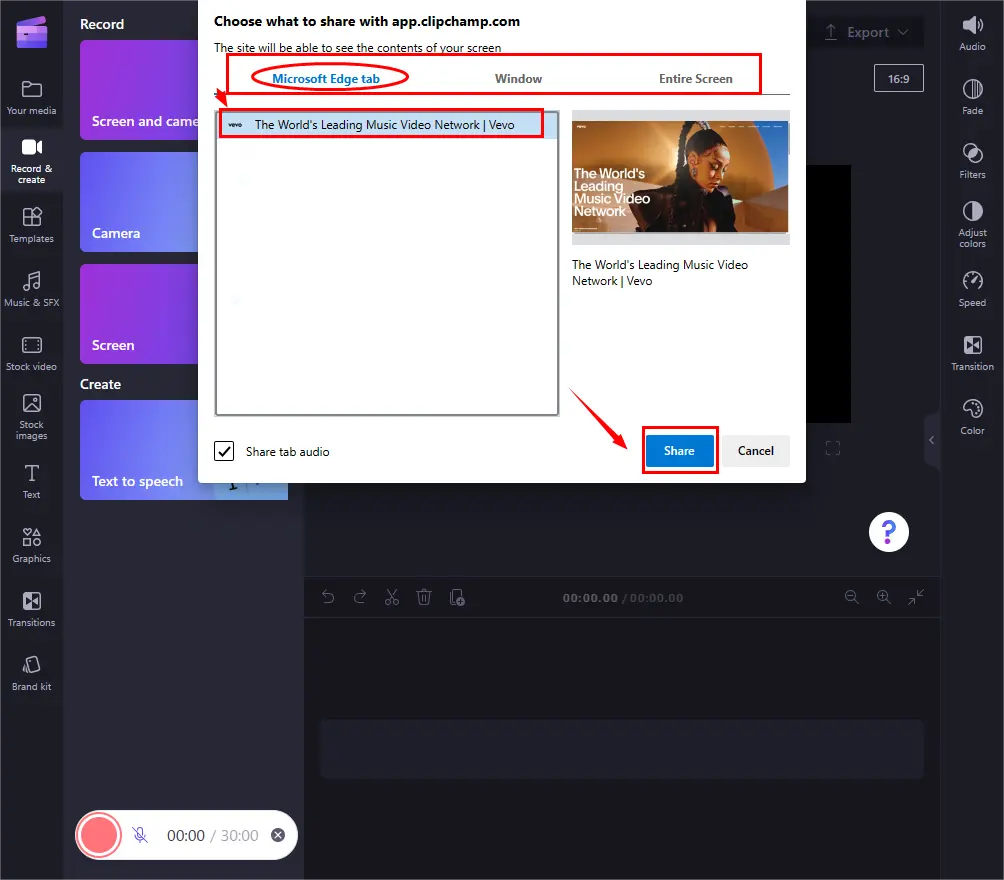
4. Determine the content to share with Clipchamp and then click Share.
(Here, Tab is advised as Vevo is an online platform.)
5. Hit the Stop icon on the floating window or the Stop sharing at the top of the targeted/Clipchamp page.
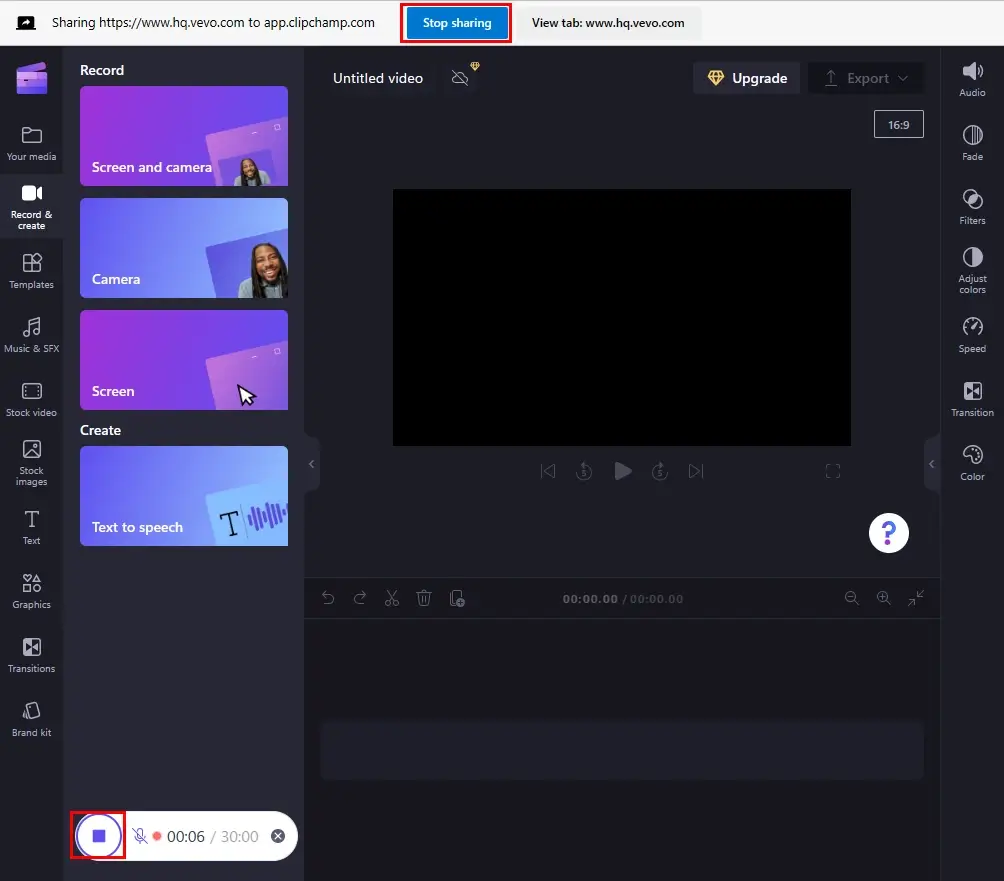
6. Press Save and edit to export your recording.

📣Notes
🎯The download will start automatically. However, your recording will also be automatically moved to its video editing page. Just close the window after your recording is exported if you have no such request.
🎯To adjust the output quality, click Export and then make the desired choice.
✨Useful Information
More to Share
📌How to Record Audio from Vevo (Music) Videos?
🎼Windows
You can rely on WorkinTool’s other software–WorkinTool Audio Recorder. It enables you to capture internal and/or external audio from your computer and then create an MP3 or WAV file.
As mentioned above, Vevo videos are usually watched on YouTube. Therefore, you can find the reference from the tutorial–How to Record Audio from YouTube.
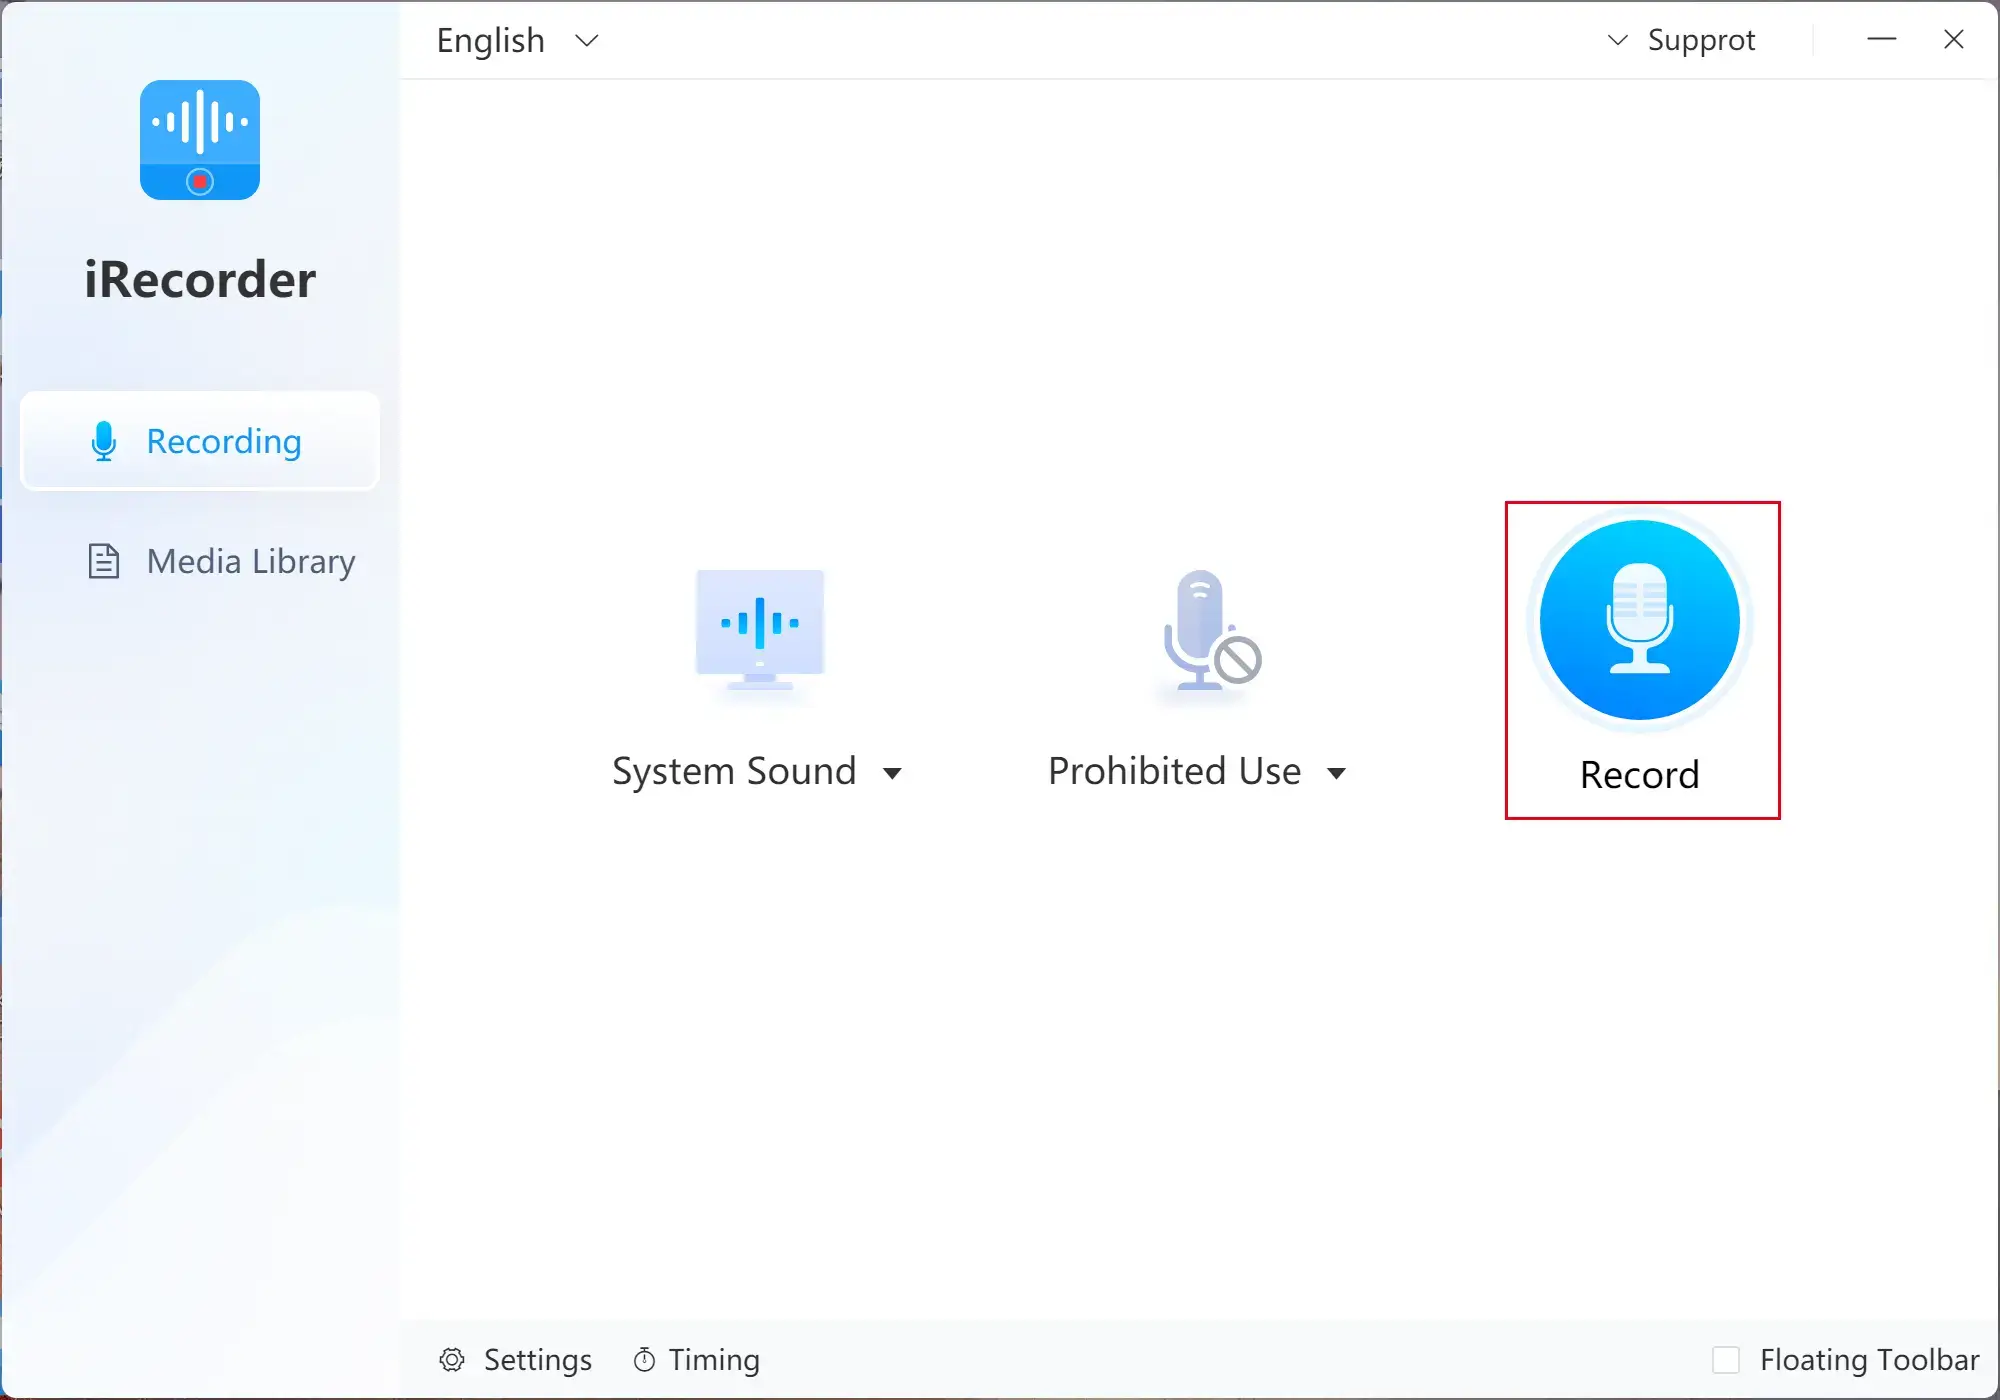
- Open WorkinTool Audio Recorder and then choose the audio source.
(For example, system sound on while microphone sound off.) - Click the blue Record button to start your recording.
- Hit the blue Pause or red Stop icon to temporarily or permanently end your recording.
🎼Mac
You can also use QuickTime Player to record audio from your computer.
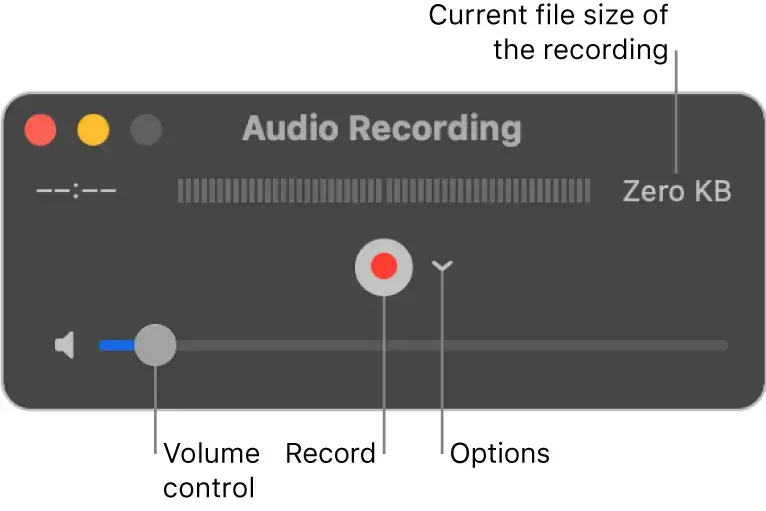
- Simply choose File > New Audio Recording.
- Adjust your settings, including microphone audio, audio quality and volume.
- Then, hit the red recording button to start your recording.
- Click the gray stop icon to stop it.
- Then, go to File > Save to export your recording.
Final Thought
Here comes the end of our discussion on how to record a Vevo video on different computer platforms. A practical screen recording tool will be highly helpful to achieve this goal effortlessly. Hence, you can try all the aforementioned solutions based on your needs.
However, if you are using a Windows computer, please take a closer look at WorkinTool VidClipper since it is user-friendly, easy to use and super multi-functional to solve many of your problems.
Now, are you ready to capture a Vevo video?

