How to Record an MP4 on Windows/Mac/Online | 6 Ways
It has become increasingly popular to record videos in the MP4 format due to its strong compatibility and high-quality compression. Whether you use a Windows/macOS PC or prefer an online solution, various methods are available to help you capture MP4 videos effortlessly. In this article, we will explore step-by-step instructions on how to record an MP4 on Windows/Mac and through online platforms.
📌Windows: 📍Built-in App–Xbox Game Bar and 📍External App–WorkinTool Capture Screen Recorder
📌Mac: 📍Built-in App–QuickTime Player and 📍External App–OBS Studio
📌Online: 📍Clipchamp and 📍Screen Capture
🙋🏻♀️We have explored various tools for each platform, empowering you to record MP4 videos with minimal effort. Whether you choose built-in programs, third-party tools or online recording tools, you can now capture and create professional MP4 videos.
🙋🏻♂️However, if you are a Windows user looking for handy screen recording software, WorkinTool Capture Screen Recorder is an ideal choice. It is user-friendly, easy to use, reliable and multi-functional to do more than MP4 recording. Now, please start your reading and experience all of them by yourself.
How to Record an MP4 on Windows/Mac/Online | 6 Ways
It has become increasingly popular to record videos in the MP4 format due to its strong compatibility and high-quality compression. Whether you use a Windows/macOS PC or prefer an online solution, various methods are available to help you capture MP4 videos effortlessly. In this article, we will explore step-by-step instructions on how to record an MP4 on Windows/Mac and through online platforms.
| 💻Windows | 📍Built-in App–Xbox Game Bar |
| 📍External App–WorkinTool Capture Screen Recorder [🔥Recommended] | |
| 💻Mac | 📍Built-in App–QuickTime Player |
| 📍External App–OBS Studio | |
| 💻Online | 📍Clipchamp |
| 📍Screen Capture |
Whether you hope to create tutorials, gameplay videos or capture memorable moments, mastery of MP4 recording will enable you to produce professional-looking videos.
Now, let’s start our journey and discover the tools and techniques required to capture MP4 videos on multiple platforms.
How to Record an MP4 on Windows
In this chapter, we will introduce you to two methods of MP4 recording on Windows. One is a built-in app called Xbox Game Bar and the other is an external app–WorkinTool VidClipper.
✅Xbox Game Bar
Xbox Game Bar is an inbuilt screen recorder on Windows 10 and 11 devices. It provides users with a simple interface and was initially designed to capture gameplay. Now, it can help them take screenshots of and capture any content on their computer screens.
Additionally, the Xbox Game Bar is known for its easy recording process; even IT novices will find it convenient to operate. More importantly, the default output format is MP4, so you don’t need any settings before recording. However, this tool usually allows users to record the entire screen only.
💡How to Record MP4 Through the Xbox Game Bar?
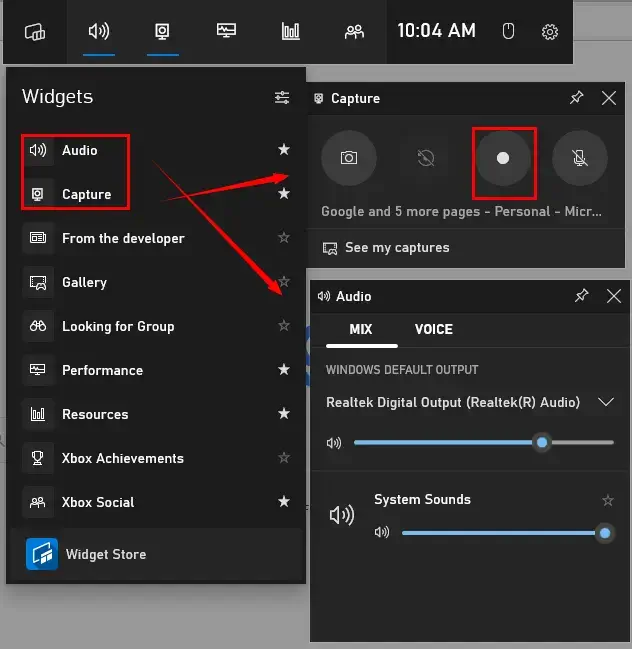
- Perform the shortcut operation-Win+G to activate this tool.
- Click Audio (amplifier icon) and Capture (camera icon) to open the audio and recording windows.
- Adjust the audio settings if needed and then click the small round icon to begin your recording.
- Hit the Pause icon on the floating window to end and save your recording.
- Press See my capture to view your output.
✨Our Advice
✅WorkinTool Capture Screen Recorder
Capture Screen Recorder is an important feature inside the WorkinTool VidClipper Video Editor, a lightweight and super multi-functional app with the following (but not limited to) features:
Therefore, it saves you the trouble of finding and installing them individually, which is time-saving and efficiency-boosting.
Capture Screen Recorder is an ideal screen recording app for everyone. Its simple and intuitive interface with all the necessary settings enables users to complete their recording tasks within one page, greatly facilitating beginners and improving their work efficiency. Professionals can expect more custom results with the help of its additional screencast settings and tools.
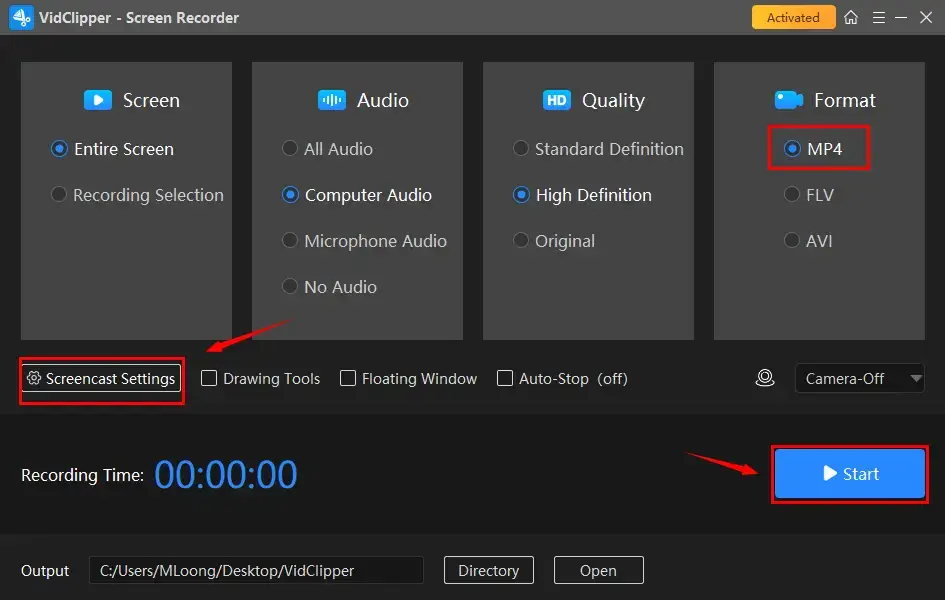
Used as an MP4 recorder, Capture Screen Recorder offers this option in the section-Format. Besides, it lets users customize the quality and choose other formats like AVI and FLV. Hence, it ensures an easy recording process with a high-quality output.
(📜More Info: WorkinTool Capture Screen Recorder Review.)
💡How to Record an MP4 Using WorkinTool Capture Screen Recorder?
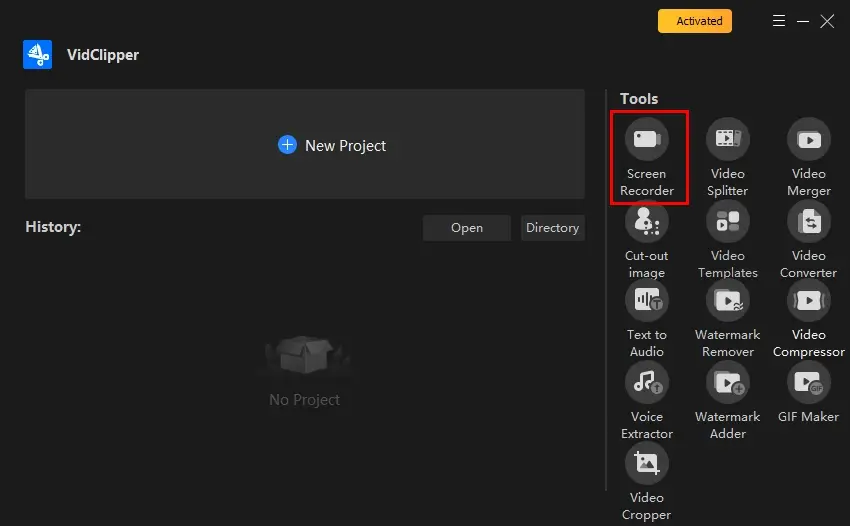
Step 1. Launch VidClipper and then click Screen Recorder on the right menu.
Step 2. Choose MP4 in the Format section, confirm other recording options (recording area, audio and quality) and then hit Start (Alt+F1).
Step 3. Activate the drawing toolbar and/or auto-stop feature if necessary.
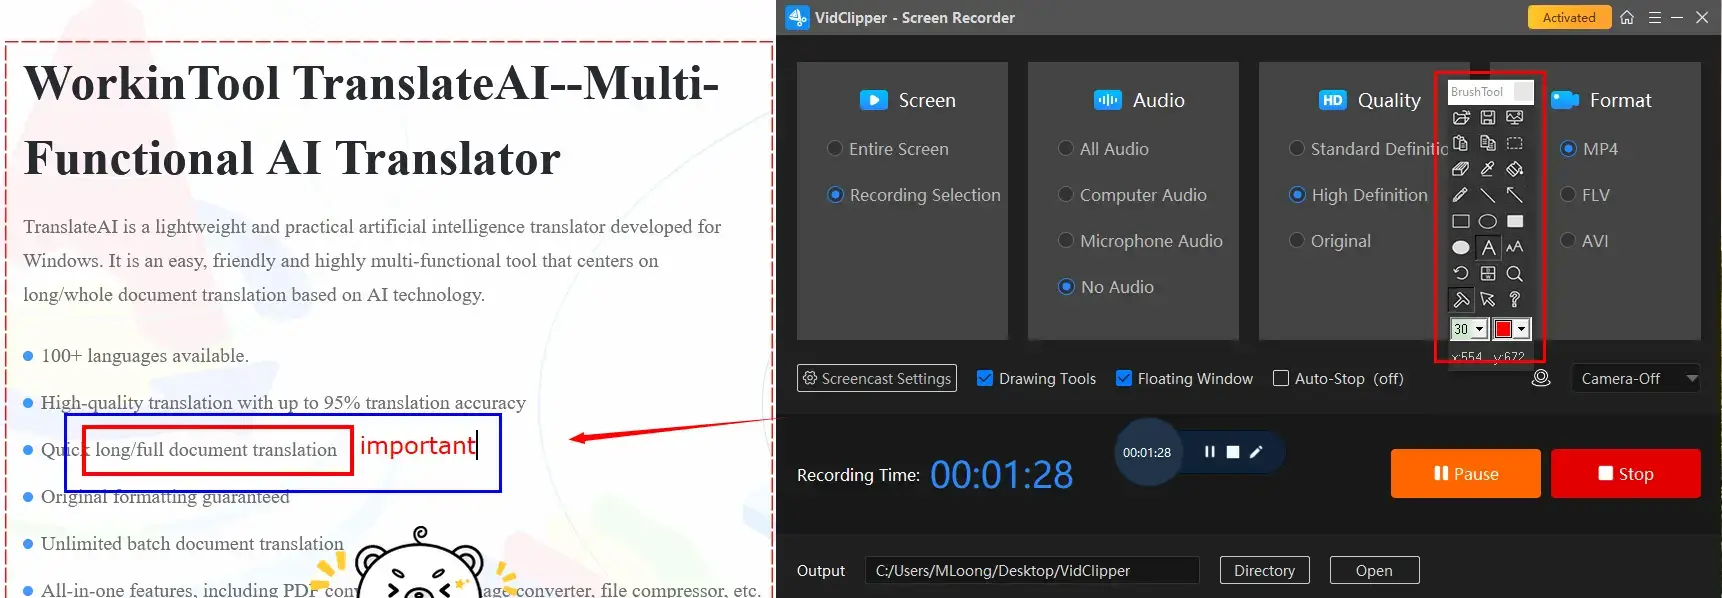
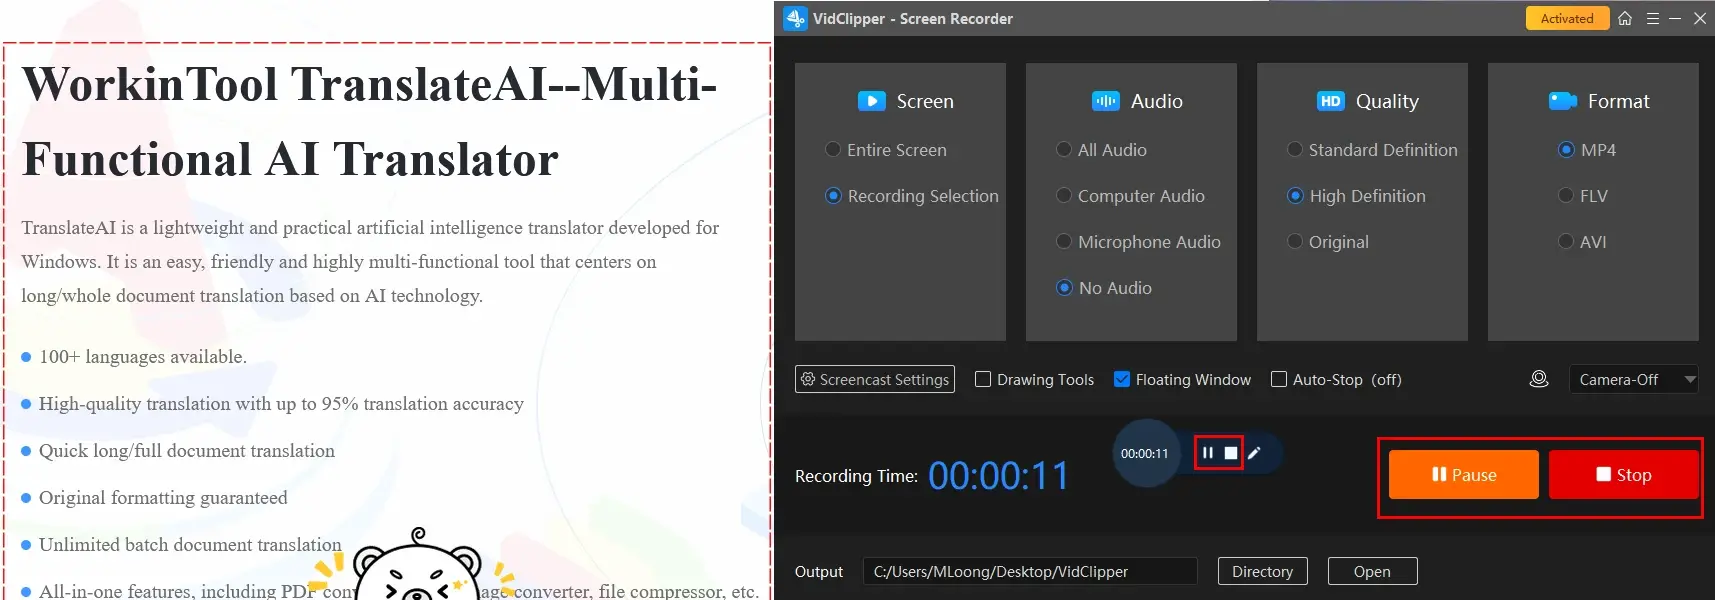
Step 4. Press the Pause (Alt+F1) or Stop (Alt+F2) on the floating window or recording page to suspend or end and save your recording.
Step 5. Select your next move.
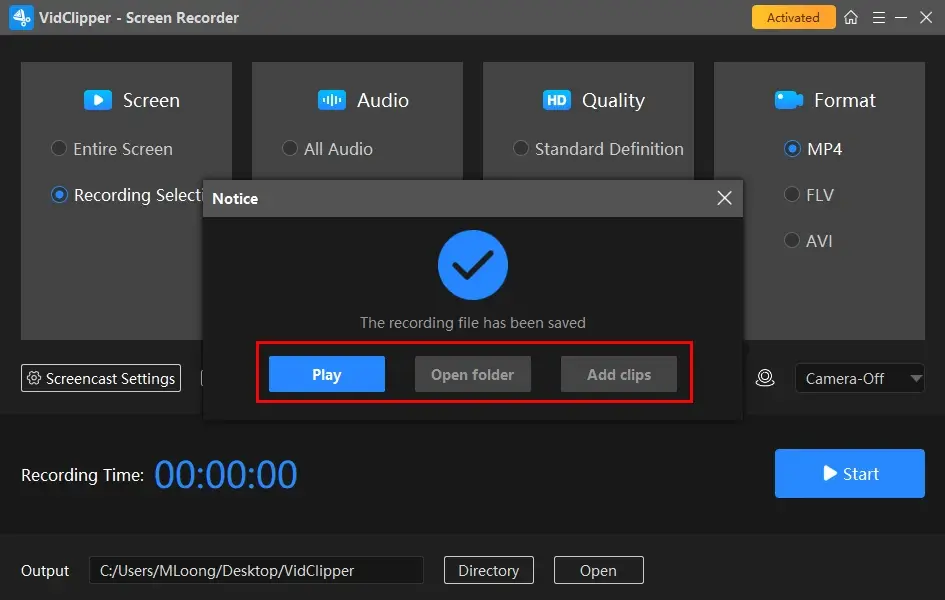
📣PS: Add clips is a useful feature that enables users to move their recordings to the VidClipper video editor. They can be further edited there, including:
✨Our Advice
🙋🏻♀️You May Also Like
How to Record an MP4 on Mac
This chapter will inform you of two approaches to MP4 recording on Mac. The first is its built-in app–QuickTime Player and the second is an external app–OBS Studio.
✅QuickTime Player
QuickTime Player is the default multimedia player pre-installed on every Apple device. In addition to its playback function, QuickTime is also known for its basic editing and screen recording features. Furthermore, it quickly captures the market owing to its cross-platform availability.
QuickTime Player gives users an easy recording process that is even beginner-friendly. Also, it allows them to capture the entire and partial screen of your computer. However, a plugin called Soundflower is needed to capture the microphone sound. Besides, you must opt for MP4 in the export stage since the default output format is MOV.
💡How to Create an MP4 Video Through Recording with QuickTime Player?
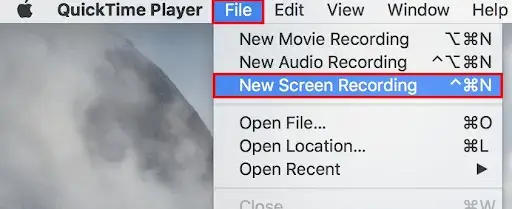
1). Open QuickTime and then go to File > New Screen Recording to open the recording page.
2). Adjust the audio settings and then press the record button to start recording.
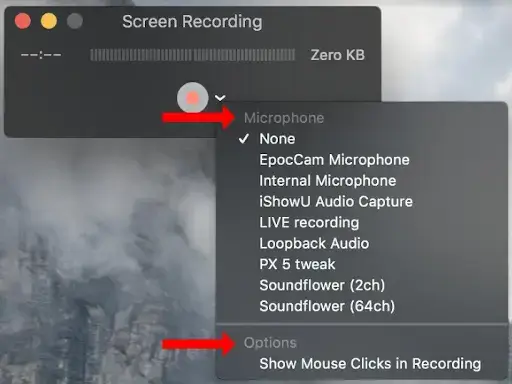
- Entire Screen: Click anywhere on your screen to capture the full screen of your computer.
- Partial Screen: Drag your cursor to pinpoint an area and then click the Record button.
3). Hit the Stop icon at the top to end your recording.

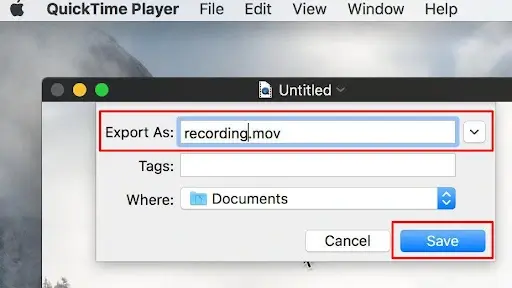
4). Choose MP4 from the drop-down menu (arrow icon) and then hit Save.
✨Our Advice
✅OBS Studio
OBS Studio, short for Open Broadcaster Software Studio, is a free and open-source screen recorder that wins global recognition. It is extremely famous for its professional recording and live-streaming features, which are suitable for beginners and professionals.
OBS offers users custom recording modes to meet their different needs, from window/display capture to gameplay/browser recording. It supports various recording formats, including MP4, which can be personalized in the section-Output from Settings. Besides, it boasts unlimited recording without a watermark.
💡How to Capture an MP4 Video in OBS?
1). Open OBS and then go to File > Settings.
2). Find Output > Recording Format, select MP4 from the drop-down box and then hit Apply > OK.
3). Navigate to Sources > + > the desired mode.
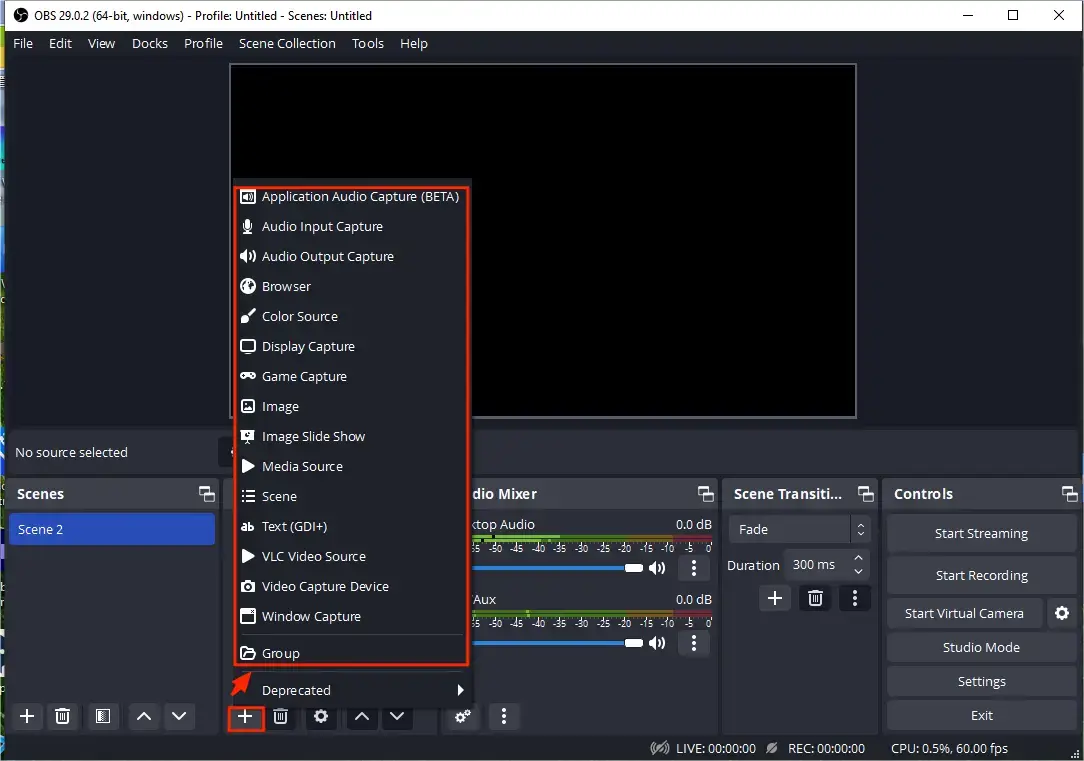
4). Take Browser as an example: Choose Browser to open a pop-up window.
5). Name your project and then hit OK.
6). Copy the URL of the wanted website, paste it into the column beside URL and then press OK.
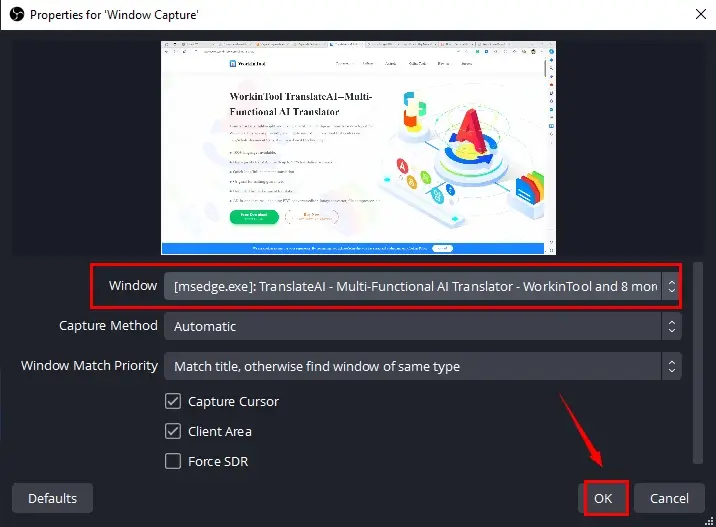
7). Determine the audio option in Audio Mixer and then click Start Recording.
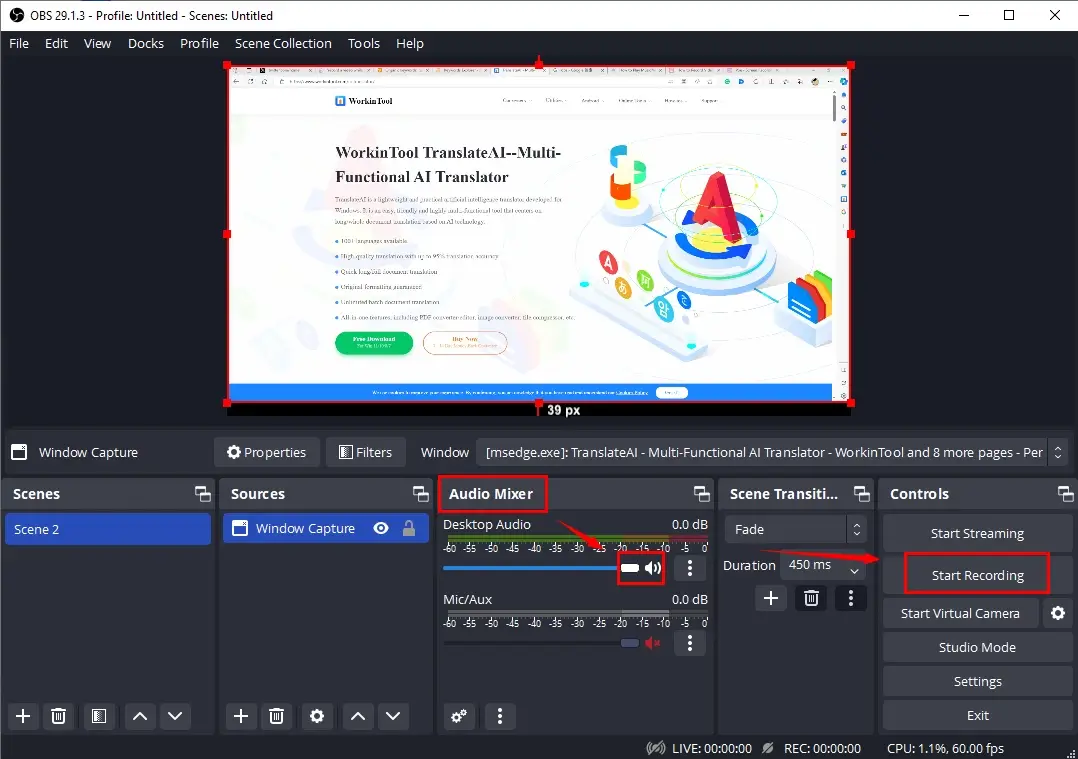
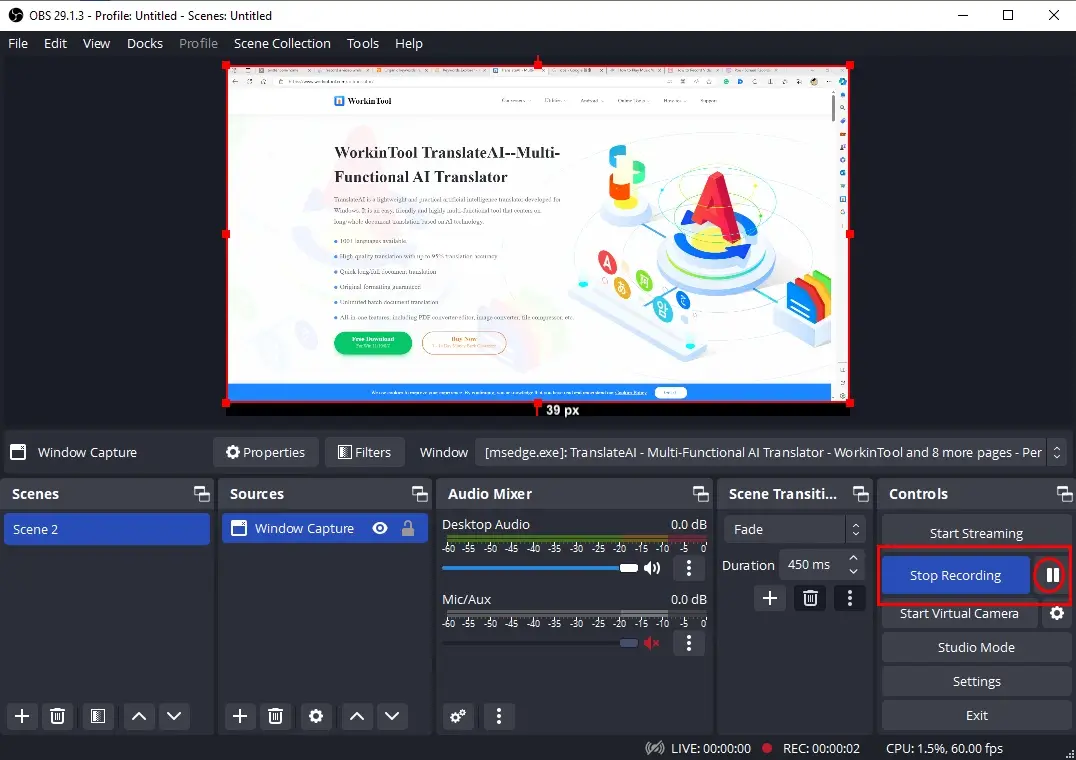
8). Hit Stop Recording to end and save your recording.
(Press the small pause button to temporarily stop it.)
9). Go to File > Show Recordings to view your captured MP4 video.
✨Our Advice
How to Record an MP4 Online
This chapter is worth your attention if you are unwilling to install and use any desktop app. We will show you two online screen recording tool–Clipchamp and FlexClip.
✅Clipchamp
Clipchamp is a versatile online video editor. It provides users with a simple and clear interface, together with various editing features. On top of its editing features, it presents everyone with an online screen recording tool inside its editor. Users can upload their videos from or save their results in cloud devices like Google Drive, OneDrive and Dropbox.
Clipchamp screen recorder lets users personalize the recording area and audio. Moreover, it gives them three recording modes-Entire Screen, Tab and Window–to satisfy their different needs. More significantly, the default recording format is MP4, which saves you the trouble of making the relevant settings before recording. However, up to 30 minutes of recording can be expected with or without license fee payment.
💡How to Take an MP4 Video via Recording in ClipChamp?
1. Open Clipchamp and then sign in to your account.
2. Click Create a new video.

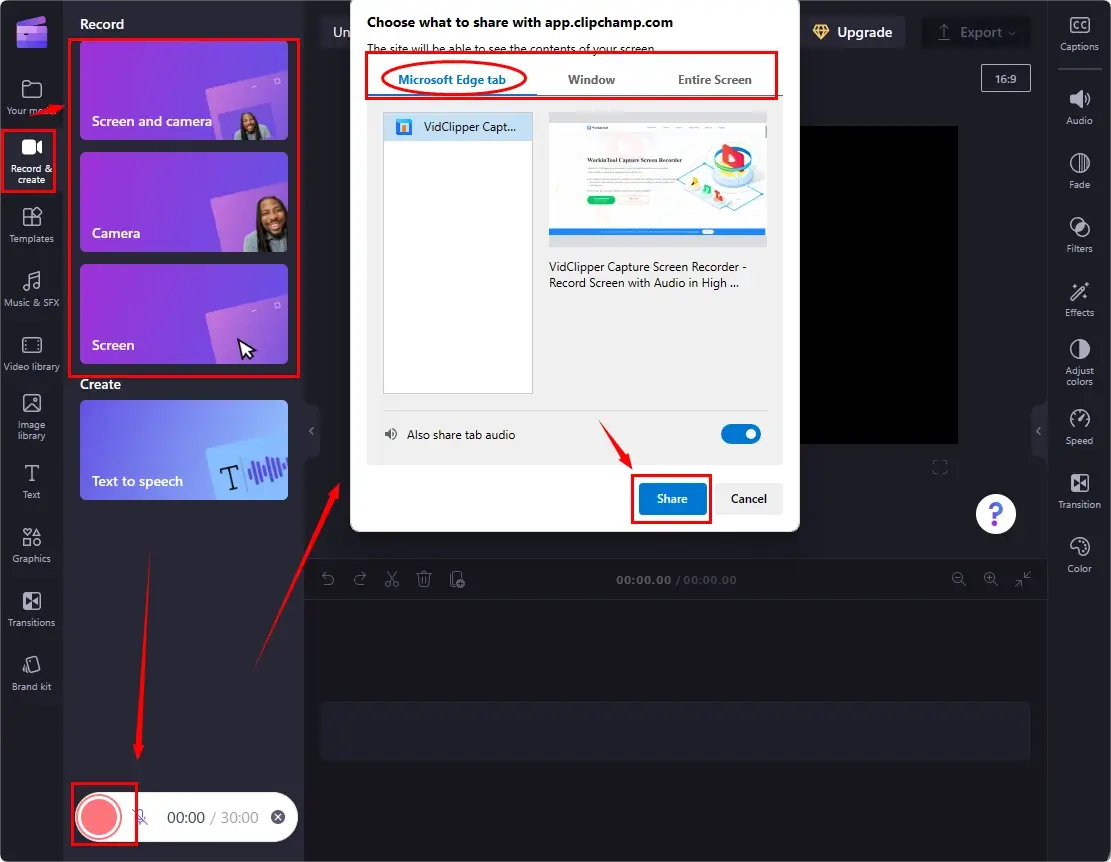
3. Choose a recording mode.
4. Press the red Record button.
5. Determine the content to share with Clipchamp and then hit Share.
(Take Tab as an example)
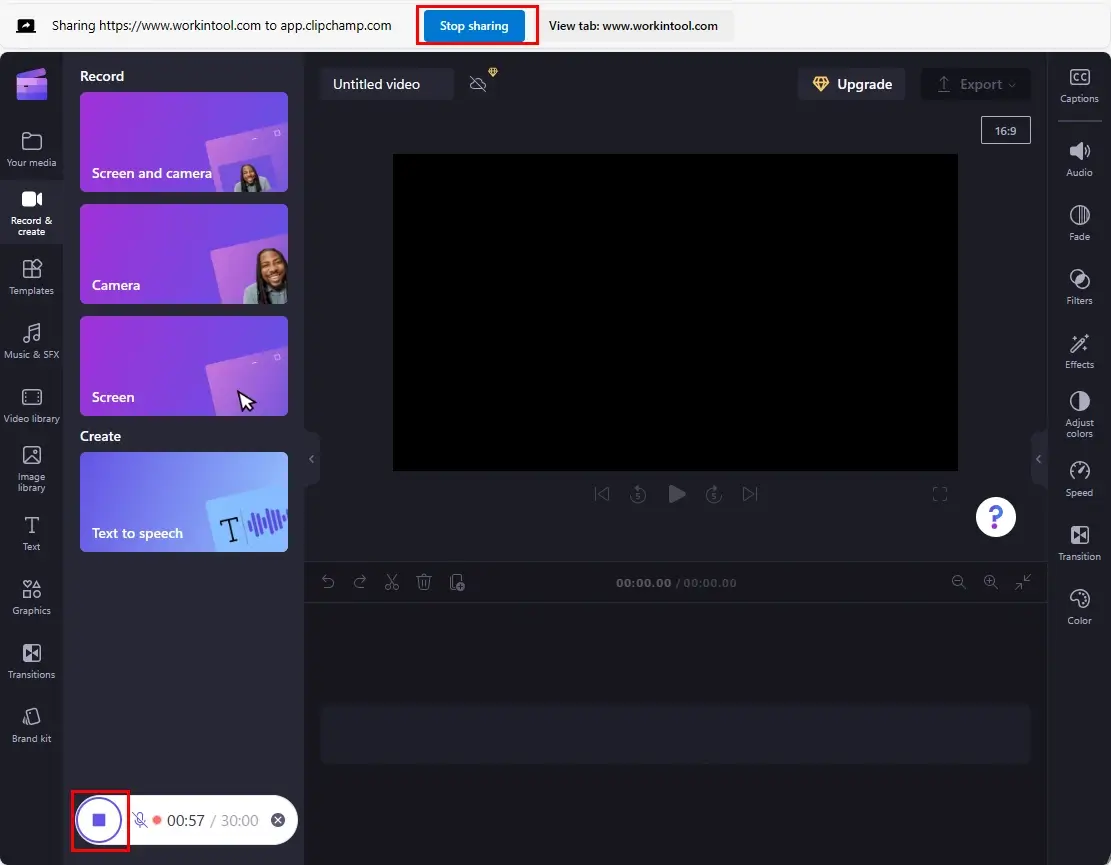
6. Press the Stop icon on the floating window or Stop sharing at the top to terminate your recording.
7. Your recording will be downloaded automatically.
(If the download doesn’t initiate automatically, please click Export and then select the desired quality.)
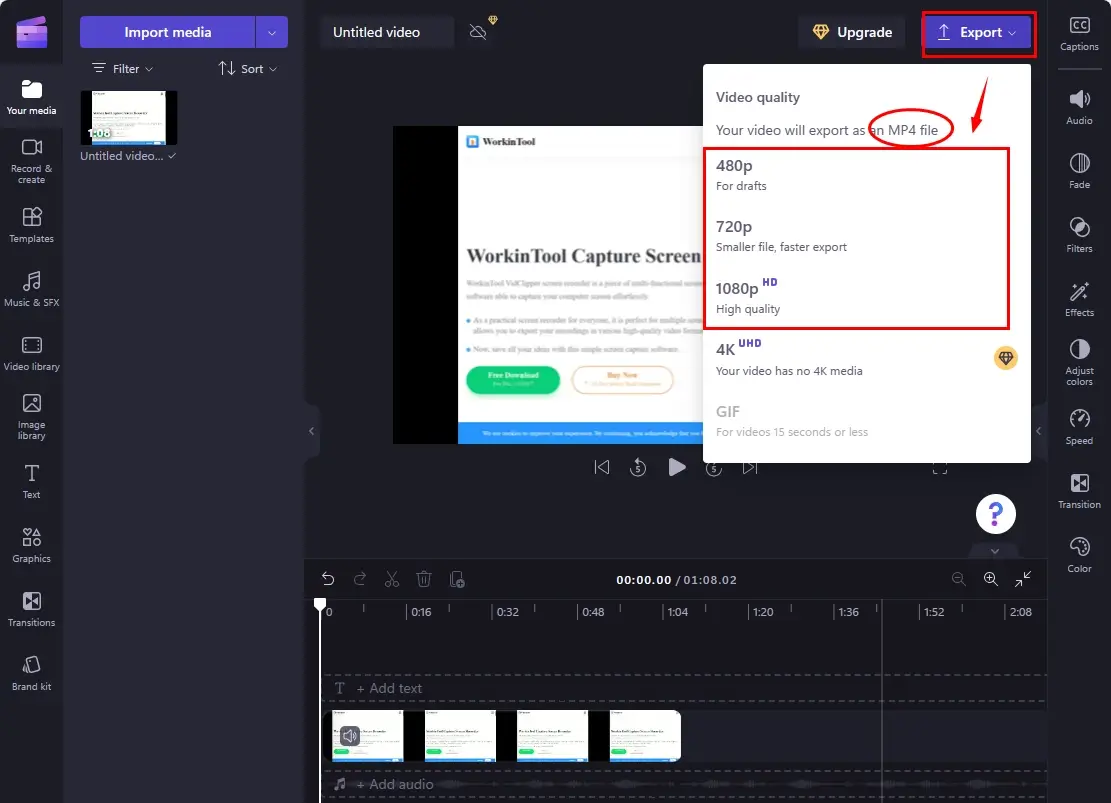
📢Note: You can rely on Clipchamp’s editing features to edit your recording further.
✨Our Advice
✅Screen Capture
Screen Capture is a browser-based screen recording service. Thanks to its extremely simple and clear interface, this platform enables users to capture any content on their computer screens, including that in their browsers/operating windows and the full screen, with(out) system and/or microphone audio. The recording process is quite effortless and fast.
Besides, this online tool sets MP4 as its only output format. Therefore, you don’t need any settings in advance. Though it is almost free to use, limitations apply to it. For instance, a watermark will be added to your recording.
💡How to Do an MP4 Recording via Screen Capture?
1. Open Screen Capture.
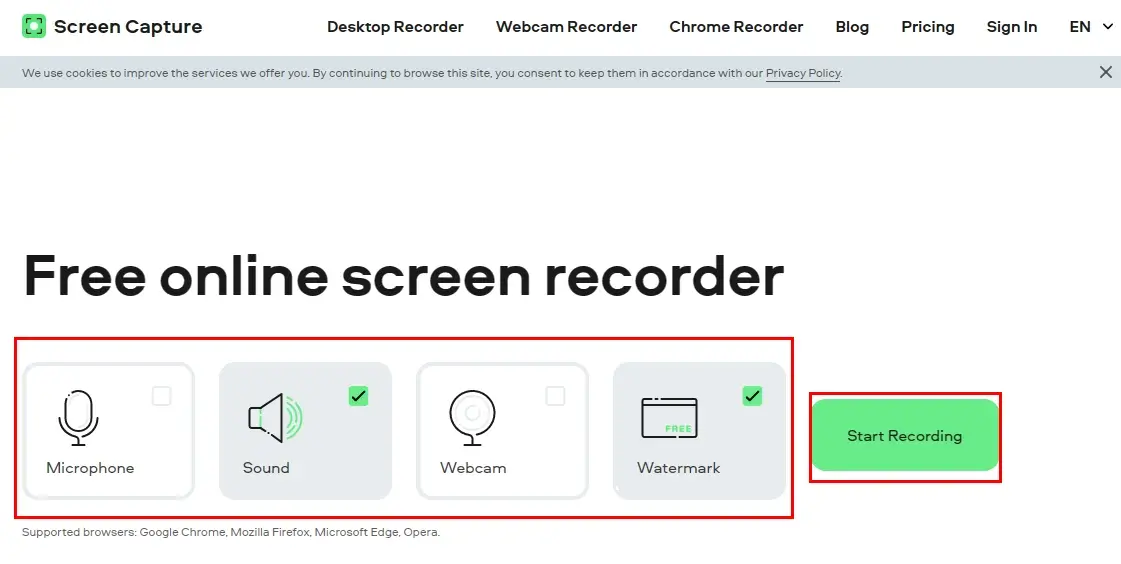
2. Make your recording options and then click Start Recording.
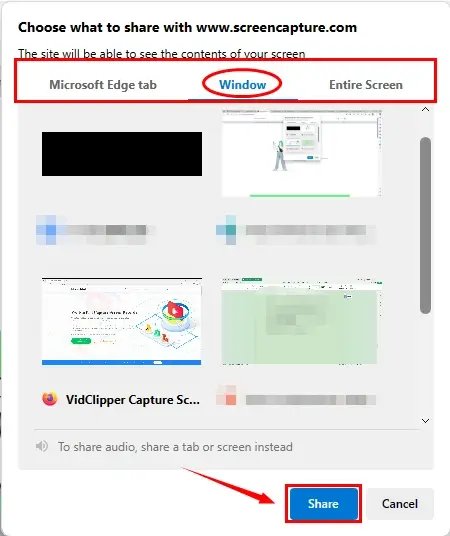
3. Decide which content to share with Screen Capture and then hit Share.
(Take Window as an example.)
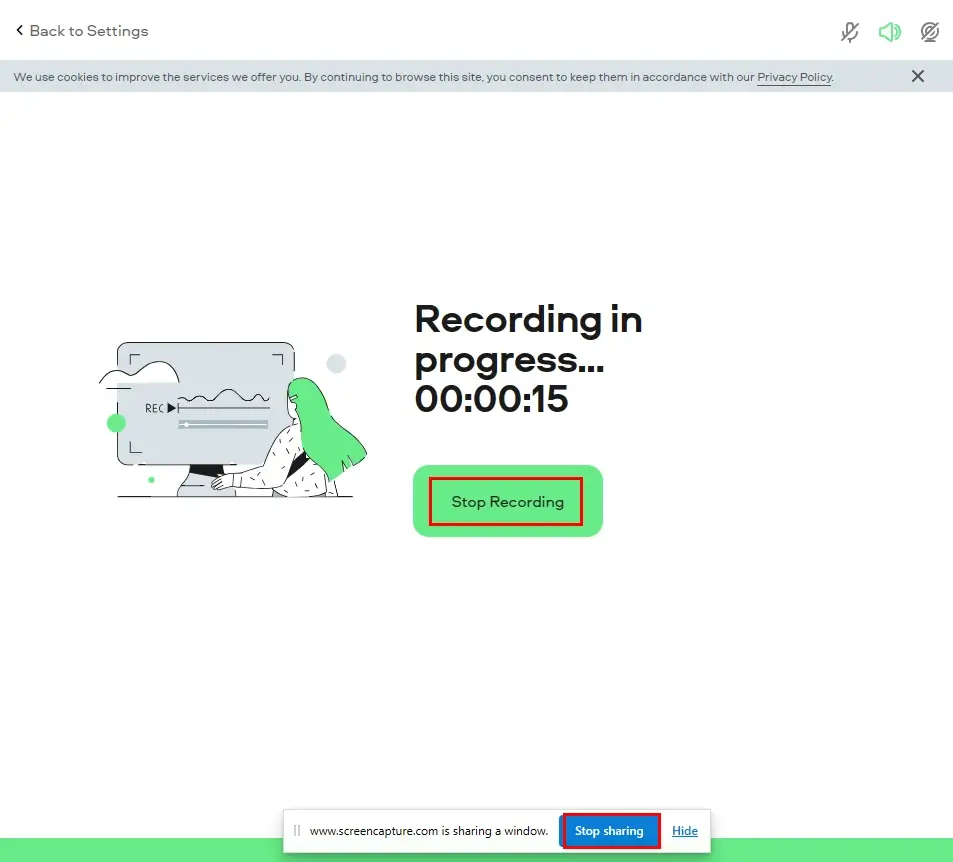
4. The recording will start automatically.
5. Press Stop Recording on the recording page or Stop sharing at the bottom.
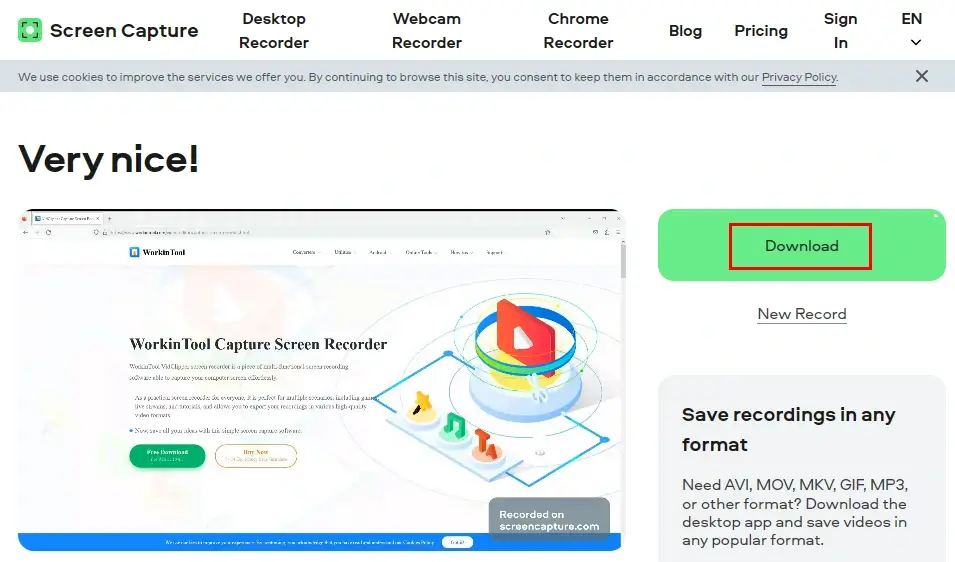
6. Click Download to export your recording.
✨Our Advice
More to Share
🎯Can you record video on MP4?
Yes. Please resort to the aforementioned apps to record an MP4 on your computer. Here is a summary:
- Windows: Xbox Game bar and WorkinTool Capture Screen Recorder
- Mac: QuickTime Player and OBS Studio
- Online: Clipchamp and Screen Capture
🎯How do I record an MP4 file on Windows 10?
If you use a laptop or computer powered by Windows 10, the solutions mentioned in this article can be helpful.
- Xbox Game Bar (Built-in App)
- WorkinTool Capture Screen Recorder (External App)
Please refer to the instructions in the chapter–How to Record an MP4 on Windows.
Final Thought
This chapter concludes our discussion on how to record an MP4 on Windows, Mac and online. MP4 Recording on multiple platforms is now within everybody’s reach. We have explored various tools for each platform, empowering you to record MP4 videos with minimal effort. Whether you choose built-in programs, third-party tools or online recording tools, you can now capture and create professional MP4 videos.
However, if you are a Windows user looking for handy screen recording software, WorkinTool Capture Screen Recorder is an ideal choice. It is user-friendly, easy to use, reliable and multi-functional to do more than MP4 recording.
Now, are you ready to record an MP4 file at home?


