How to Trim a Video on Windows/Mac/Online in 2024
Video editing skills have become quite essential with the prevalence of video-related social media like TikTok. Among all of them, video trimming has definitely been one of the most important techniques since its mastery will allow you to easily remove the unwanted or unnecessary part(s) from your video. You probably have basic knowledge of video cutting, but do you want to learn new ways to realize this goal? Today, we will present a blog post on how to trim a video on different PC platforms, including Windows, Mac and online.
🎯Windows–Third-Party Tool–WorkinTool VidClipper and Built-in Program–Video Editor (Microsoft Photos)
🎯Mac–Third-Party Tool–VLC Media Player and Built-in Program–iMovie
🎯Online–WorkinTool Free Online Video Trimmer
Please feel free to try all the aforementioned methods. However, whether you are a beginner or a professional, you can pay particular attention to WorkinTool VidClipper if you use Windows OS. It is user-friendly, easy to use and super multi-functional. Now, please start your reading to learn about specific solutions and experience them by yourself.
How to Trim a Video on Windows/Mac/Online | Video Cutters in 2024
Video editing skills have become quite essential with the prevalence of video-related social media like TikTok. Among all of them, video trimming has definitely been one of the most important techniques since its mastery will allow you to easily remove the unwanted or unnecessary part(s) from your video. You probably have basic knowledge of video cutting, but do you want to learn new ways to realize this goal? Today, we will present a blog post on how to trim a video on different PC platforms, including Windows, Mac and online.
| 💻Windows | 📍Third-Party Tool–WorkinTool VidClipper [⭐Recommended] |
| 📍Built-in Program–Video Editor (Microsoft Photos) | |
| 💻Mac | 📍Third-Party Tool–VLC Media Player |
| 📍Built-in Program–iMovie | |
| 💻Online | 📍WorkinTool Free Online Video Trimmer [🔥 Hot] |
Now, let’s begin our journey.
How to Trim a Video on Windows
If you are using a Windows PC, you have two methods of realizing this goal–a third-party tool (WorkinTool VidClipper) and a built-in program (Video Editor).
1️⃣Method 1: How to Trim a Video Using WorkinTool VidClipper?
VidClipper video editor is a widely-recognized tool developed by WorkinTool, a promising SaaS brand. Regarded as one of the Premiere alternatives, it is a practical and helpful video editing tool for everyone.
For beginners, its simple and clear interface, equipped with multi-functional features, will facilitate their editing effortlessly and instantly. Hence, having this one program on your computer will provide you with various useful tools, including
All the operations prove to be easy and convenient. Therefore, no prior technical experience is required to use WorkinTool VidClipper.
For professionals, VidClipper’s editing console offers them a chance to create professional-looking videos with the assistance of features like color correction, freezing frame, color keying, pixelation, etc. They don’t have to worry that the tools are too basic to present exquisitely-edited clips.
When it comes to video trimming, you can seek assistance from VidClipper’s tool–Video Splitting, which can also serve as a video trimmer. You only need a few clicks to realize this goal and can expect more than one clip. Here are more reasons for choosing VidClipper.
✅Video Trimming in WorkinTool VidClipper.
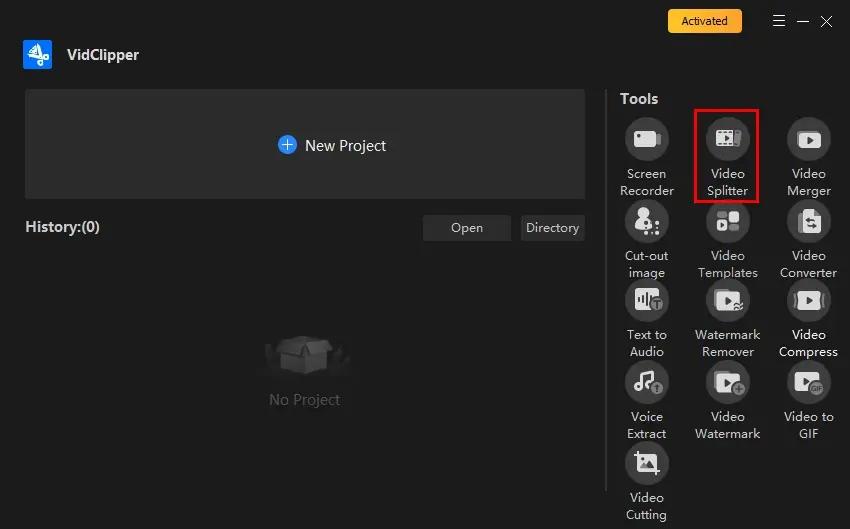
Step 1. Launch the tool and then find Video Splitter on the right menu.
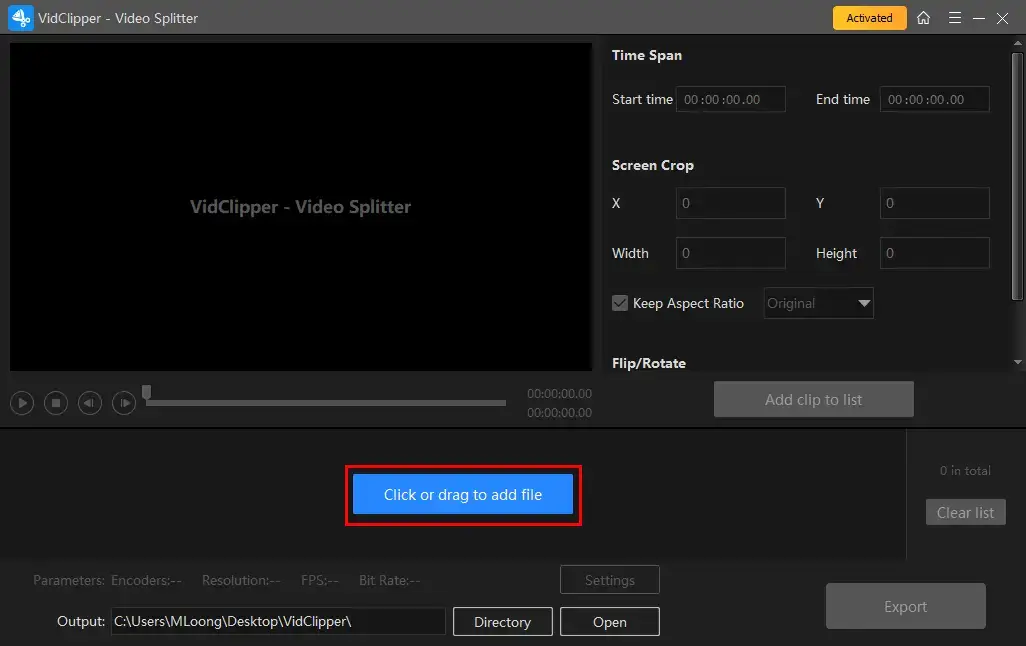
Step 2. Hit Click or drag to add files to import your video.
Step 3. Trim your video.
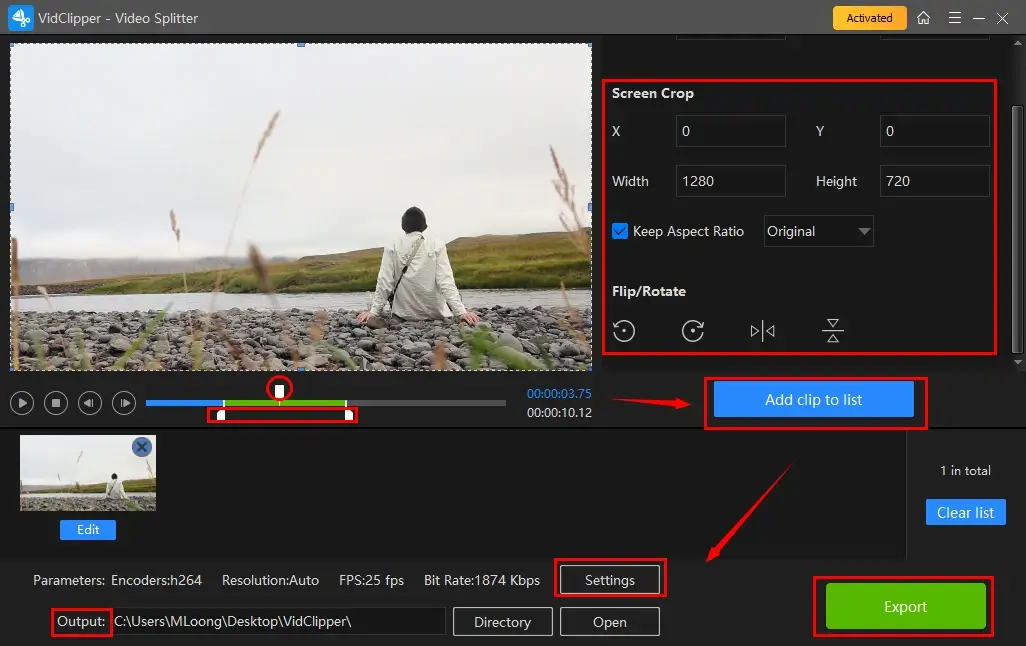
- Move the two white downward sliders to determine the trimming duration and then the upward one to pinpoint the starting time for your clip.
- Click Add clips to list to save your trimmed clip.
- Repeat the above steps to get more clips.
(This allows you to cut out parts of your video.)
Step 3. Edit your clips.
Use the features beside the monitor to edit your cut videos, including
- Video Cropping: Resize your clip by adjusting its frame edges or the parameters.
- Keep Aspect Ratio: Change the aspect ratio of the clip, such as original, 16:9, 9:16, 4:3, 3:4, 1:1 and 6:7.
- Rotate/Flip: Rotate your clip by 90 degrees clockwise or counter-clockwise and flip your video horizontally/vertically.
Step 4. Press Export.
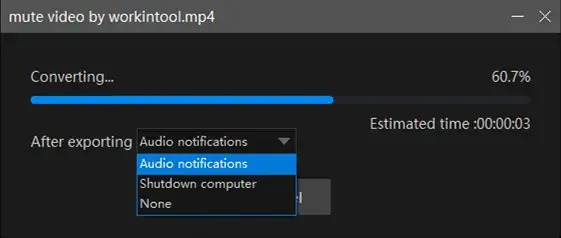
📣PS: The reminder or post-export status can be personalized when your trimmed clips are under processing, including a ringtone reminder, PC shut down and no further operation.
🧐Additional Words for WorkinTool VidClipper
📌What is inside the settings?
You can export more custom clips by adjusting the parameters in this section.
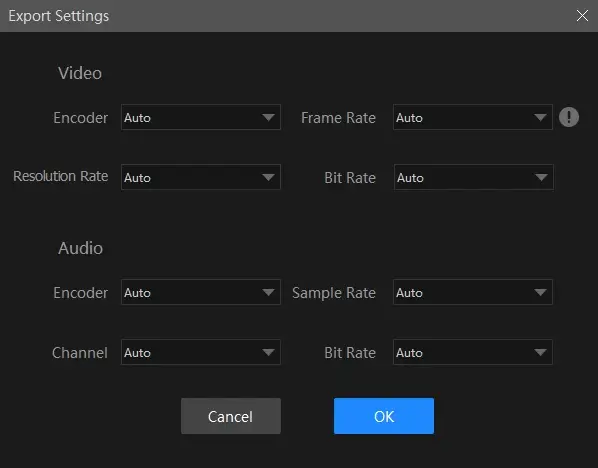
| Video | Encoder | Convert digital video to analog video signals. H264 and mpeg 4 |
| Resolution Rate | The number of pixels in each frame determines the amount of detail in your video or how realistic and clear the video is displayed. From 432 x 240 to 1920 x 1080 to custom | |
| Frame Rate | The measurement of how quickly a number of frames appear within a second, which is why it’s also called FPS (frames per second). From 5 to 60 to custom | |
| Bit Rate | The measurement of the amount of data used to encode a single second of video. From 512 to 40000 to custom | |
| Audio | Encoder | An algorithm that compresses and decompresses digital audio data according to a given audio file format or streaming audio format. Mpeg aac |
| Sample Rate | A measurement of the samples per second taken by the system from a continuous digital signal. It determines the range of frequencies captured in digital audio. From 16000 to 48000 | |
| Channel | A representation of sound coming from or going to a single point. 1 (Mono) and 2 (Stereo) | |
| Bit Rate | The amount of data transferred into audio. From 32 to 320 |
📌What else can WorkinTool VidClipper do?
Here are some more tutorials for you to depend on VidClipper to do more.
✨Useful Information
2️⃣Method 2: How to Cut a Video Through Video Editor?
Video Editor is a built-in video editing feature for Microsoft Photos in Windows 10/11. It serves as a basic video editor that enables users to trim/split/combine videos, add filters/motion effects/captions and adjust the color balance. For video cutting, you can easily achieve this goal with its tool–Trim. Meanwhile, as a pre-installed app, you can enjoy it without the need for installation and any license payment. However, MP4 is the output format by default.
✅Video Cutting in Video Editor.
1). Activate Video Editor by typing the same text in the search column at the bottom.
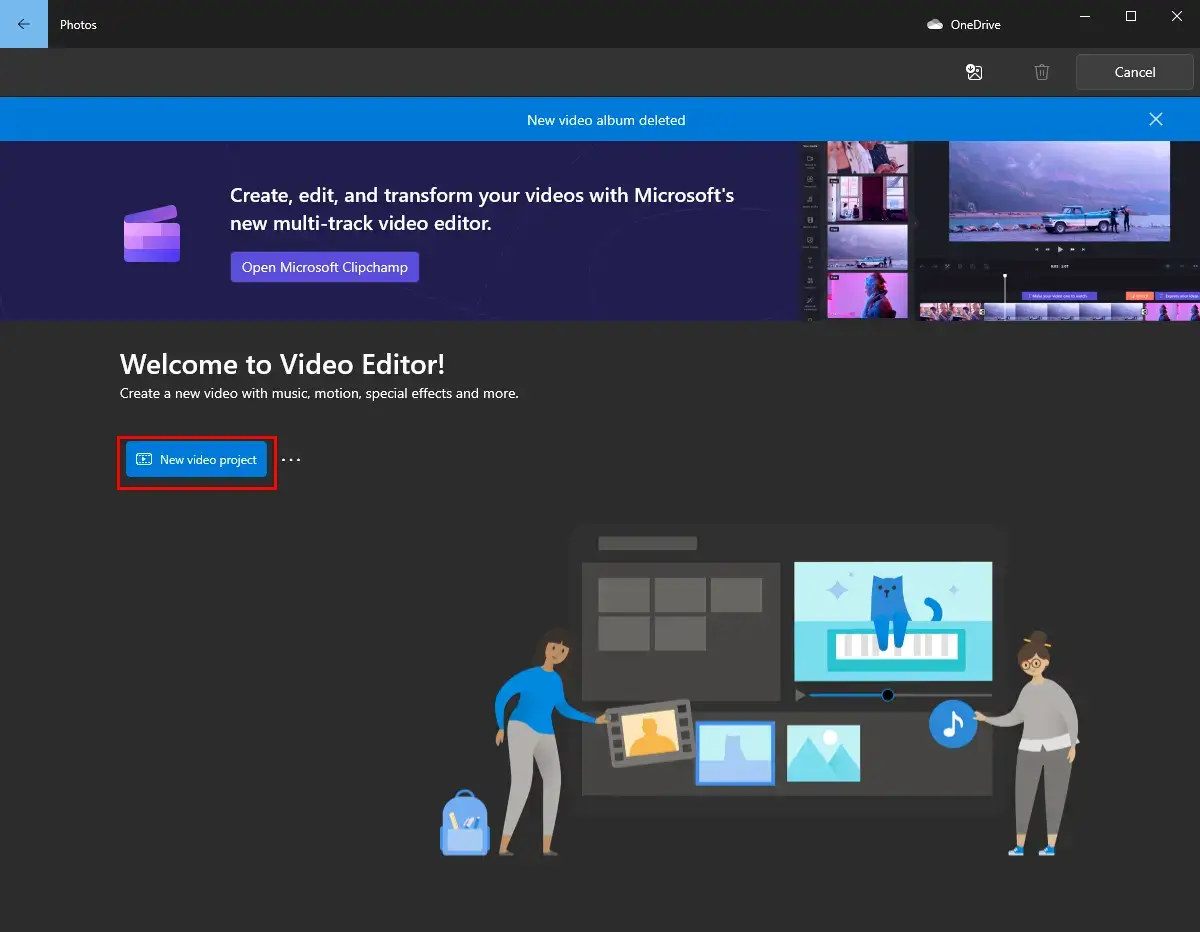
2). Click New Video Project to open its editing page.
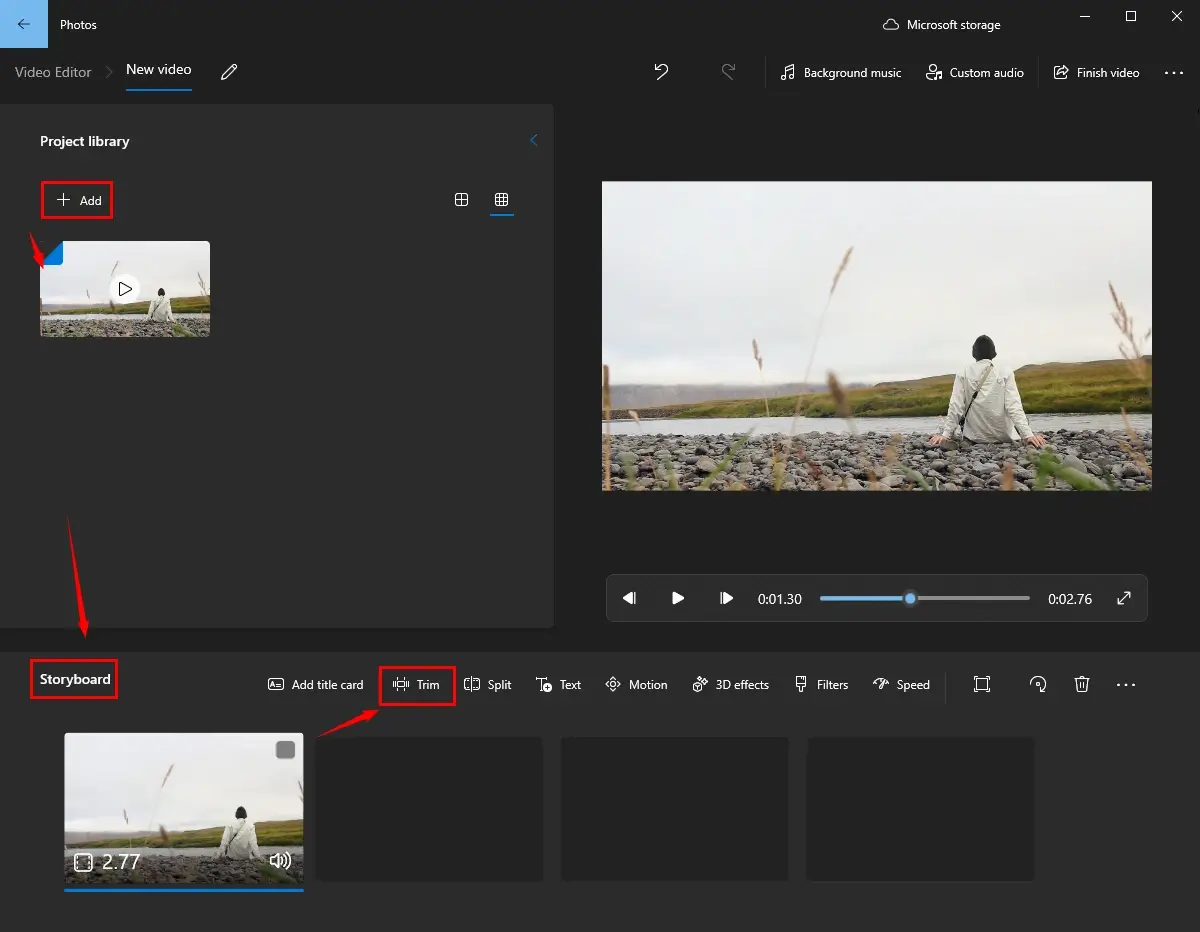
3). Hit +Add to import your video and then drag it to the frame under Storyboard.
4). Select Trim in the toolbar.
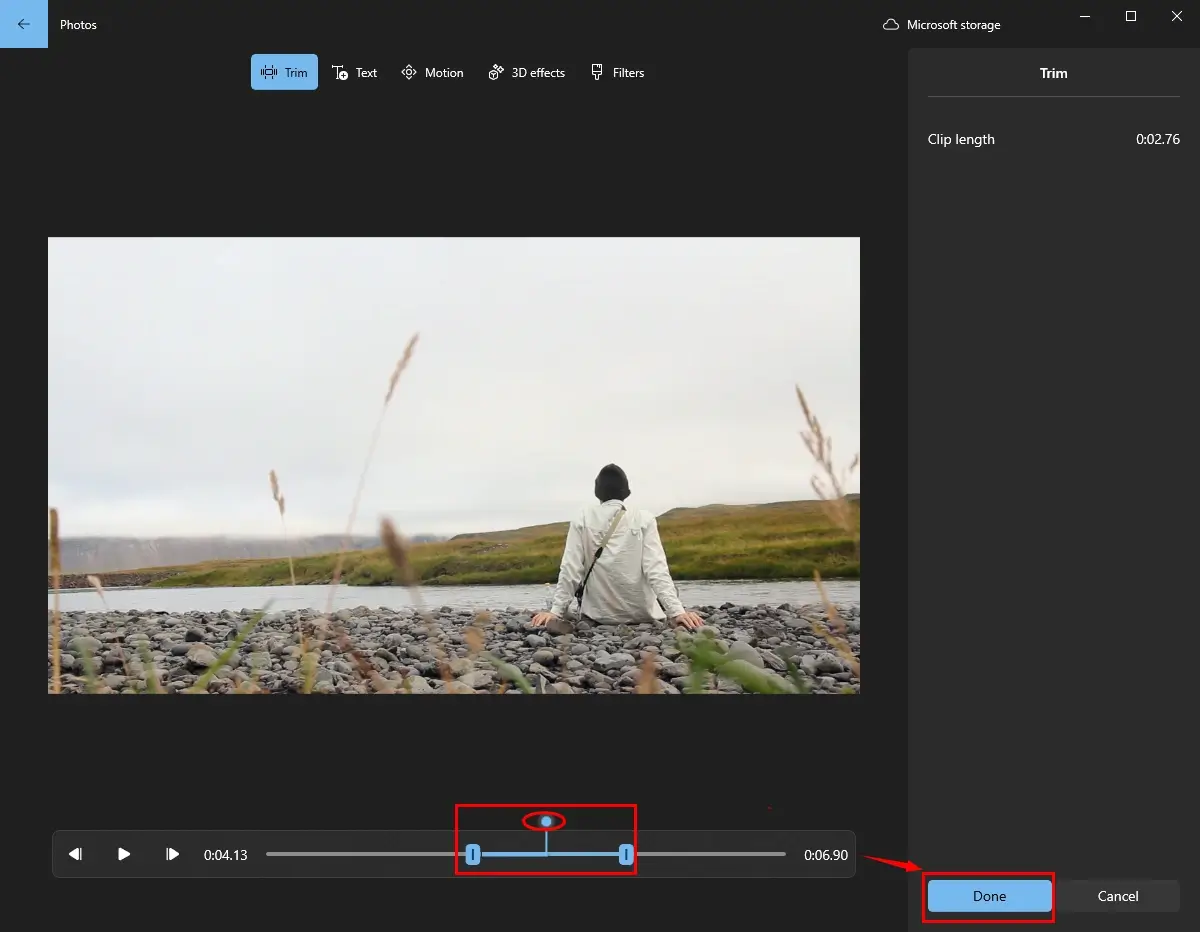
5). Move the blue square sliders to decide the duration range while the blue round slider to locate the starting point and then click Done.
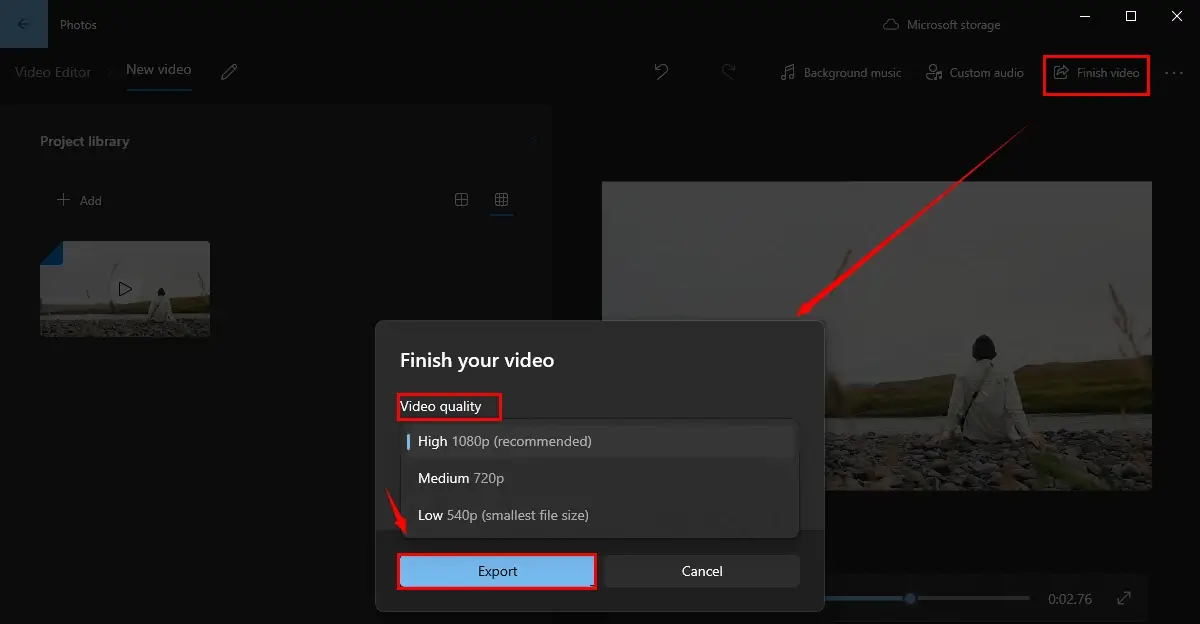
6). Navigate to Finish video, select video quality and then press Export in the pop-up window.
✨Useful Information
How to Cut a Video on Mac
If you are a Mac user, you can rely on the following approaches to cutting your video. One is a third-party tool—VLC Media Player and the other one is a built-in app—iMovie.
1️⃣Method 1: How to Trim a Video in VLC Media Player (macOS)?
VLC media player is a free and open-source audio/video player compatible with multiple platforms, including Mac. It features multi-formatted audio and video file playing, including CDs, DVDs and live streaming. Besides, VLC media player is known for its versatility. In addition to its playback capabilities, VLC also wins worldwide recognition through its audio/video editing and conversion, offering you additional tools like audio and video filters, equalizers, and subtitle support. It is also highly customizable, with a range of skins and extensions available to enhance its functionality and appearance.
For video trimming, it is a bit challenging with VLC, especially for beginners, since its feature–Record is needed instead of the normal trimming function. Please refer to the guidance below.
✅Video Cutting in VLC.
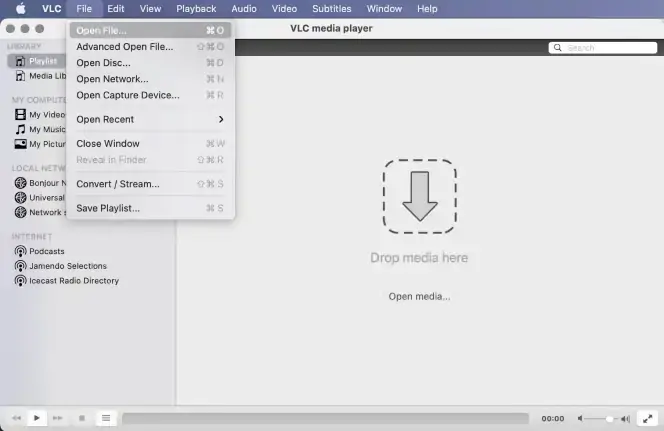
1). Open VLC and then navigate to File > Open File to import your video.
(Simply drag your video or perform the shortcut operation–Command+O.)
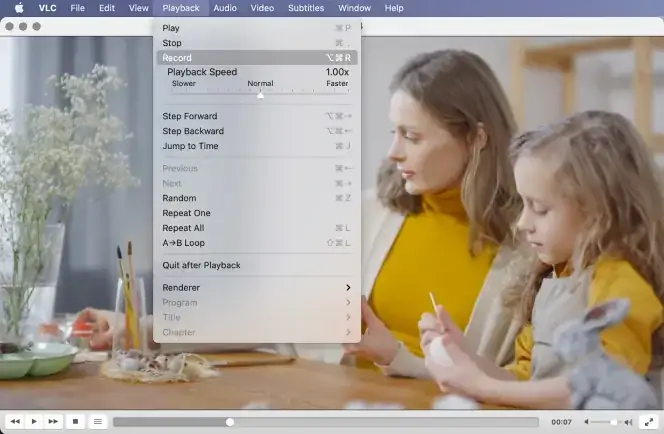
2). Locate the starting time of your video and then go to Playback > Record (shortcut ket–Option+Command+R).
3). Hit the Play icon to play your video while recording and then press it again to stop it.
4). Go to the Movies folder (default location) to find your trimmed clip.
✨Useful Information
2️⃣Method 2: How to Shorten a Video With iMovie?
iMovie is the default video editing application developed by Apple Inc. for macOS and iOS devices. It is a popular and easy-to-use video editing tool without the need for installation and license payment. iMovie enables users to create and import videos and then arrange and edit them on a timeline. iMovie boasts an array of features, such as video and audio effects, transitions, titles, and 3D globes and maps. It also targets output with various formats and social media sharing. However, the default format will always be .mov.
✅Video Shortening in iMovie.
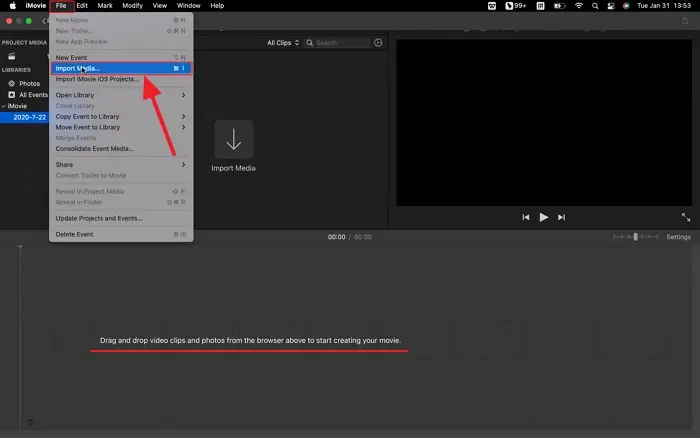
1). Launch iMovie and then click File> import Media to upload your video.
(Or drag and drop the video to the editing panel to complete its uploading.)
2). Move the white vertical line to the exact point of your video on the timeline.
3). Once the trimming position is located, use the shortcut key–Command+B keys to split the video into two sections.
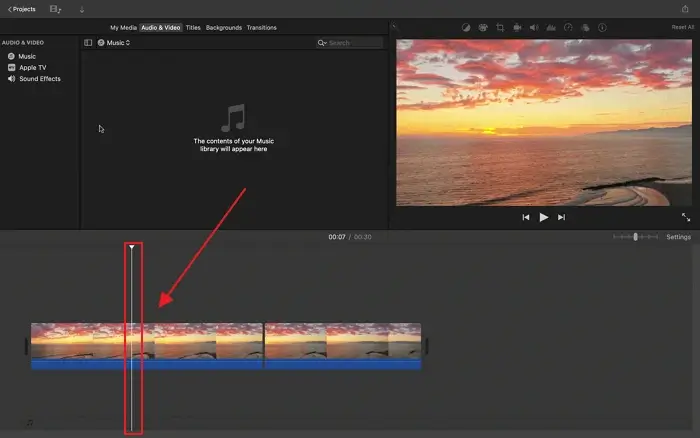
4). Select the unwanted part and then press the Delete button to get rid of it.
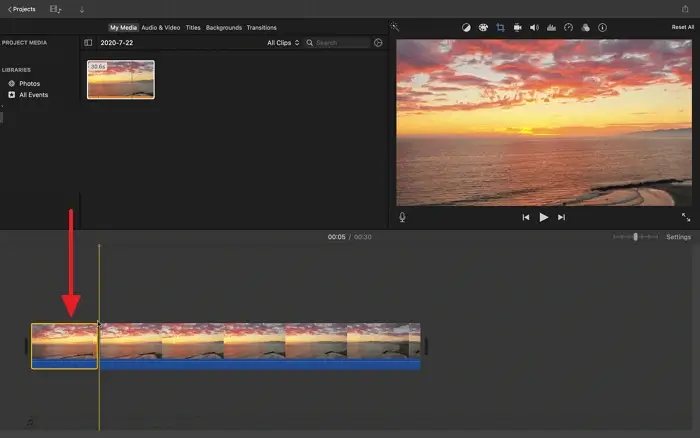
5). Hit the Space key to preview the new video.
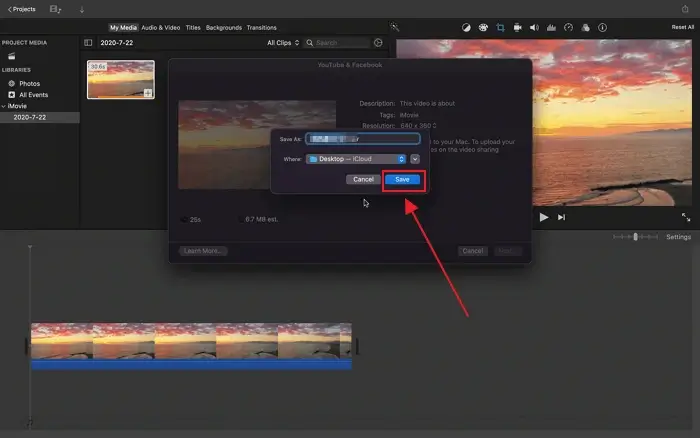
6). Click on the Share icon and then choose File to export it.
✨Useful Information
How to Clip a Video Online
If you find it inconvenient to install and use any desktop software, you should read this chapter carefully.
If a desktop video editor is not your primary choice, you can resort to a free online video trimmer to help you with this request. Here, please take a look at WorkinTool’s free online video trimmer.
WorkinTool online video trimmer is an online service that aims at free and effortless video cutting for every user. With its help, you have a handy internet-based video cutter, which saves you the trouble of downloading and installing an app. You can access it anywhere and anytime with internet access and all operations can be completed online. Additionally, it is a green online program that keeps your data and information privacy safe. All uploaded files will be removed automatically within 24 hours.
For video cutting, you can expect a desired clip within three steps. Therefore, you don’t have to be tech-savvy to use it. In addition to its easy video trimming feature, you can customize the playback speed of your clip in WorkinTool online video trimmer.
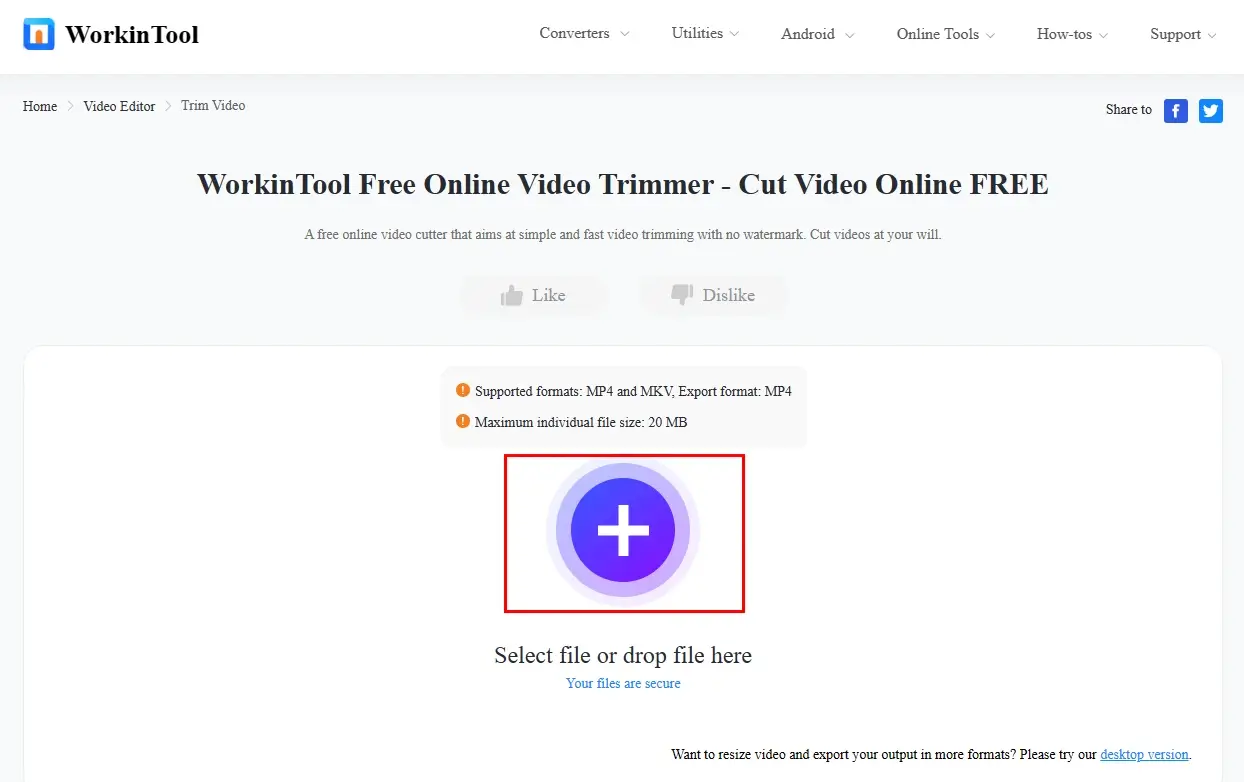
However, limitations apply to this free video trimmer online. For instance, it supports MP4 and MKV as input formats and MP4 only as output format. Meanwhile, the maximum file size is 20 MB.
✅Video Clipping in WorkinTool Free Online Video Trimmer.
Step 1. Open the website and then click on the purple + icon to import your video.
Step 2. Move the two blue sliders to decide which part you feel like cutting, adjust the playback speed if you want to and then hit Convert.

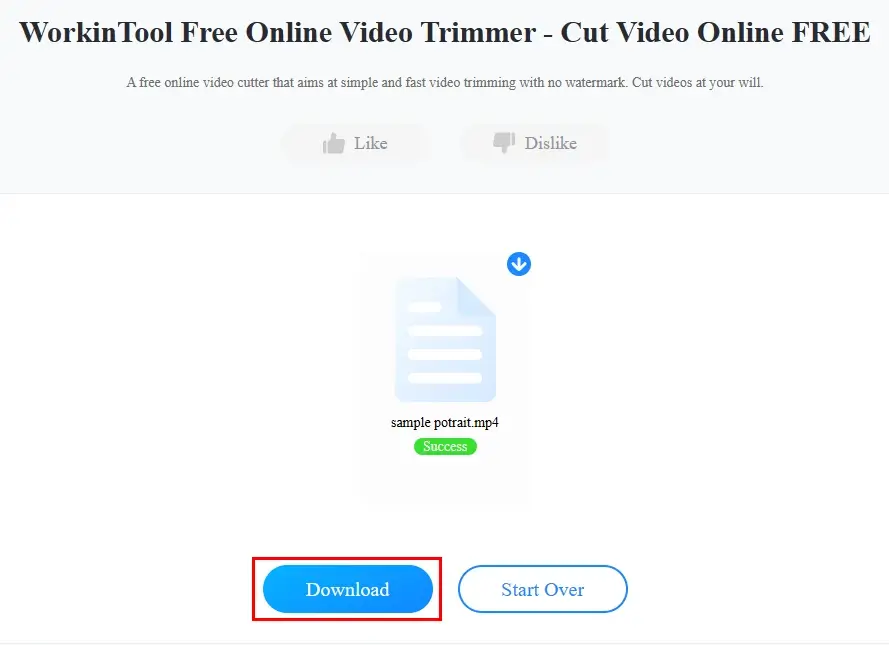
Step 3. Press the Download tab to save your clip.
| Merge Videos | Change Video Speed | Add Watermark to Video |
| Extract Audio from Video | Video to GIF | Video Converter |
✨Useful Information
📢Note: Please download the desktop software–WorkinTool VidClipper if you want to enjoy unlimited editing features.
Final Thought
This chapter concludes our discussion on how to trim a video on Windows, Mac and online. If you are a new video editor with little prior experience, you can start with the built-in apps in each operating system. However, if you are a user with knowledge of video editing, you can try the aforementioned third-party tools.
However, whether you are a beginner or a professional, you can pay particular attention to WorkinTool VidClipper if you use Windows OS. It is user-friendly, easy to use and super multi-functional.
Now, are you ready to cut your videos?


