How to Record on Roblox on PC in 2024 | 6 Ways
Sometimes, you may feel like keeping your gameplay highlights on Roblox and sharing your best moments with others, or capturing your gameplay as a tutorial video; recording it will be a great way to realize these goals. If you have such requests, please spare a few minutes on this article on how to record on Roblox on your PC in six ways. All the methods prove to be practical and convenient.
📌With Its Built-in Recorder–Roblox Screen Recorder
📌Without Its Built-in Recorder: Windows–Xbox Game Bar and WorkinTool VidClipper, Mac–QuickTime Player and OBS Studio, Online–Screen Capture
💡Please feel free to try all the methods based on your needs until an ideal solution is pinpointed. However, if you are a Windows user, please take a closer look at WorkinTool VidClipper since it is user-friendly, simple to operate and super multi-functional to solve your various problems.
🧐Now, please start your reading to learn about specific solutions and experience them by yourself.
How to Record on Roblox on PC in 2024 | 6 Ways [Windows/Mac/Online]
Roblox, created by Roblox Corporation in 2004, is a massively multiplayer online gaming platform available on various platforms, including PC, mobile devices, and gaming consoles. It is also a game creation system that allows users to design their own games and play games created by other users. As a game lover, Roblox cannot be a strange name. Sometimes, you may feel like keeping your gameplay highlights on Roblox and sharing your best moments with others, or capturing your gameplay as a tutorial video; recording it will be a great way to realize these goals. If you have such requests, please spare a few minutes on this article on how to record on Roblox on your PC in six ways. All the methods prove to be practical and convenient.
| 🎬With Its Built-in Recorder | 📍Roblox Screen Recorder | |
| 🎬Without Its Built-in Recorder | 💻Windows | 📍Built-in Program–Xbox Game Bar |
| 📍Third-Party Tool–WorkinTool VidClipper [🔥Recommended] | ||
| 💻Mac |
📍Built-in Program–QuickTime Player | |
| 📍Third-Party Tool–OBS Studio | ||
| 💻Online |
📍Screen Capture | |
Now, let’s begin our discussion.
Does Roblox offer a screen recording feature? Yes, you can use its inbuilt screen recorder or fulfill your purpose of preserving the shining moments on this platform. Here is what you should do.
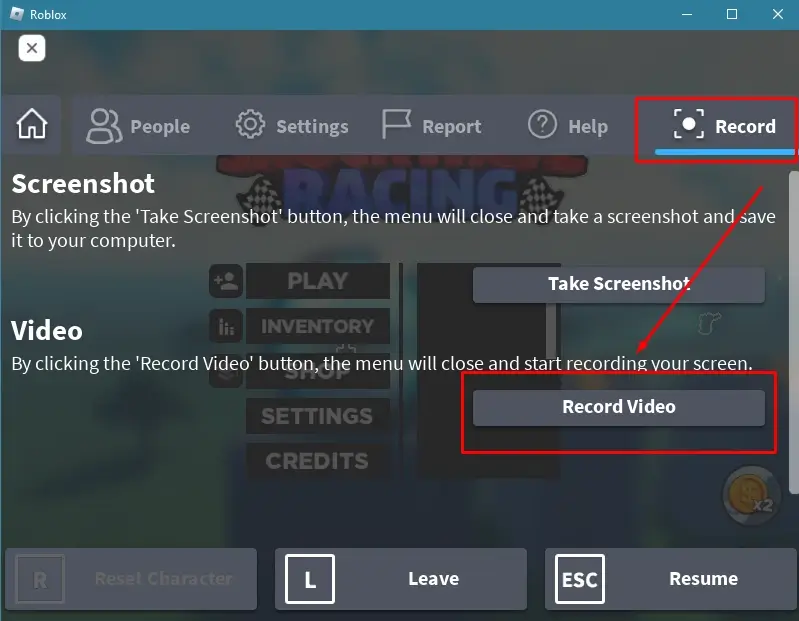
- Click the menu button in the upper-left corner.
- Find and press the Record tab in this menu.
- Hit Record Video to start your recording.
- Click the red icon in the upper-left corner or Stop Recording in the menu to end and save your recording.
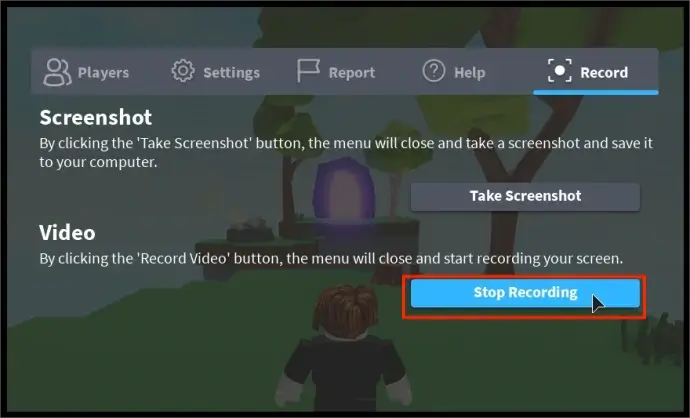
📣PS: If you want to view your video, click the My Videos link in the pop-up window.
✨Our Advice
If you intend to capture your Roblox gameplay with more useful settings and export a more custom recording, you’d better resort to a handy screen recorder. In this chapter, we will inform you of five third-party tools to capture videos on Roblox on different platforms, including Windows, Mac and online.
How to Screen Record on Roblox on Windows?
Two methods are available to help you get a recording of Roblox gameplay: Xbox Game Bar and WorkinTool VidClipper.
✅Xbox Game Bar
Xbox Game Bar is a pre-installed program in Windows 10 and 11. Designed to capture gameplay on a Windows computer, it targets a simple recording process. You can customize your shortcut key to quickly activate this app and use it to get a recording with minimal effort. You can use it to capture your computer screen with(out) audio and record last 30 seconds on your PC.
📕Here is how to use Xbox Game Bar to record your Roblox gameplay:
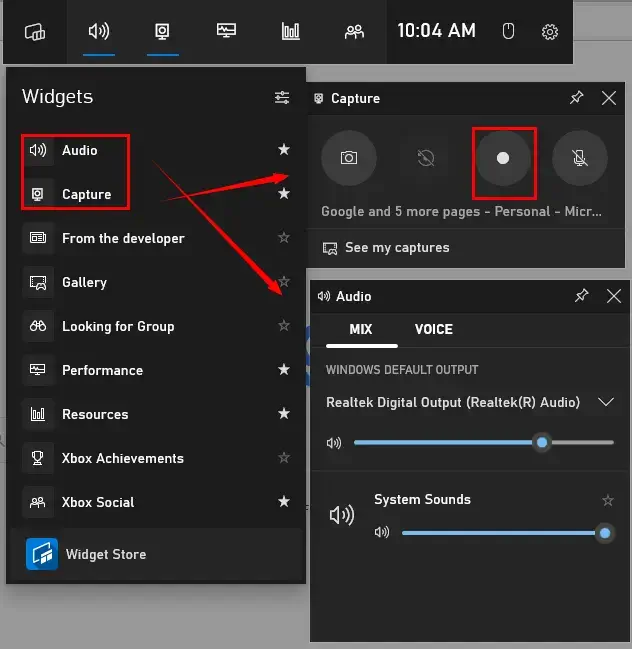
- Perform the shortcut performance–Win+G to activate the app.
- Click on the Audio and Capture options to open the relevant consoles.
- Adjust your audio settings if you want to.
- Hit the recording icon to begin your Roblox gameplay capture.
- Press the Stop icon to end your recording.
- Click anywhere on your screen to close this app.
📢Note: Click on See my capture to find and view your Roblox recording.
✨Our Advice
✅WorkinTool VidClipper
If you have higher requirements for your Roblox gameplay recording and are a Windows user, you can turn to WorkinTool VidClipper for help.
VidClipper is one of the acclaimed tools of the WorkinTool software family. Initially designed as a video editor, it has now become a multi-functional program suitable for both beginners and professionals. Installing it on your PC, you will automatically have a screen recorder, video converter/compressor/splitter/merger/AI-powered maker/cropper/watermark adder and remover, audio converter/extractor, GIF maker, text-to-audio converter and more.
VidClipper boasts a clear and simple interface with several quick editing tools on its opening page, so editing beginners will find it quite convenient to operate. With the help of its professional editing console, specialized video editors are able to create more professional videos.
When it comes to its screen recording function, here are its key features:

|
📕Please follow the steps for Roblox gameplay recording with WorkinTool VidClipper:
Step 1. Launch the tool and then click Screen Recorder on the right menu.
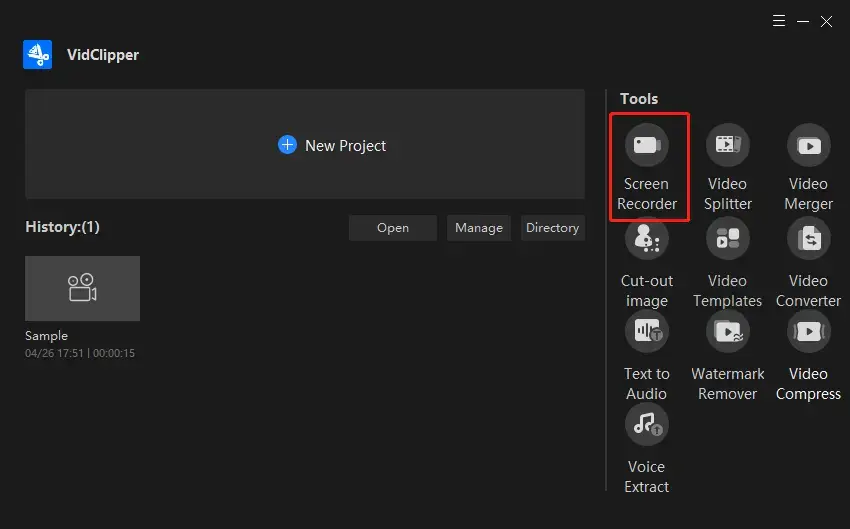
Step 2. Mark your options (recording area, audio, quality and format), adjust your settings, set your output directory and then hit Start (shortcut key–Alt+F1) to begin your recording.
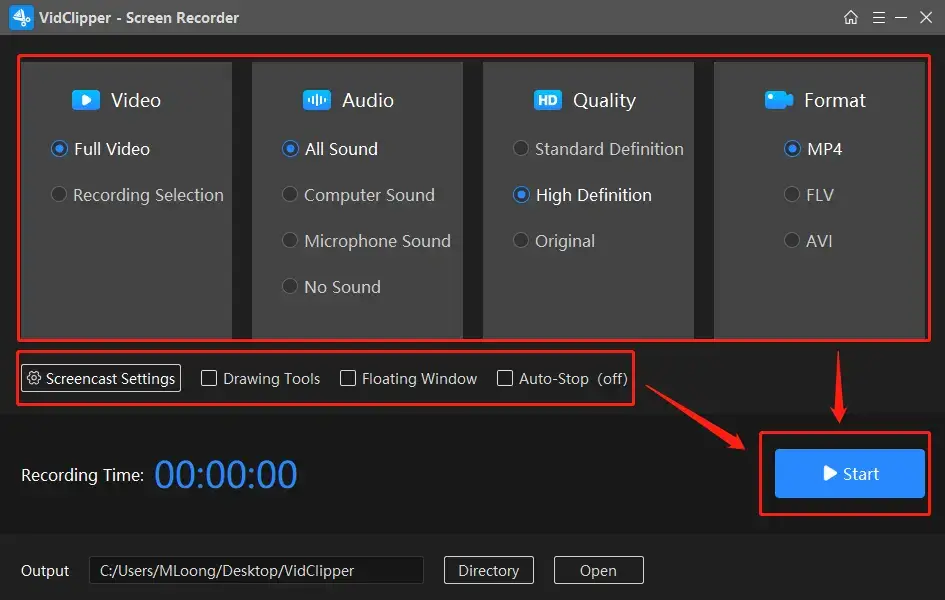
- Full Video: To record the entire screen of your computer after a three-second countdown.
- Recording Selection: A red frame will appear to enable you to choose a recording area. A small window will pop up and then click Start to begin your recording after a three-second countdown.
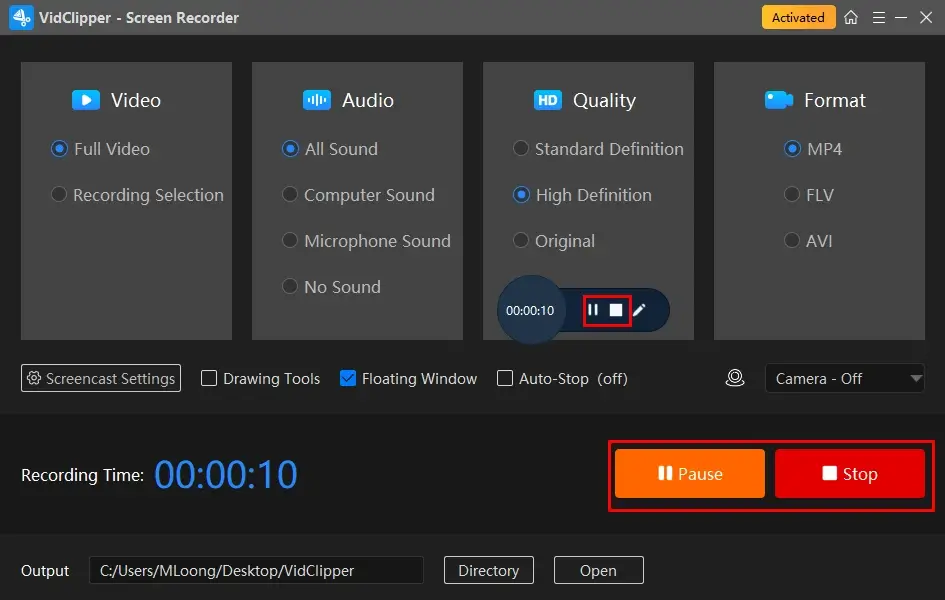
Step 3. Click the Pause or Stop icon on the floating window and the recording page to suspend or end/save your recording.
Step 4. Select your next-step operation after recording.
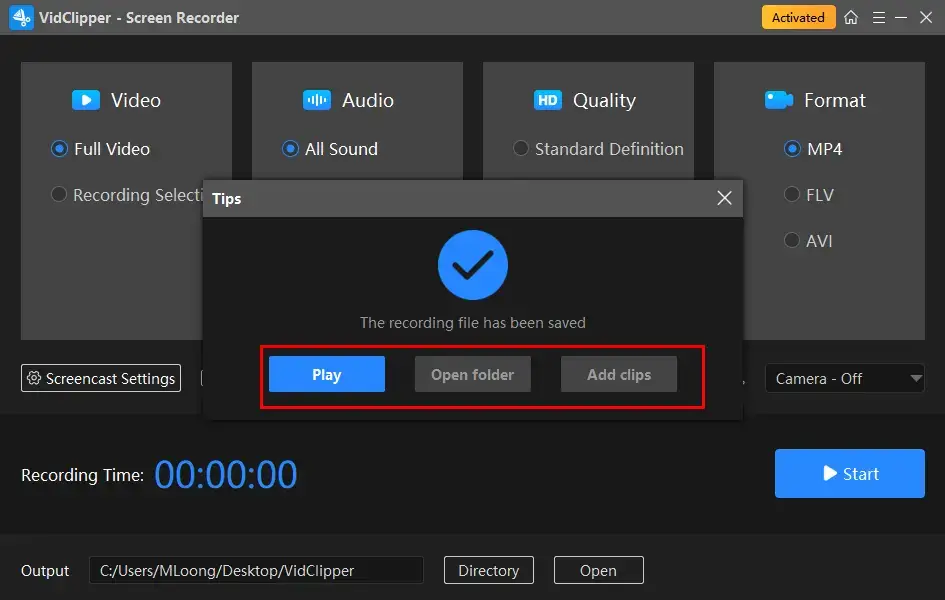
*Add clips is a valuable feature to move your recording to the VidClipper video editor and allow you to edit it further, like putting a filter, adding text, color correction, adding video transitions, effects and animations, freezing frame, speeding up or slowing down and more.
🙋♂️More to Share About WorkinTool VidClipper
📌What is inside the screencast settings?
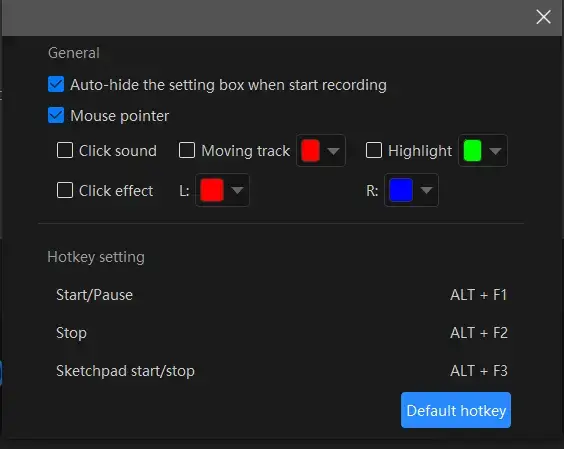
- Auto-Hide: Tick this choice to hide the settings box when your recording starts.
- Mouse Pointer: Mark this option to personalize the color of several operations like Moving track, Highlight and Click effect (left and right click).
- Click Sound: Activate or mute the sound of every click.
- Click Effect: “Colorize” your every click, both left and right.
📌What is the Auto-Stop feature?
Auto-Stop is a feature that aims at the automatic ending of your recording after the full recording length is set. Therefore, you don’t have to worry about your recording, even when you are away from your computer.
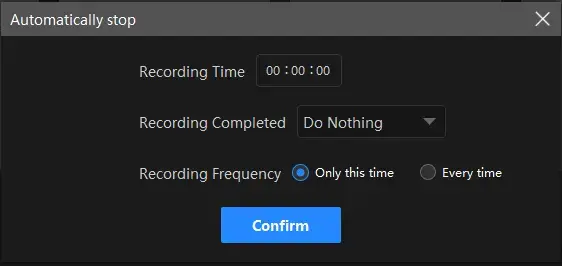
| Recording Time | Set your full recording length in advance to stop your recording automatically. |
| After Recording | Customize the post-recording operation when your recording comes to an end, including Do nothing, Exit program, Sleep and Shut down your PC. |
| Recording Frequency | Decide how often your auto-stop settings are active, such as One time and Every time. |
📌What is the Drawing Toolbar?
A drawing toolbar is at your disposal to draw lines or shapes and type text on your recording directly. Therefore, you save the cumbersome process of having to complete the relevant operations after your recording. You can activate it by
- Clicking the pen-like icon on the floating windows,
- Ticking the option–Drawing Tools on the recording page,
- Using the shortcut key–Alt+F3.
📌Can I rely on WorkinTool VidClipper to capture other gameplay platforms?
Yes. You can make use of this program to record (but not limited to) these gameplay platforms:
| Twitch Gameplay | Steam Gameplay | Switch Gameplay |
| Minecraft Gameplay | Sims 4 Gameplay | VR Gameplay |
| Apex Legends | Record Gameplay No Lag | Live Stream |
✨Our Advice
How to Capture Roblox Gameplay on Mac
This chapter will be suitable for Mac users. We will introduce you to two ways to get a recorded video out of Roblox gameplay: QuickTime Player and OBS Studio.
✅QuickTime Player
QuickTime Player is the built-in program on every Apple device and also the media player by default. More than just an audio/video player, it is also a basic audio/video editor and screen recorder. You can use its screen recording feature to capture your computer and Webcam screen with or without audio. The recording process is far from challenging. However, the export format will be MOV.
📕Here are the instructions on Roblox recording with QuickTime Player:
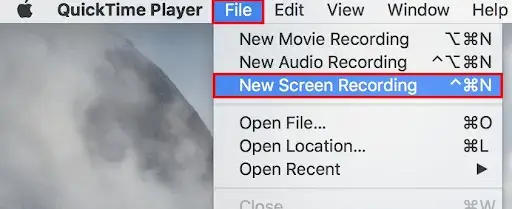
1). Open the player and then navigate to File > New Screen Recording.
2). Make your settings adjustments (microphone on/off and mouse click on/off) and then click the red Record button in the pop-up window.
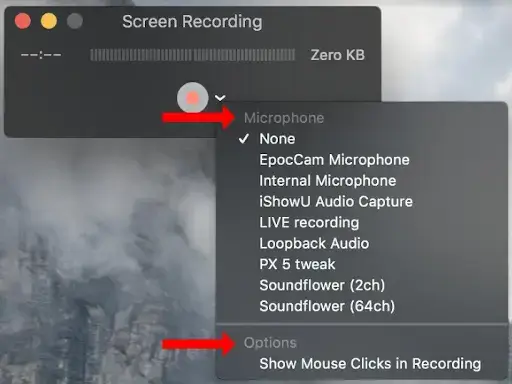
- If you want to record the entire screen, simply click anywhere on your computer.
- Alternatively, drag the cursor to create a selected recording area and then click Start Recording.
3). Press the Stop button when you are ready to stop recording.
(Shortcut key–Command+Control+Esc)

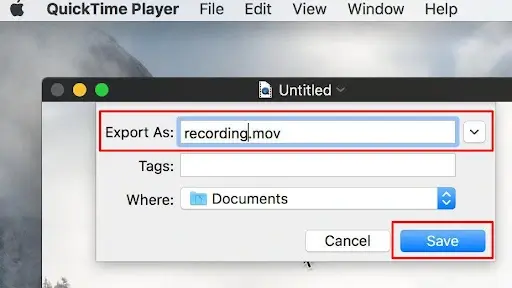
4). Name your recording and then click Save.
✨Our Advice
✅OBS Studio
OBS Studio (Open Broadcaster Software Studio) is a free and open-source software made for video recording and live streaming. Compatible with various operating systems like Windows, macOS, and Linux, OBS Studio is widely used by content creators, gamers, and professionals to record or stream their content, including gameplay, tutorials, podcasts, and live events. However, OBS’s interface is relatively complex, which may bother beginners.
The software makes it possible to capture and mix audio and video sources from multiple devices, including webcams, microphones, and desktop screens. It also offers advanced features to improve its flexibility, such as scene composition, chroma keying, and video encoding settings to optimize the quality and size of the output files.
📕This is the guidance on Roblox screen capture with OBS Studio:
1). Launch OBS Studio and click on the + icon under the Sources box to add a new source.
2). Select Game Capture and choose the Roblox game window as the source.
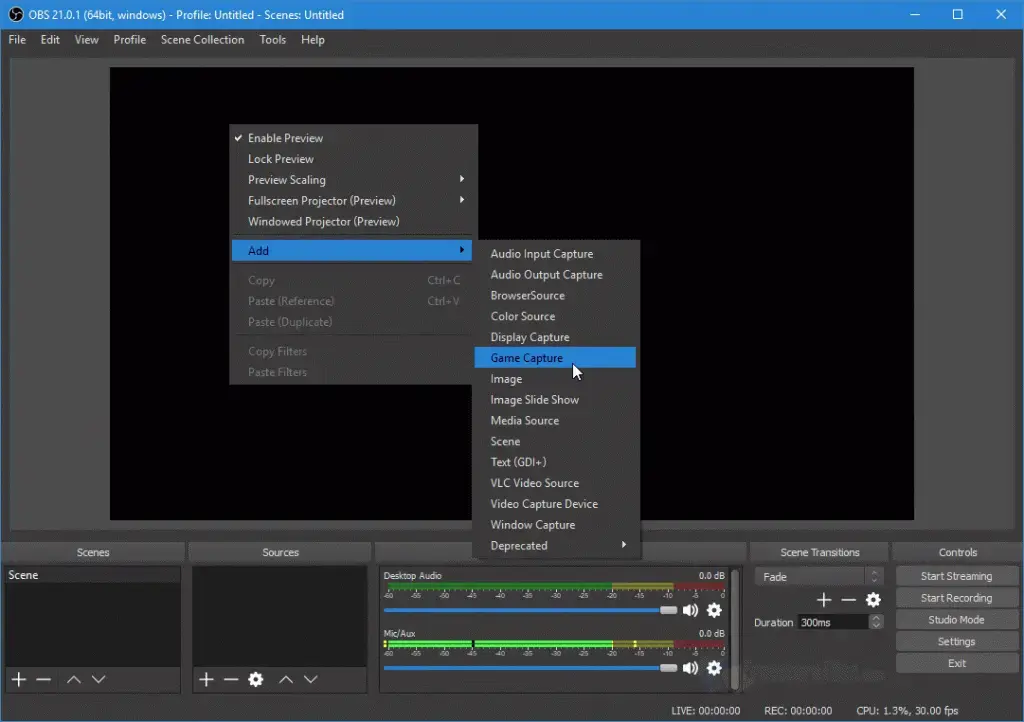
3). Name your recording in a new window
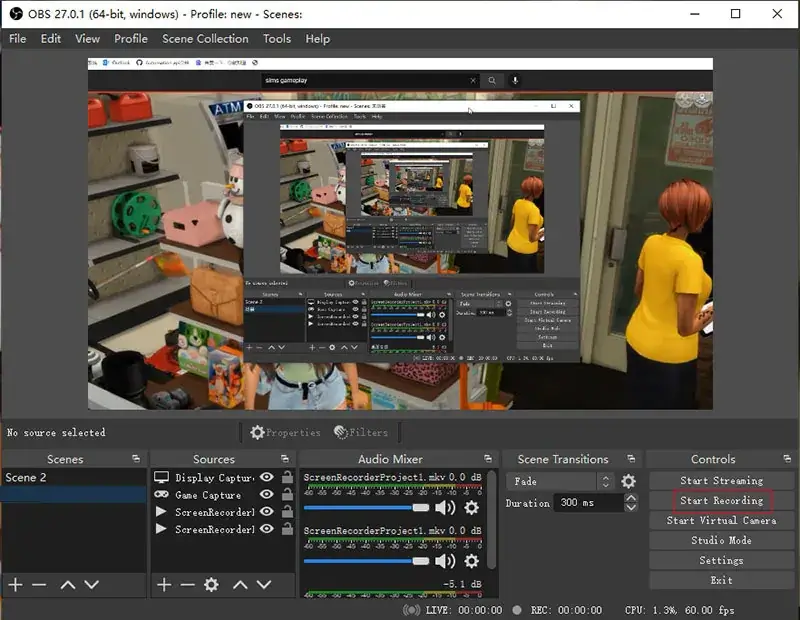
4). Hit the Start Recording button to begin your Roblox gameplay recording.
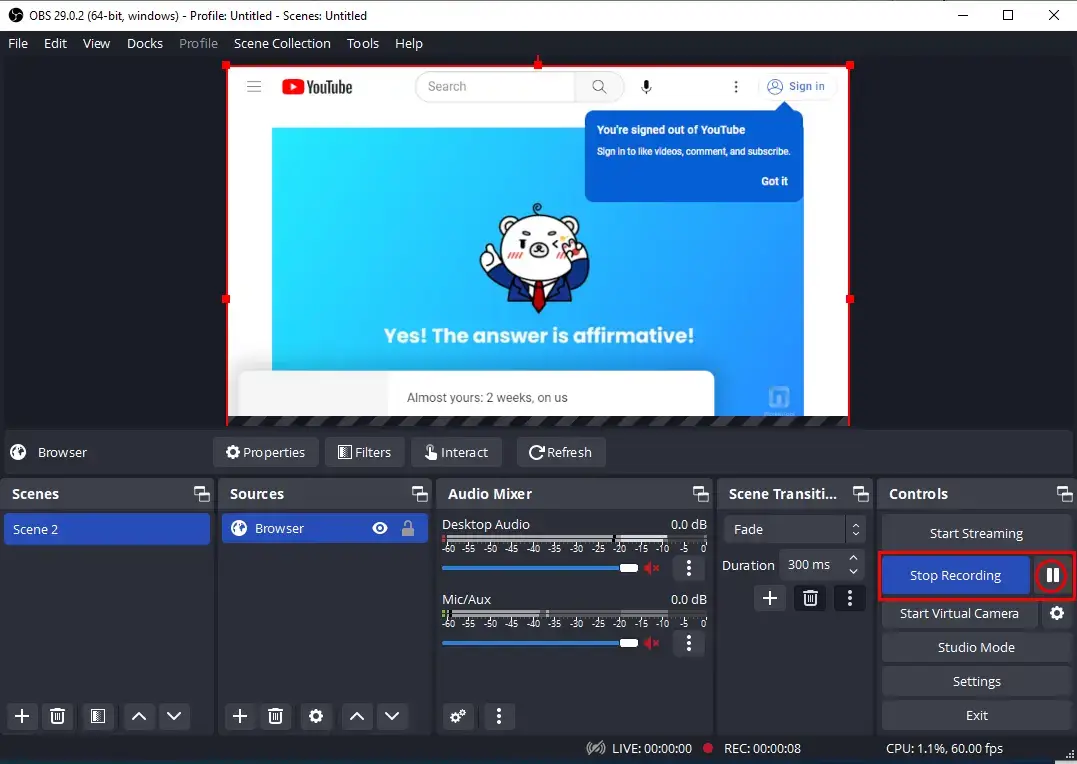
5). Press the Stop Recording button to end and save the recording session.
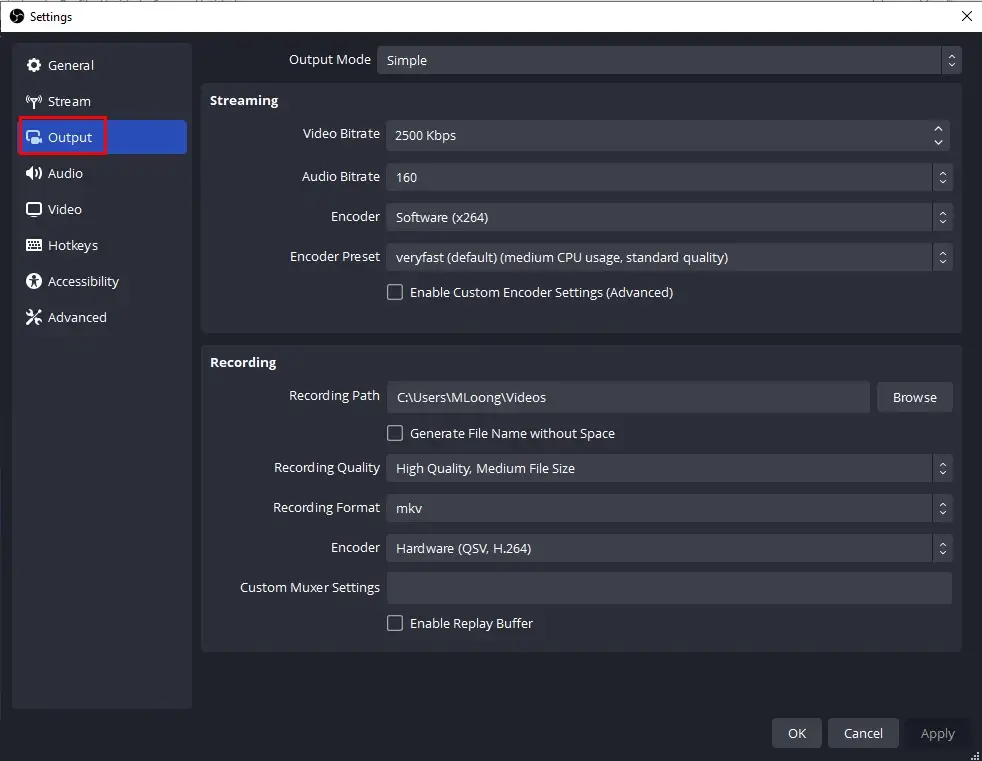
6). The recorded video will be saved to the folder specified in the Output settings.
📢Notes:
🎉If you intend to customize the recording settings, such as the video bitrate, format, and resolution, simply click Settings > Output.
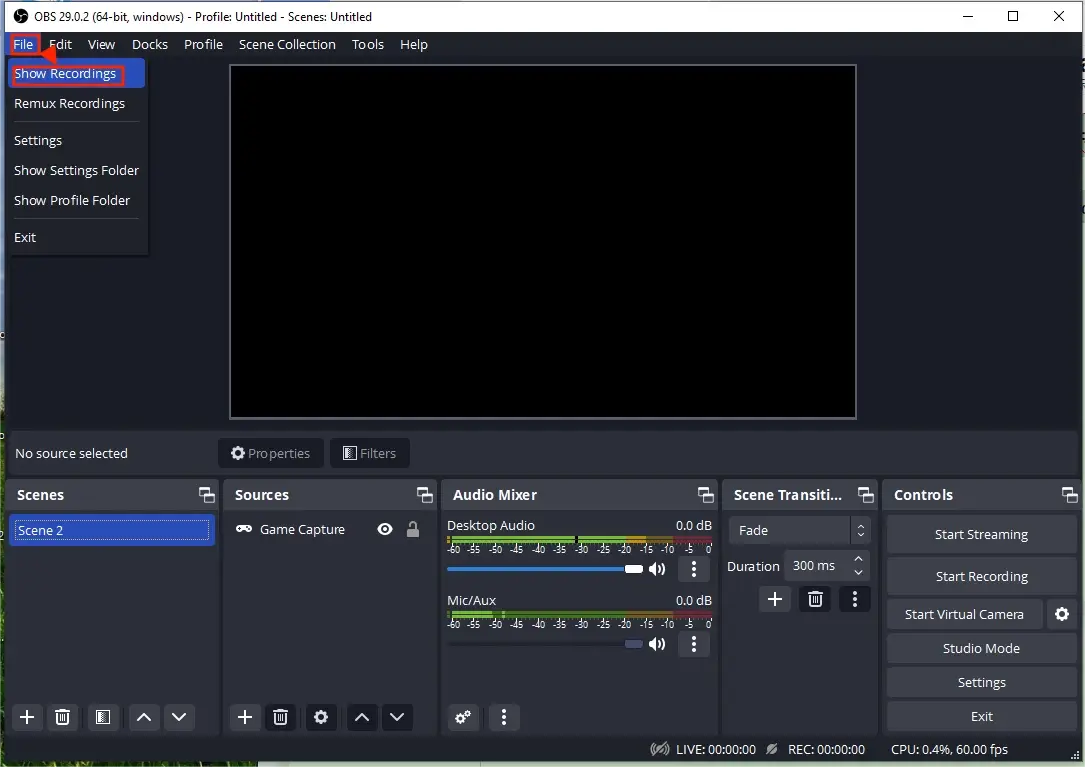
🎉If you want to view your recording, please go to File > Show Recordings.
✨Our Advice
How to Get Roblox Gameplay Recording Online
If you find it inconvenient to use any desktop software, a free online screen recorder can be a good alternative. Options vary in the market; hence, we will save your time by presenting Screen Capture.
Screen Capture is a free online service for screen recording. As a professional screen recorder, it is created for simple screen recording without downloading and installing an app. You can use it to capture your computer screen and camera content with(out) audio. Also, it boasts a super easy interface so that you can expect a high-quality recording within a few clicks. Besides, it supports a Chrome extension version that makes screen recording more convenient.
However, a watermark will be added to your recording. If you want to remove it, please upgrade your free plan to a pro version.
📕Please refer to the guidance on Screen Capture Usage below:
1. Open Screen Capture.
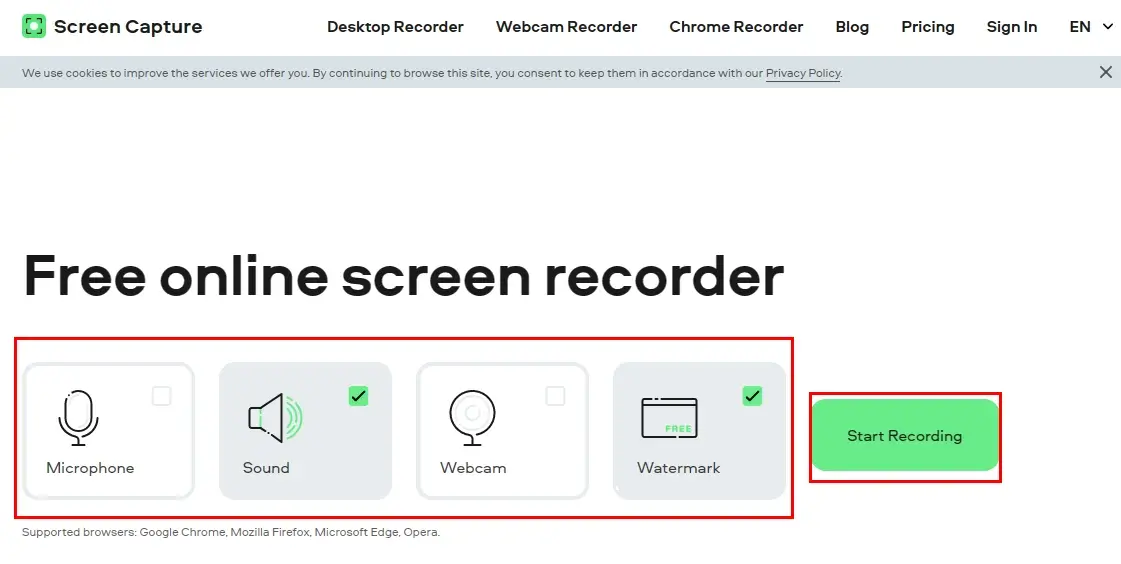
2. Select the screen and audio to record and then click Start Recording.
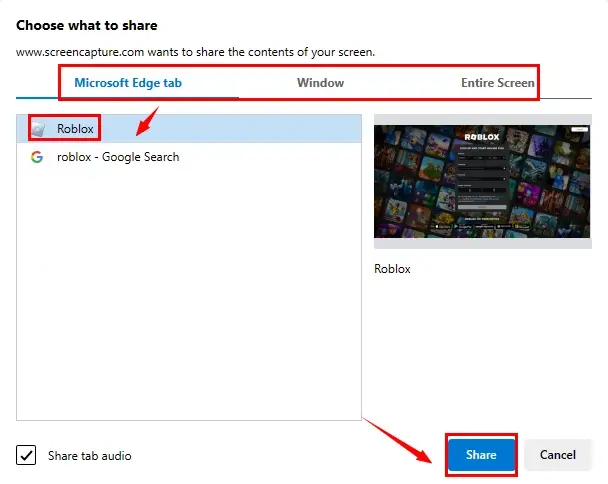
3. Determine the content to share with Screen Capture and then hit Share.
(Suggestion: Window for a desktop Roblox app while Browser Tab for Roblox online.)
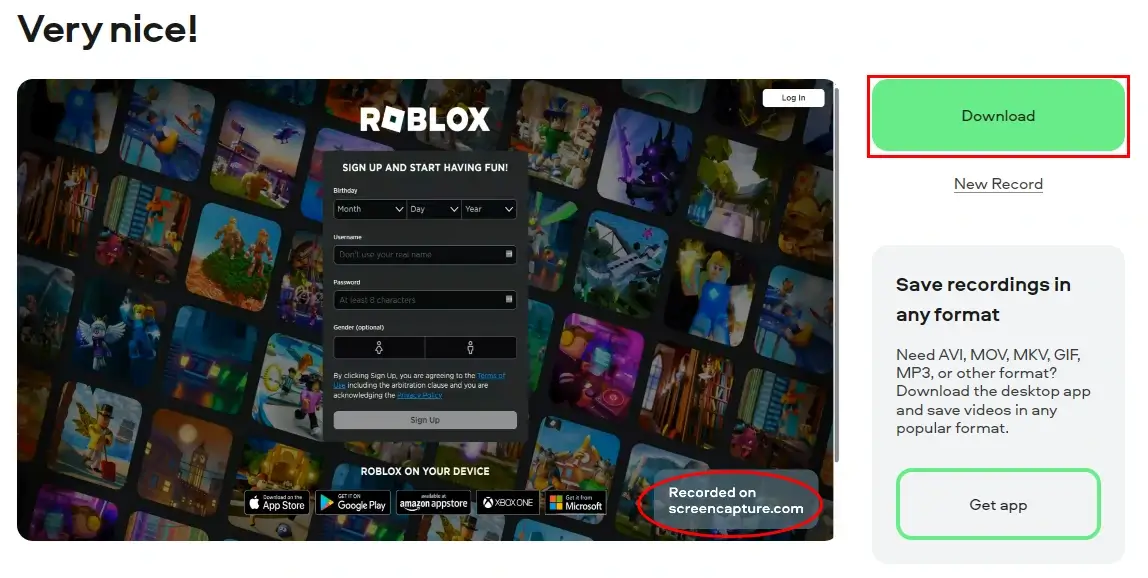
4. Click Download to get your Roblox recording.
✨Our Advice
🎯How do I record me playing Roblox?
All the aforementioned solutions are helpful to fulfill this purpose. All you need to do is to select camera or Webcam and turn the microphone option on before your Roblox recording.
For example, WorkinTool VidClipper allows you to record video from Webcam. You should tick All Sound and then choose your camera from the drop-down box.
🎯What are the keys to record on Roblox?
To record on Roblox, you can use the following keys:
- F9: The default key to start or stop recording a video on Roblox.
- F10: The key used to take a screenshot of your gameplay.
This chapter concludes our discussion on how to record on Roblox on Windows, Mac and online. Please feel free to try all the methods based on your needs until an ideal solution is pinpointed.
However, if you are a Windows user, please take a closer look at WorkinTool VidClipper since it is user-friendly, simple to operate and super multi-functional to solve your various problems.
Now, are you ready to capture your Roblox gameplay?

