How to Record GoToMeeting as an Attendee on PC in 2024
An online meeting has become a significant element in the modern workplace, especially during and after the pandemic outbreak. Therefore, online meetings may contain crucial information and it is essential to keep them for future reference. We have discussed ways to record several digital meeting platforms as a participant. Today, we will show you how to record GoToMeeting as an attendee on PC, particularly without permission. All the methods prove to be easy and practical.
📌GoToMeeting Inbuilt Screen Recorder
📌Windows–WorkinTool VidClipper
📌Mac–OBS Studio
📌Online–Screen Capture
🌟Recording a meeting, session, webinar or training on GoToMeeting is an effective way to keep important information or turn it into a video tutorial or other materials in the future. With all the solutions mentioned in this blog post, you can fulfill this purpose without hassle. However, if you are a Windows user willing to use a desktop program, WorkinTool VidClipper will be your ideal choice since it is user-friendly, easy to use, powerful to capture any content on your screen and super multi-functional to solve many of your problems.
🙋🏾♀️Now, please start your reading to learn about specific solutions and experience all of them by yourself.
How to Record GoToMeeting as an Attendee Without Permission on PC in 2024
An online meeting has become a significant element in the modern workplace, especially during and after the pandemic outbreak. Therefore, online meetings may contain crucial information and it is essential to keep them for future reference. We have discussed ways to record several digital meeting platforms as a participant. Today, we will show you how to record GoToMeeting as an attendee on PC, particularly without permission. All the methods prove to be easy and practical.
| 🙋🏻♀️As a presenter/attendee with permission | 📍GoToMeeting Inbuilt Screen Recorder |
| 🙋🏻♂️As an attendee without permission | 📍Windows–WorkinTool VidClipper[🔥Recommended] |
| 📍Mac–OBS Studio | |
| 📍Online–Screen Capture |
Now, let’s begin our journey.
Before GoToMeeting Recording
📌What is GoToMeeting?
GoToMeeting is a user-friendly web conferencing and online meeting platform allowing people to collaborate, communicate and participate in virtual meetings. It provides various features designed to facilitate remote collaboration and is commonly used by businesses and organizations for team meetings, client presentations, training sessions and more.
With GoTo Meeting, users can schedule and host online meetings, invite participants via email or calendar invitations and join meetings from various devices such as computers, smartphones and tablets. The platform supports audio and video conferencing, screen sharing, file sharing, chat functionality and remote desktop control.
📌Can you record GoTo Meetings, Sessions or Webinars?
Yes. GoToMeeting is recordable as both a presenter and a participant.
- As a presenter with a pro account or participant with permission, you can resort to the built-in screen recording feature inside GoToMeeting.
- As a presenter without a pro account or participant without permission, you’d better have a handy screen recorder to help you achieve this goal.
Hence, please read on to learn about every specific solution.
How to Record GoToMeeting with Its Inbuilt Screen Recorder
If you have upgraded your account to a pro one or are an attendee with permission, you can definitely access its built-in screen recorder. Here is what you should do:
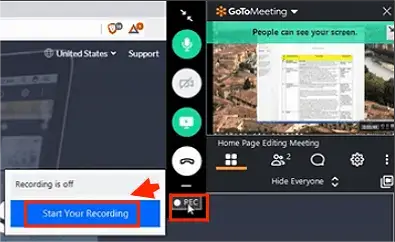
- Open GoToMeeting on your Mac or Windows and then host or join a meeting.
- Find the REC button on the Control Panel and then click it to start your recording.
- Press Stop Your Recording to end your meeting/session/webinar capture.
(📣PS: You can play the recording and create a link to share with others.)
✨Our Advice
How to Record GoToMeeting with Alternative Screen Recorders
Although the inbuilt screen recorder is convenient and straightforward, it comes with the limits discussed above. Hence, it is advisable to try some practical alternative screen recorders that enable you to record GoToMeeting as an attendee without permission. Here, we will introduce you to three screen recording tools to meet your different needs:
✅WorkinTool VidClipper (Windows)
WorkinTool VidClipper was initially developed as a video editor. Driven by the idea of practicability, the WorkinTool team has upgraded it to a super multi-functional tool that allows every user to enjoy the following (but not limited to) features:
Therefore, you save the trouble of finding and installing them individually, which is time-saving and efficiency-boosting.
As a screen recording app, WorkinTool VidClipper rises to fame in the market under the name–Capture Screen Recorder. It is an ideal tool for everyone. Beginners will find it extremely simple and convenient to operate, thanks to its intuitive interface and one-page operations. Professionals will create fantastic recordings with the help of its additional screencast settings and tools. Besides, it allows users to record without time limit and watermarks. So you can definitely depend on VidClipper to capture a meeting, session, webinar and training on GoToMeeting.
(For more information: WorkinTool Capture Screen Recorder Review.)
💡How to Record GoToMeeting on Windows using WorkinTool VidClipper?
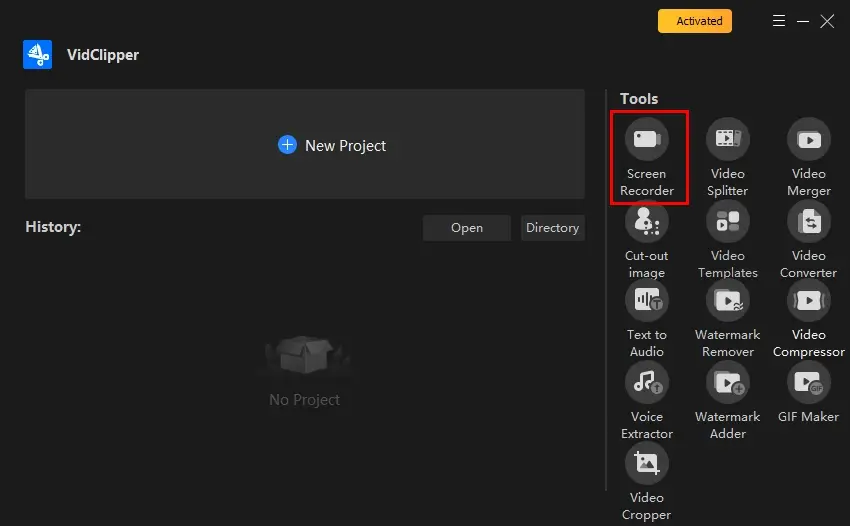
Step 1. Launch the tool and then find Screen Recorder on the right menu.
Step 2. Confirm your recording options (recording area, audio, quality and format) and activate the camera (if necessary).
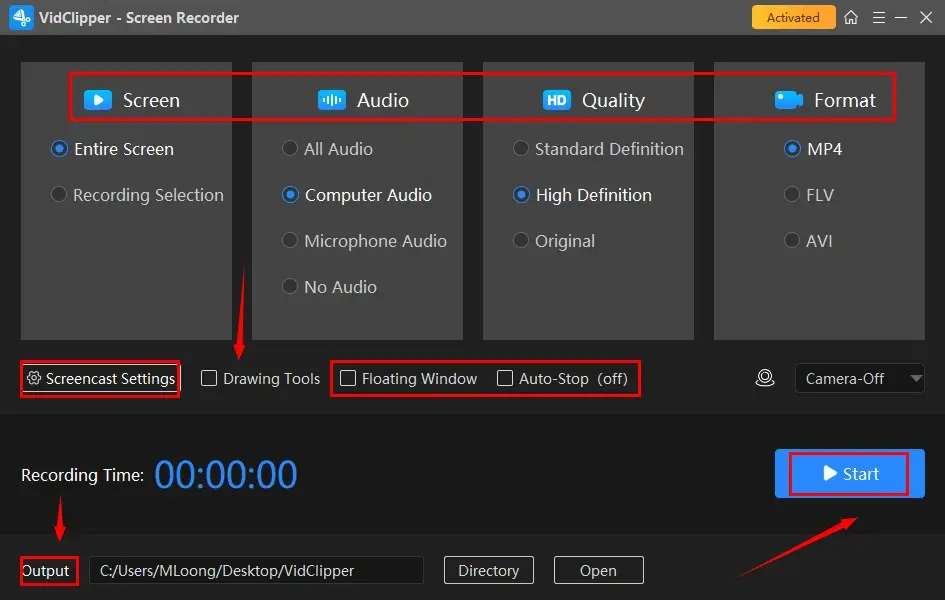
- As an attendee delivering a statement at a meeting, you are advised to choose recording selection + All audio + High Definition + MP4.
- As an attendee only, you are recommended to select recording selection + computer audio + High Definition + MP4.
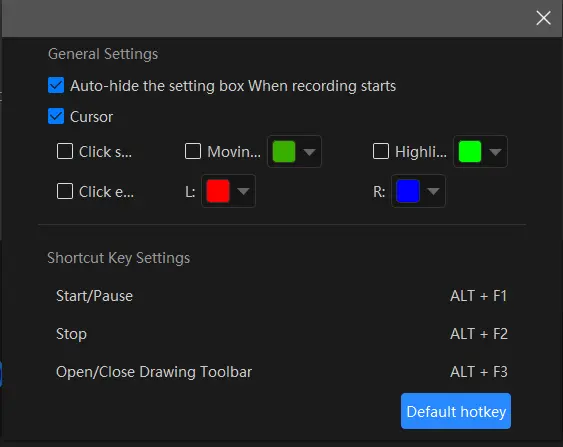
Step 3. Adjust the screencast settings if needed and then press Start (shortcut key–Alt+F1).
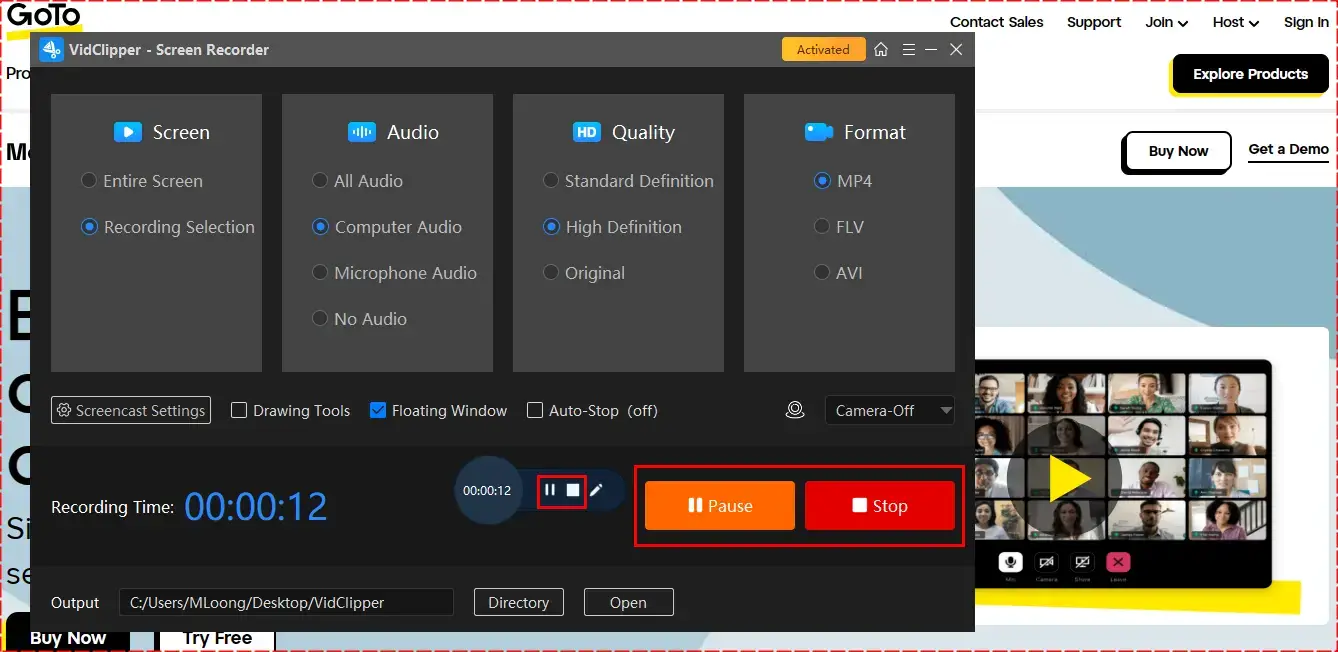
Step 4. Hit the Pause or Stop icon on the floating window or the recording page to suspend or end and save your recording (Shortcut keys: Pause/Resume–Alt+F1, Stop-Alt+F2).
Step 5. Choose your next move.
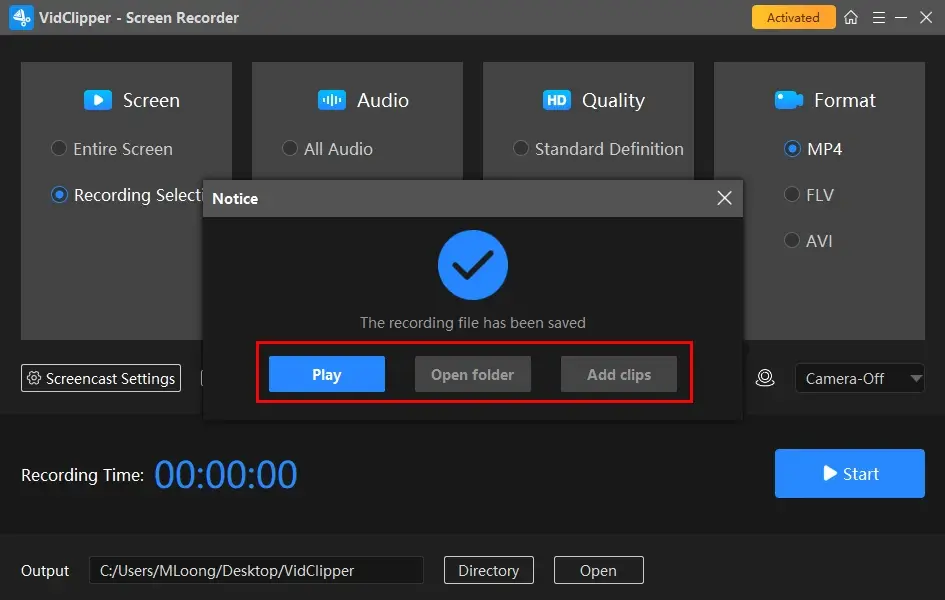
📢Note: *Add clips is a highly useful feature that helps you move the recording to VidClipper’s editing console. So you can edit your recording further there. For instance:
🙋♀️Additional Words for WorkinTool VidClipper
🌈What is inside the drawing toolbar and auto-stop feature?
- The Drawing Toolbar is a feature designed for you to draw lines or shapes and annotate directly on your recording, saving you the hassle of having to annotate or edit your Vimeo recordings later on.
- The Auto-Stop feature aims at an automatic end of your recording. You can expect a completed recording on your PC even if you are away from it. For example, you can use it to record last 30 seconds on PC.
🙋♂️For more information, please refer to this article: WorkinTool Capture Screen Recorder Review: Screen Record Anything.
🌈What other meetings can WorkinTool VidClipper capture?
✨Our Advice
✅OBS Studio (Mac)
OBS Studio, short for Open Broadcaster Software Studio, is a free and open-source program for screen recording and live streaming. It boasts professional screen recording features and strong compatibility. Additionally, OBS Studio offers a wide range of recording modes to meet users’ different needs, including window, display, browser and more. Hence, it is widely used by content creators, gamers and professionals to capture and broadcast their screen, gameplay or other video sources.
💡How to Capture GoToMeeting on Mac with OBS Studio?
1. Open OBS and then click + in the section-Sources.
2. Choose an ideal mode to record GoToMeeting.
[Window Capture (a desktop app) or Browser (online GoToMeeting) is recommended here.]
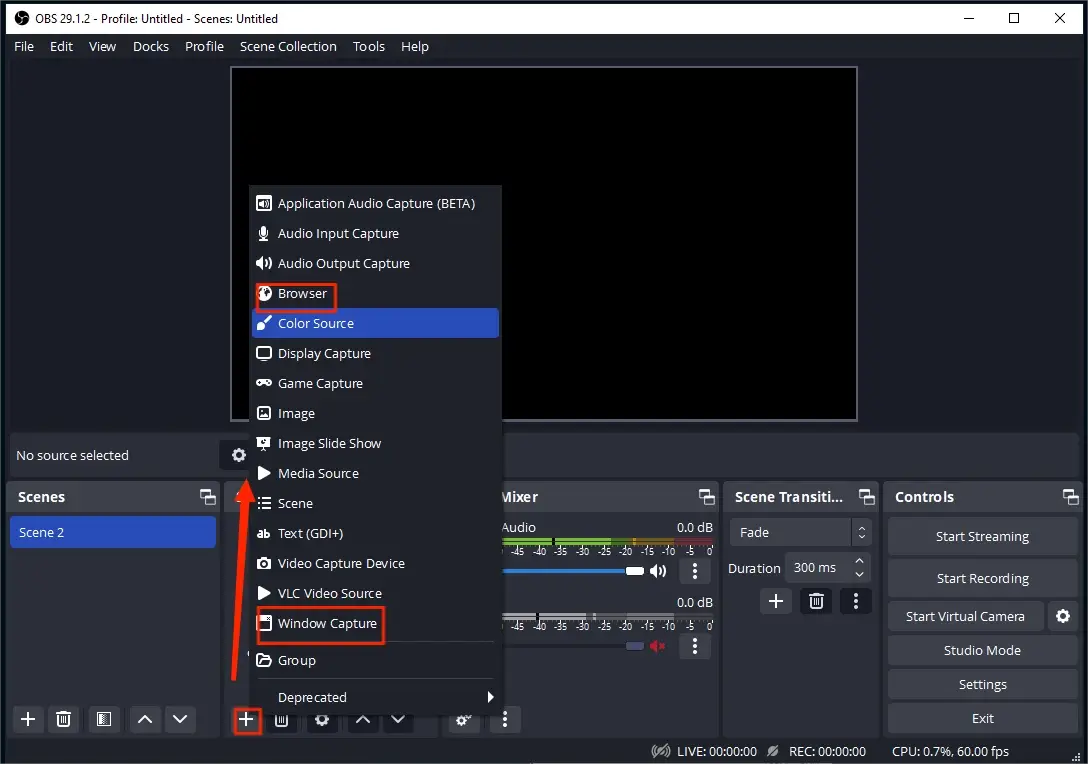
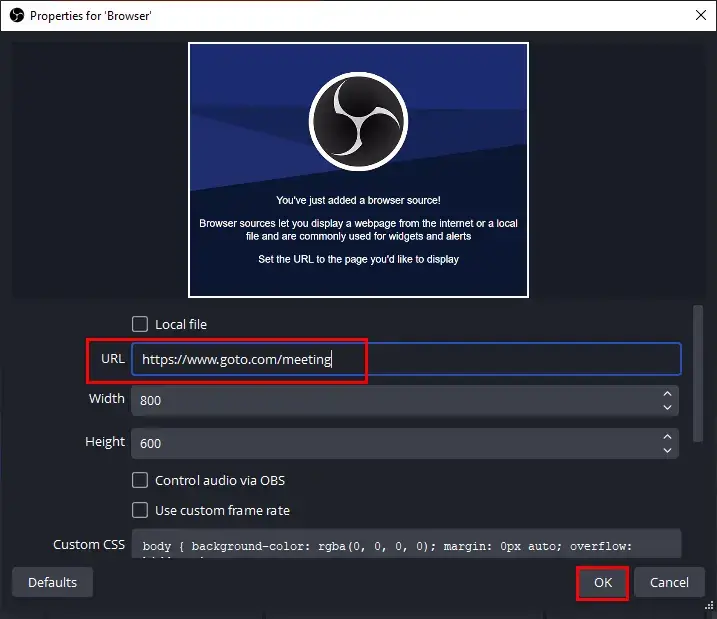
3. For example, select Browser and then name your project and press OK in the pop-up window.
4. Copy the URL of your GoTo meeting, paste it in the column beside URL and then hit OK.
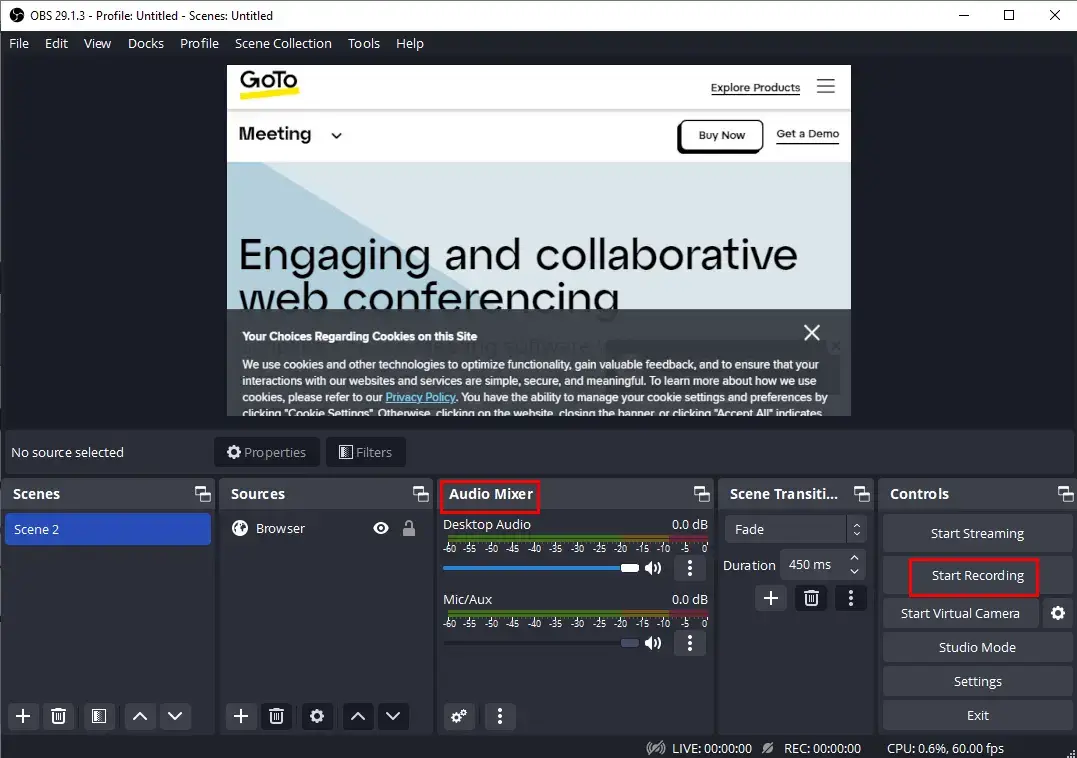
5. Customize your audio options in the Audio Mixer and then press Start Recording.
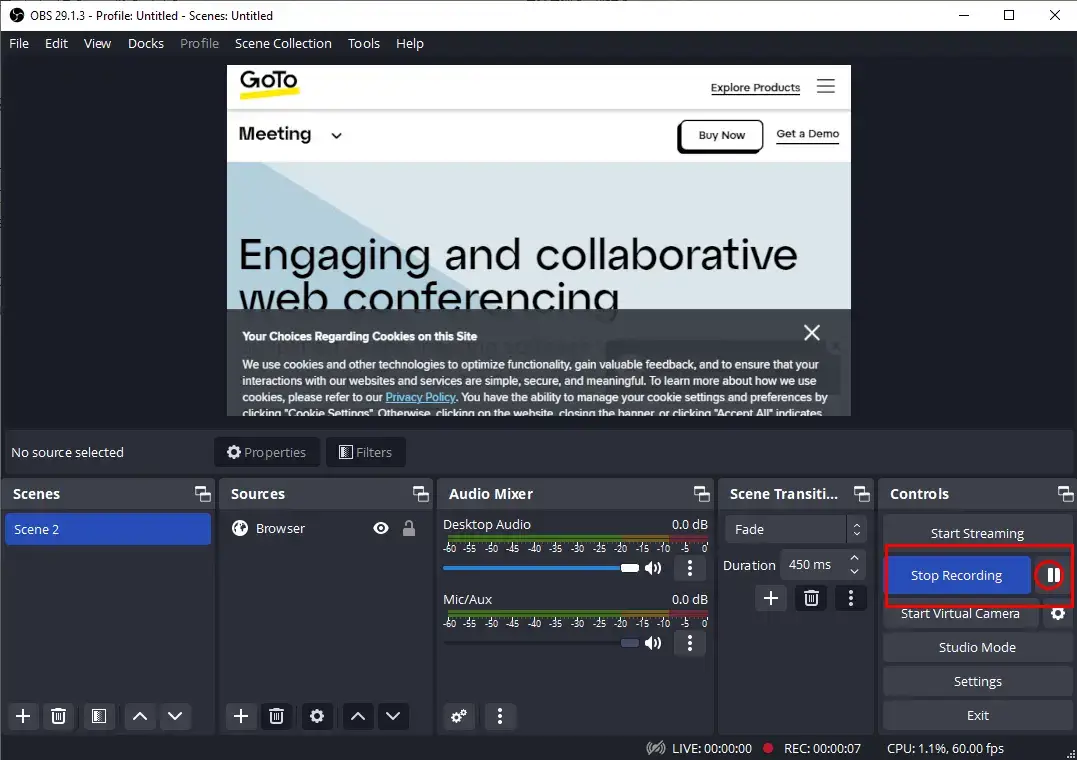
 6. Click Stop Recording to end and save your GoToMeeting recordings.
(Press the small pause icon to temporarily stop your recording.)
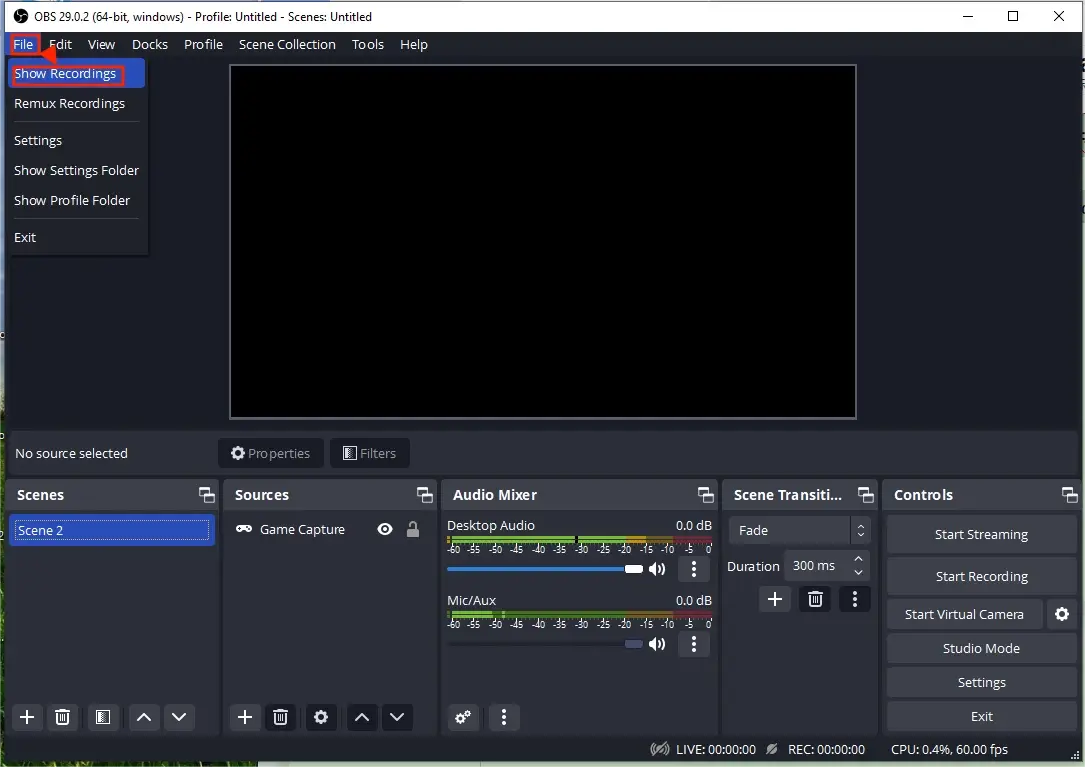
📢Note: To view your recording, please go to File > Show Recordings.
✨Our Advice
✅Screen Capture (Online)
Screen Capture is an online professional screen recording service. It allows users to capture content on their computer screens and/or Webcam without the need for a desktop app. It captures users’ minds with its simple interface and recording process. Moreover, Capture Screen provides them with various recording modes to satisfy their different needs, including window, tab and entire screen. Meanwhile, it is generally free to use; however, a watermark will be added to your recording if you try its free version.
💡How to Get a Recorded GoToMeeting Online via Screen Capture?
1). Open Screen Capture.
2). Choose your recording sources, including microphone, sound and Webcam, and then click Start Recording.
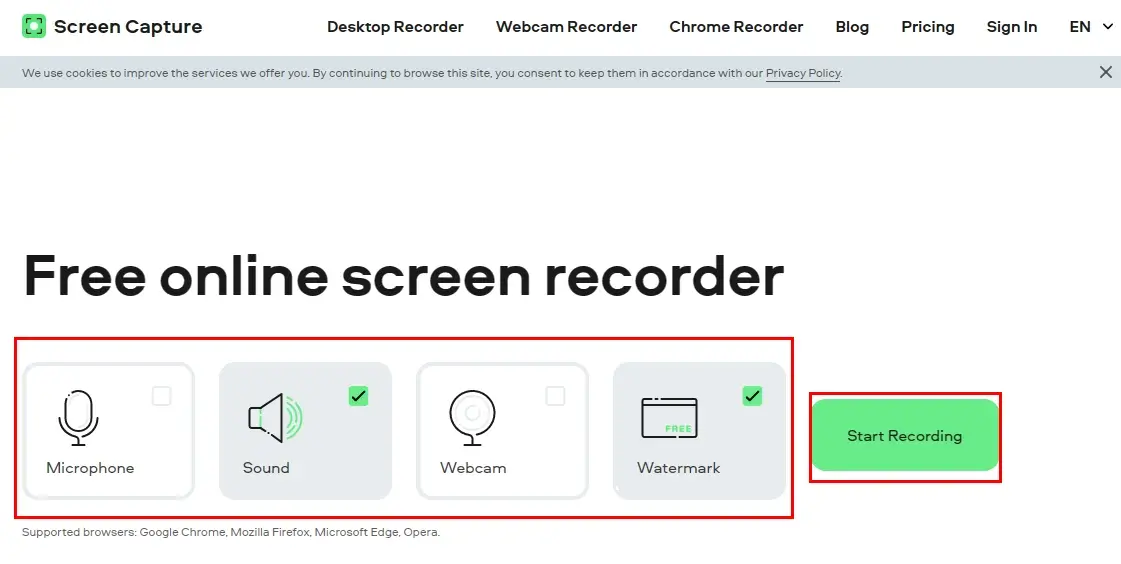
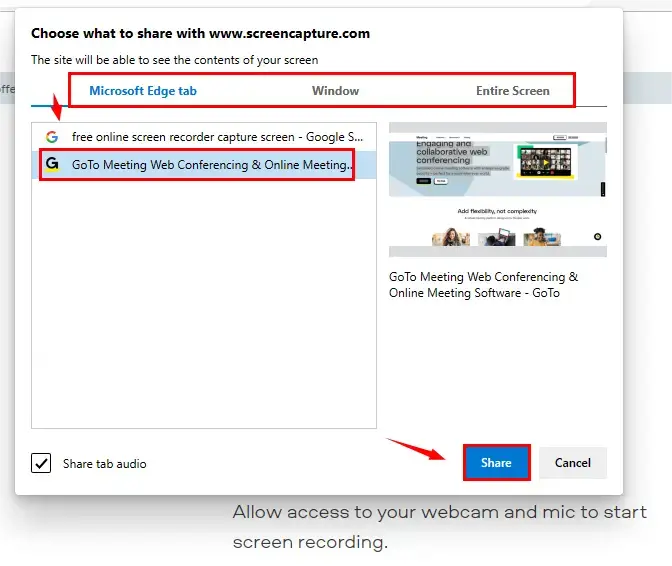
3). Select the content to share with Screen Capture and then press Share.
(Tab for online GoToMeeting while Window for a desktop app)
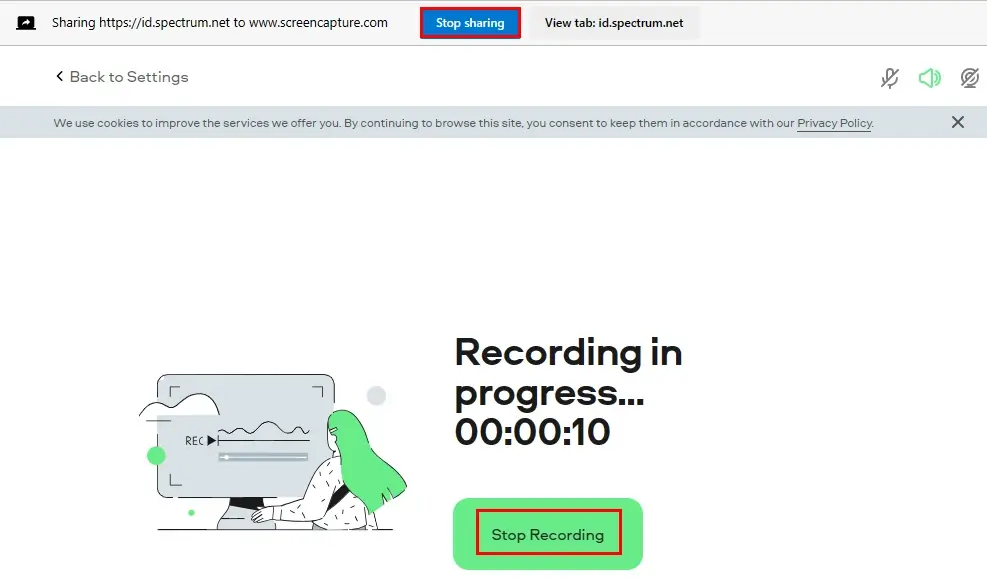
4). Hit Stop Recording on the recording page or Stop sharing on the target page to end your recording.
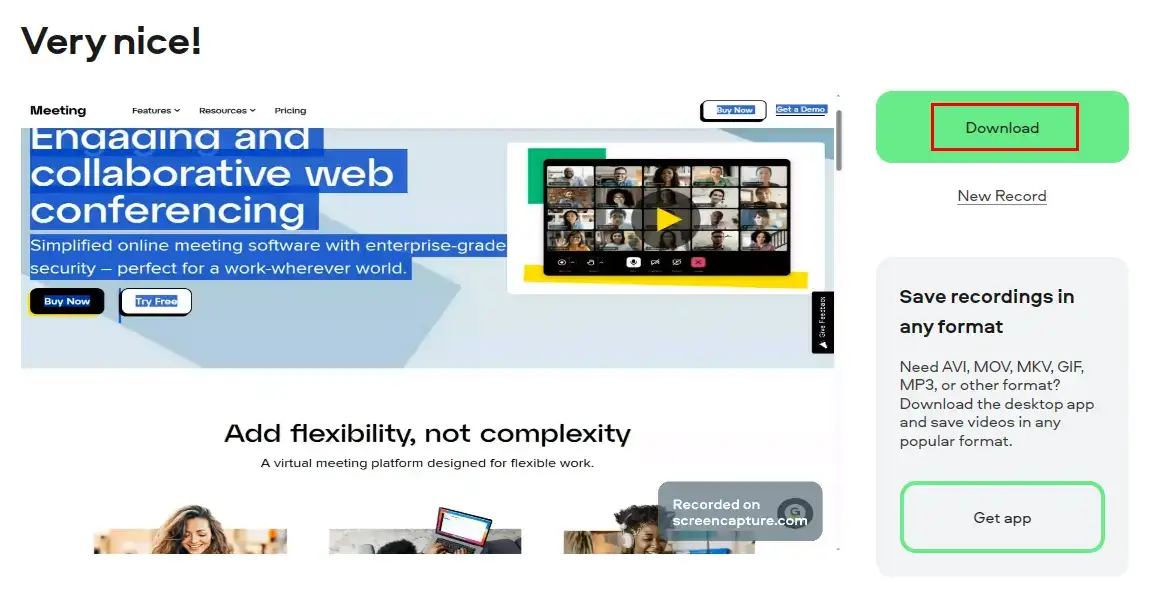
5). Click Download to save your recording.
✨Our Advice
More to Share
🎯How do I access a recorded GoToMeeting?
You can access your recorded videos by following the instructions below:
- Sign in to the GoTo web or desktop app.
- Navigate to the Meetings section.
- Select the Past option.
- Enable the Recorded toggle to filter the recorded sessions.
📣PS: If you don’t see any recorded sessions initially, you can use the filter located next to the Recorded toggle. This filter lets you view recordings from the last 7 days, 30 days or 12 months, depending on your preference.
🎯How do I download a video from GoToMeeting?
To realize this objective, you can
- Open your GoToMeeting app or website and then log into your account.
- Go to Meetings > Past.
- Click Download.
- Set your save path and then select Save to export your recording as MP4.
🎯What is the best GoToMeeting recorder?
It is hard to define the best app for GoToMeeting screen recording since different users may have different requirements. You need to figure out what your core demand is when picking a tool.
Here is a chart to compare the aforementioned apps in this article.
Final Thought
Here is the end of our discussion on how to record GoToMeeting as an attendee without permission on your PC. In summary, recording a meeting, session, webinar or training on GoToMeeting is an effective way to keep important information or turn it into a video tutorial or other materials in the future. With all the solutions mentioned in this blog post, you can fulfill this purpose without hassle.
However, if you are a Windows user willing to use a desktop program, WorkinTool VidClipper will be your ideal choice since it is user-friendly, easy to use, powerful to capture any content on your screen and super multi-functional to solve many of your problems.
Now, are you ready to capture a GoToMeeting session, webinar or training?

