How to Put a Filter on a Video for FREE on PC | 5 Ways
With the prevalence of video sharing on social media platforms, video filter is an essential trick for video editing. How can I effectively and easily add video filter effects? Please spare a few minutes for this blog post that discusses how to put a filter on a video on PC. You will be introduced to five simple, practical and FREE ways:
🎯How to Put a Filter on a Video in Windows–Microsoft Photos and WorkinTool VidClipper
🎯How to Add Video Effects on Mac–VLC Media Player
🎯How to Insert Filter Effects into a Video Online–Clideo
🎯Additional: How to Put a Filter on a Video on Windows and Mac–VLC Media Player
All the aforementioned methods prove to be easy, helpful and free, so you are welcome to try any of them until a suitable one is located. However, it is strongly advisable to use WorkinTool VidClipper since it is convenient, user-friendly, powerful and free with no output watermark. Please continue your reading to learn more about specific solutions and experience them by yourself.
How to Put a Filter on a Video for FREE on PC | 5 Ways [Windows, Mac and Online]
With the prevalence of video sharing on social media platforms, video filter is an essential trick for video editing. How can I effectively and easily add video filter effects? Please spare a few minutes for this blog post that discusses how to put a filter on a video on PC. You will be introduced to four simple, practical and FREE ways:
| Put a Filter on a Video in Windows |
|
| Add Video Effects on Mac |
|
| Insert Filter Effects into a Video Online |
|
| Additional: Put a Filter on a Video on Windows and Mac |
|
Now, let’s begin our discussion.
Words Before Video Filter Insertion
📌What is video filter?
Usually, video filters are overlays that correct or adjust the colors on your clip. They help to change color, darken or brighten a video. The commonly used video filters are:
| Saturated Filters | To highlight the contrast and over-saturate the color. |
| Monochrome Filters | To make a video black and white. |
| Cinematic Filters | In order to create a movie-like feeling for your clip. |
| High-Contrast Filters | To make your video contrast more outstanding. |
| Color-Changing Filters | To alter or adjust the color of your video. |
📌Why should you put a filter on a video?
The ultimate purpose of video filter addition is definitely to beautify your videos and make them conspicuous. However, these are some general reasons for doing so:
- Color Adjustment and Correction: Sometimes, a camera may fail to capture the exact scene displayed in front of you. Hence, video filters are helpful to change the situation by quickly correcting color imbalances in your clips or applying consistent color throughout them.
- Tone Change: The tone of your video can be altered when filters are added to your videos. For instance, inserting high-contrast filters will create a more dramatic sense.
- Branding and Presentation: Putting video filters is the quickest way to endow your clips with a professionally-edited look. When you intend to promote your brand or deliver a formal presentation, a video without any editing will be the last thing you want to do since it won’t be able to grip your potential customers’ minds.
So how can I add filters to a video exactly? Please read on to find out the answers.
How to Put a Filter on a Video for FREE on Windows
This chapter will inform you of two easy and useful methods of video filter effects addition.
1. How to Add Video Filter Effects Through Video Editor in Microsoft Photos?
The fastest way to realize this goal is Microsoft Photos, a built-in program on Windows 10 or 11. More than just a photo viewer and video player, Photos has become a good image and video editor after undergoing powerful updation. Video filters are one of its editing features and 14 are available for you to customize your clips.
Here is what you need to do:
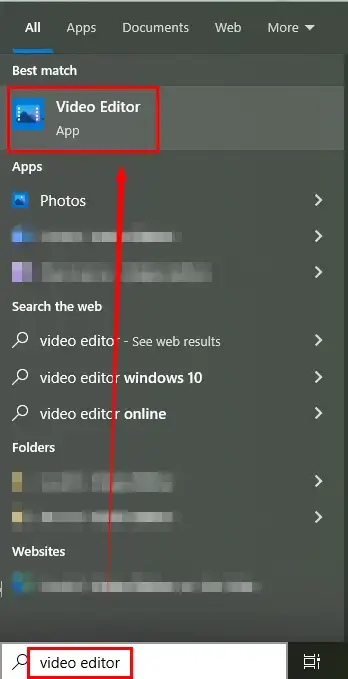
1). Open Video Editor by typing the same words in the search column beside the Win icon.
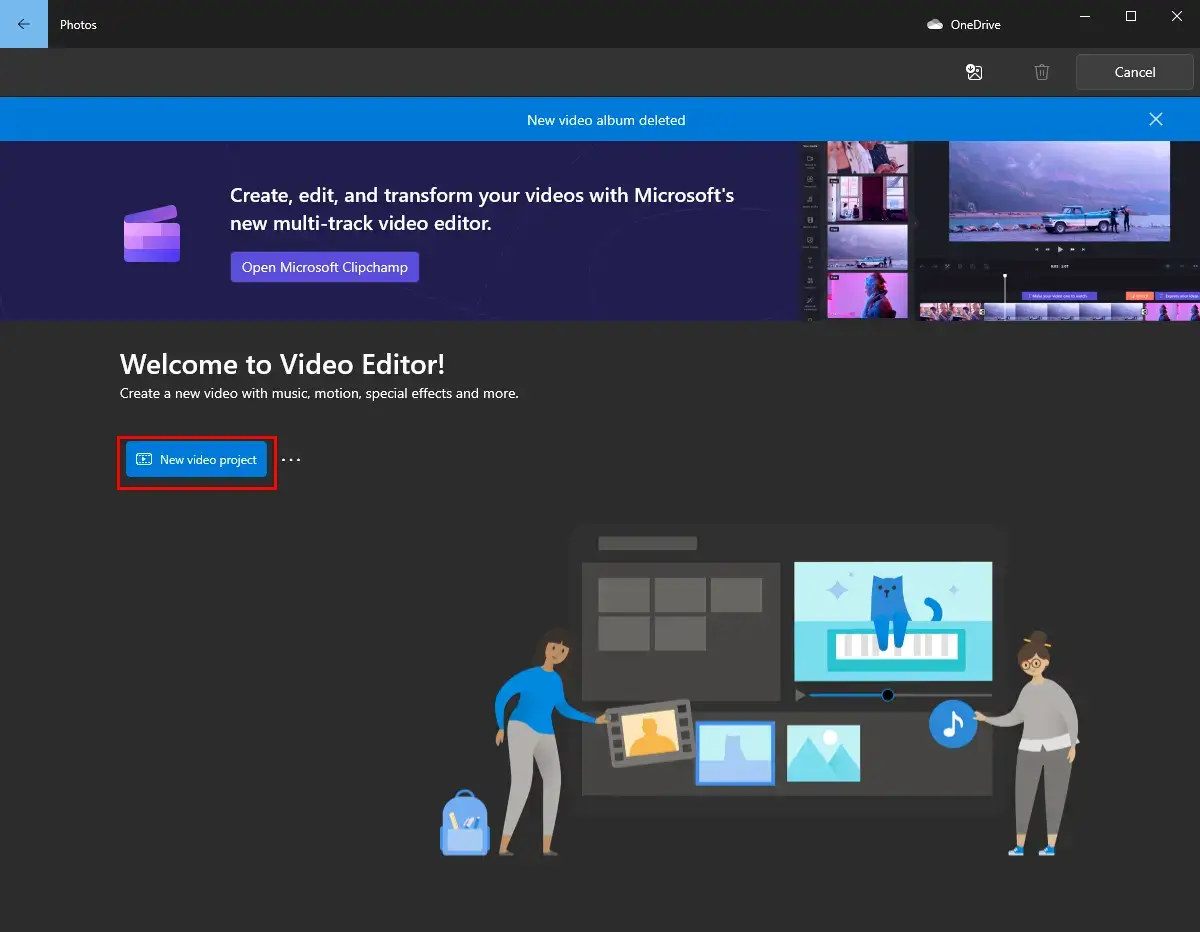
2). Click New video project to enter the editing interface and then name your project if you want to.
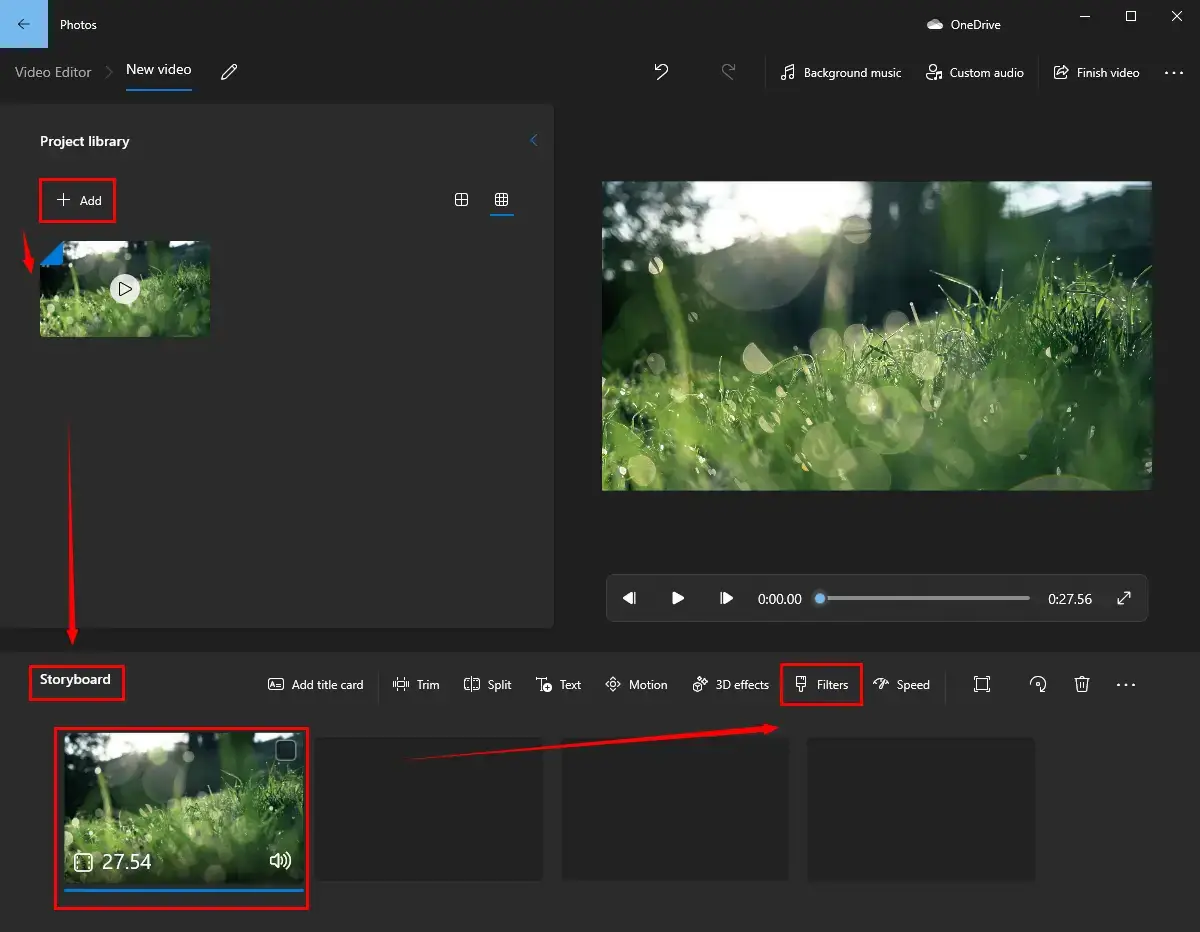
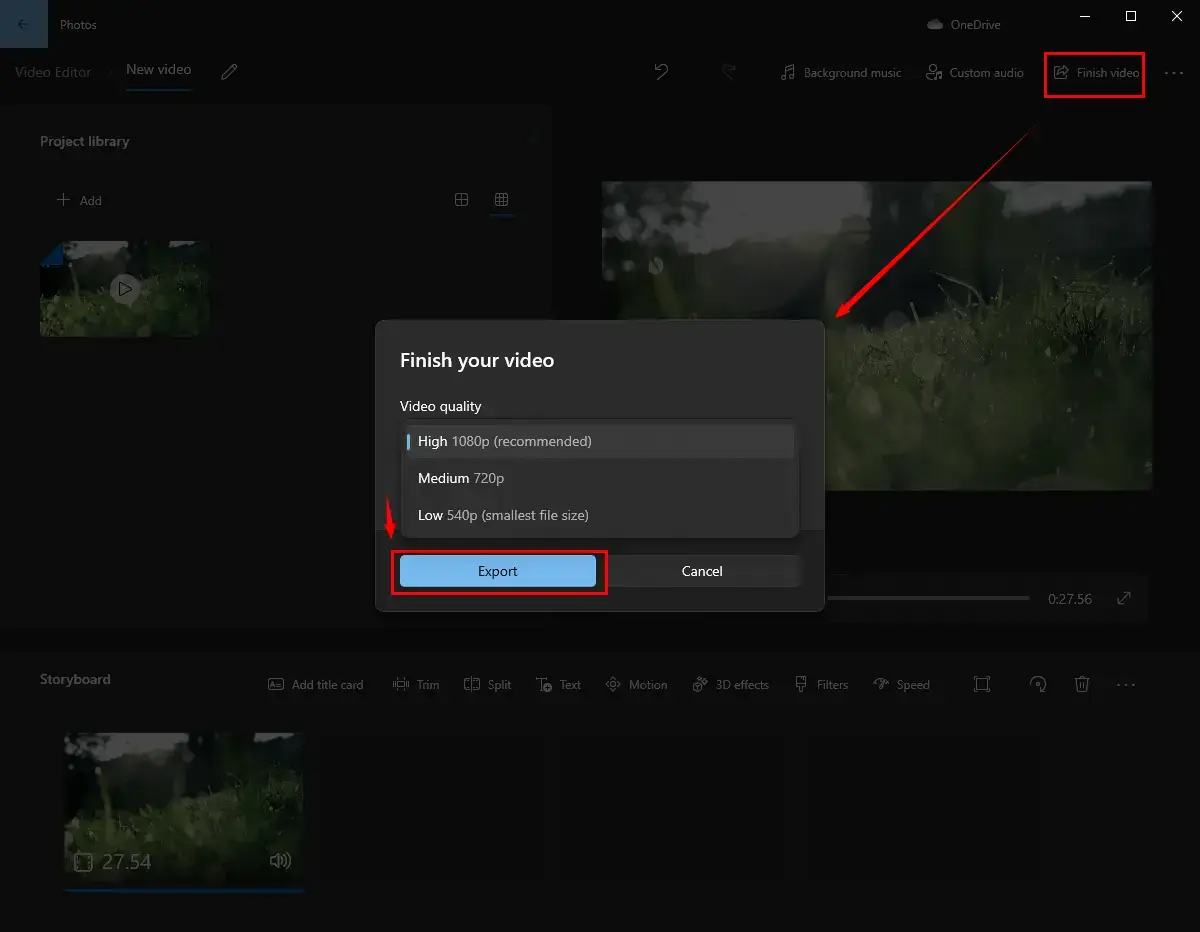
3). Hit +Add to import your video, drag it to the frame under Storyboard and then find Filters.
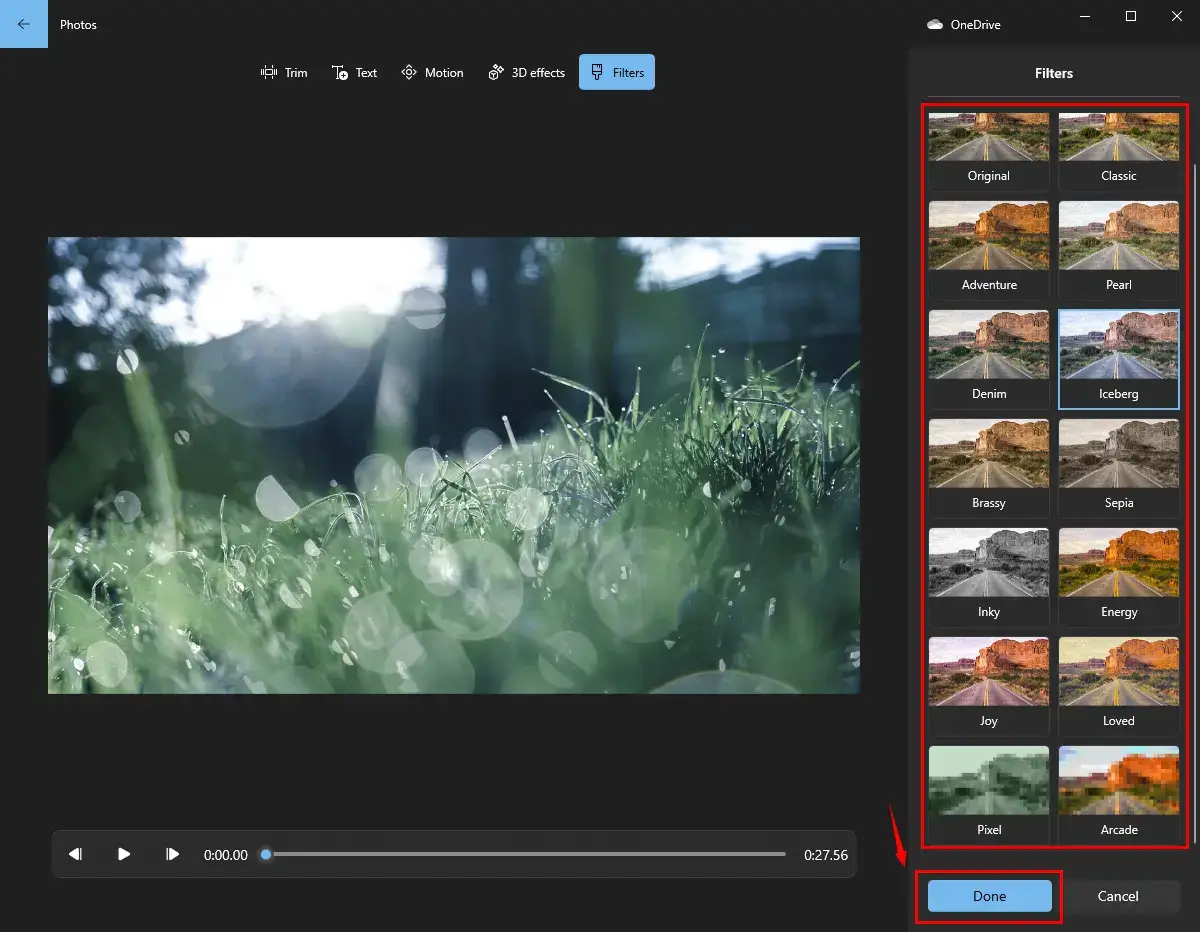
4). Choose any filter that fascinates you and then click Done.
5). Press Finish video, select the video quality and then hit Export.
| ✨The Verdict | |
| 😎WoW | 😒Oops |
|
|
2. How to Put a Filter on a Video Using WorkinTool VidClipper?
If you are a video content creator or a frequent video sharer on social media, the approach above might not be enough for you. A handy desktop video editor would be an ideal solution. Here, you can pay particular attention to WorkinTool VidClipper.
WorkinToo VidClipper is an acclaimed all-around, free video editor. Aspiring to offer useful software simple enough for even IT beginners, WorkinTool’s designers render it a user-friendly interface with powerful editing features to deal with both professional and basic tasks. When it comes to video filter effects insertion, VidClipper allows you to accomplish this mission within a few clicks. There are more reasons for picking this helpful tool:
| WorkinTool VidClipper: Decorate Your Clips with Any Filter You Want | ||
| ⭐100% free without signup | ⭐No output watermark | 
|
| ⭐60+ categorized filters | ⭐Edit more with 300+ transitions, 70+ overlay effects, 200+ elements and 600+ sound effects | |
| ⭐Quick editing features for non-professionals | ⭐Powerful editing console for video experts | |
| ⭐Custom output settings | ⭐Multiple video formats | |
Please follow the steps below to apply video filters to a video via WorkinTool VidClipper:
Step 1. Download and install WorkinTool VidClipper.

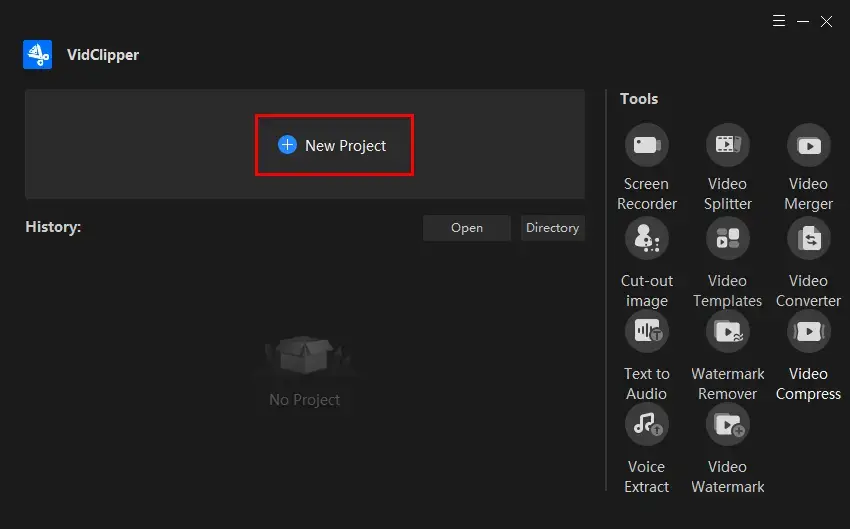
Step 2. Launch it and click +New Project to open the editing console.
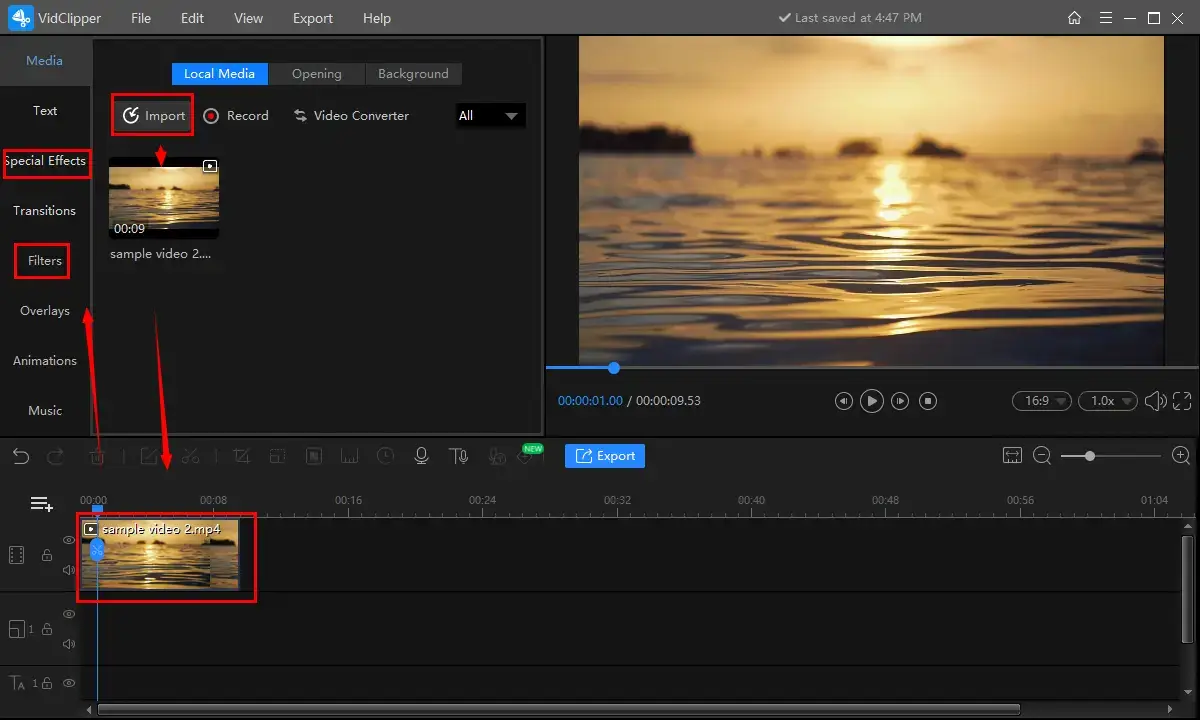
Step 3. Hit Import to upload your video, drag it to the timeline below and then go to Filters or Special Effects.
(You can also drag your clip to the + area to import it.)
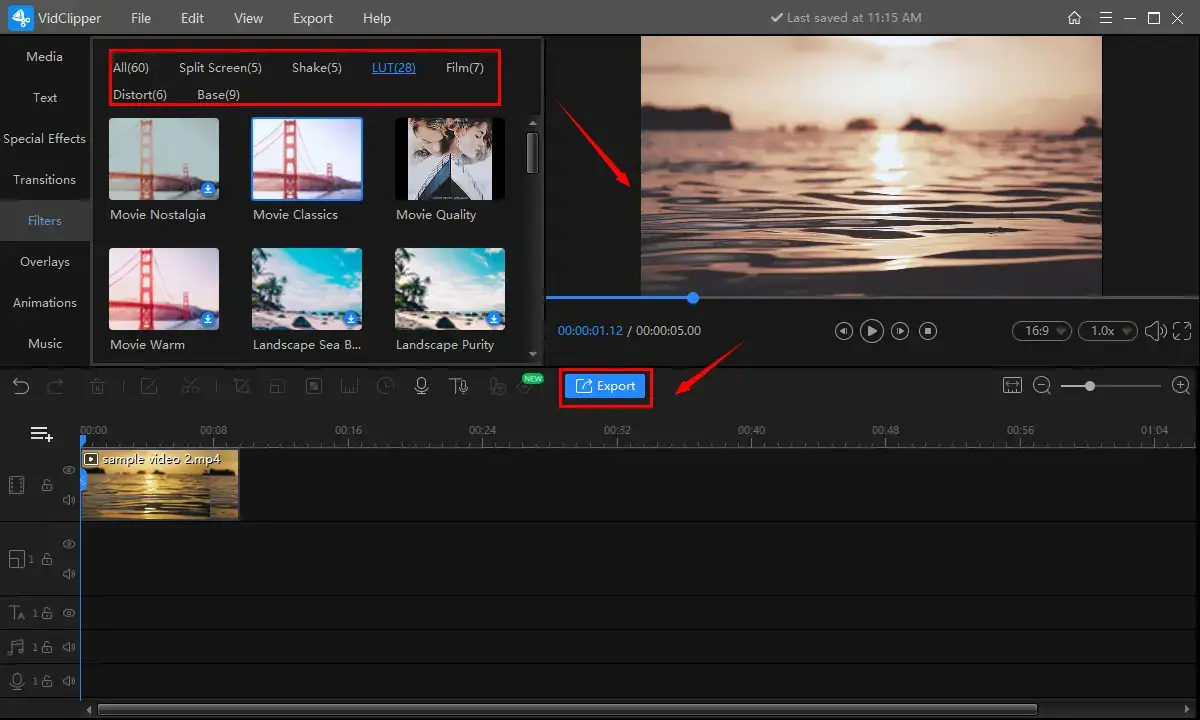
Step 4. Select a wanted filter, preview the effect on the player on the right and then press Export.
| Filters | ||
| Mode | Notes | Filter Numbers |
| Split-Screen | Add a split-screen effect so as to make a split screen video. | 5 |
| Shake | Make your video shaky or add wave-like effects to it. | 5 |
| LUT | Automatically adjust your video color to endow it with different senses. | 28 |
| Film | Give your clip a cinematic air. | 7 |
| Distort | Mirror, distort or blur some part of your clip. | 6 |
| Base | Alter the background of your video, including watercolor, grayscale, zoom in, lattice and more. | 9 |
Step 5. Choose the video format, adjust the output settings, finish your directory settings and then click Export.
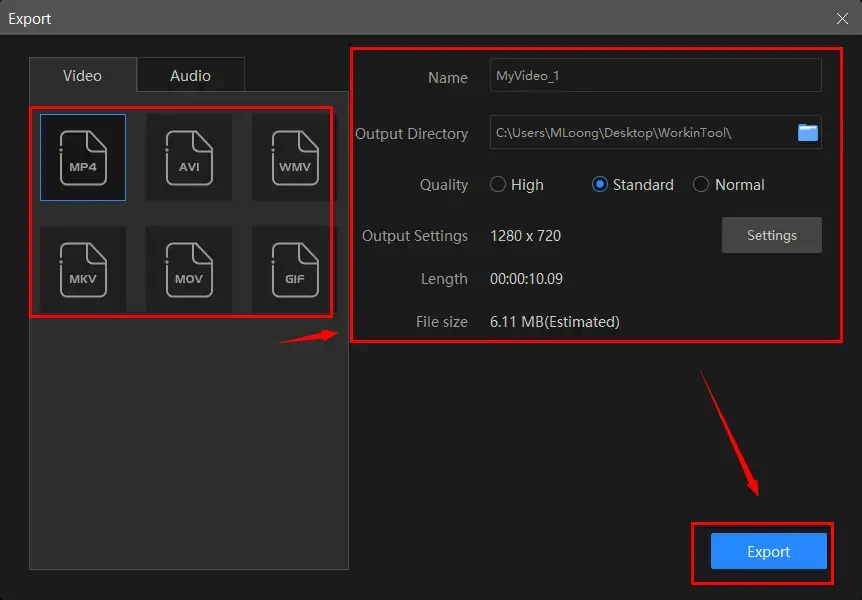
Notes of Export Settings |
||
| Quality | High, Standard and Normal | From high definition to low definition |
| Video | Encoder | Convert digital video to analog video signals.
H264 and mpeg 4 |
| Resolution Rate |
The number of pixels in each frame determines the amount of detail in your video or how realistic and clear the video is displayed. From 432 x 240 to 1920 x 1080 to custom |
|
| Frame Rate | The measurement of how quickly a number of frames appear within a second, which is why it’s also called FPS (frames per second).
From 5 to 60 to custom |
|
| Bit Rate | The measurement of the amount of data used to encode a single second of video.
From 512 to 40000 to custom |
|
| Audio | Encoder | An algorithm that compresses and decompresses digital audio data according to a given audio file format or streaming audio format.
Mpeg aac |
| Sample Rate |
A measurement of the samples per second taken by the system from a continuous digital signal. It determines the range of frequencies captured in digital audio. From 16000 to 48000 |
|
| Channel | A representation of sound coming from or going to a single point.
1 (Mono) and 2 (Stereo) |
|
| Bit Rate | The amount of data transferred into audio
From 32 to 320 |
|
Step 6. Hit Open Folder to lead you to your new clip with a filter on.
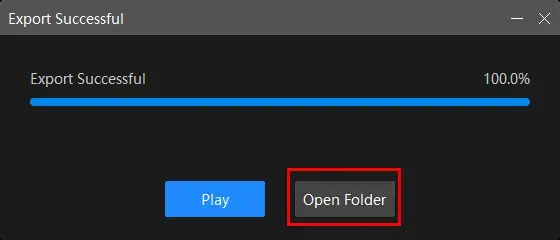
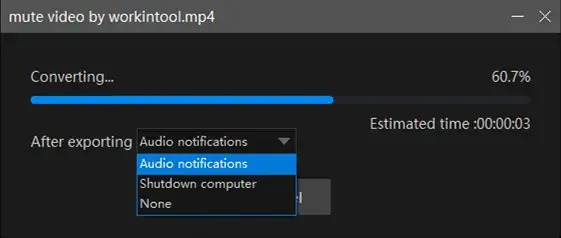
📢PS: The reminder or post-export status can be optional when your video filter addition is under processing, including a ringtone reminder, PC shut down and no further operation.
📝More About WorkinTool VidClipper
💡Can I edit my filtered video further in WorkinTool VidClipper?
Certainly. Practical editing features are available in WorkinTool VidClipper. For instance, several quick editing modes are designed on the opening page to improve your work efficiency, including screen recorder, video splitter, video merger, video background remover, video templates, text-to-audio converter and watermark remover.
Additionally, its professional editing console boasts various valuable editing features, including texts, transitions, special effects, animations and sound, in addition to video filters. Hence, VidClipper enables you to
- Remove background noise from this video
- Add subtitles to this video
- Freeze frame this video
- Make a video montage
- Add text to a video
- Reverse a video
- Overlay videos
- Trim a video
- Flip a video
| ✨The Verdict | |
| 😎WoW | 😒Oops |
|
|
How to Add Video Effects for FREE on Mac
iMovie will be the first answer to this question, though there are so many ones. It is the most simple and convenient method of putting a filter on a video on Mac.
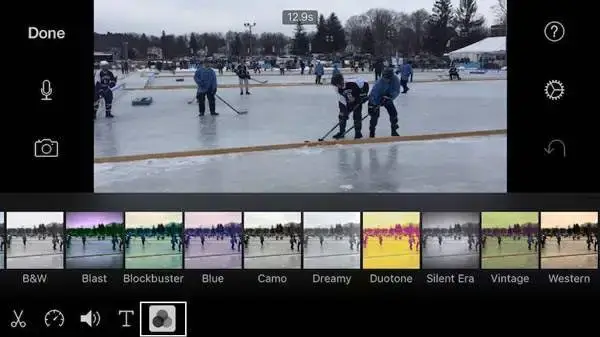
iMovie is a powerful media player and editor pre-installed on macOS. It allows you to undertake basic video editing tasks effortlessly and instantly. Video filter is one of its editing features and the categories include color adjustments, crop, rotate, stabilize, shaky, transitions, speed, filters, green screen, split-screen, picture-in-picture, etc. It is useful enough for a video sharer.
Here are the instructions on adding video filer effects to a video on Mac:
Step 1. Open iMovie on Mac and then drag your clip to the timeline.
(Click on the video in the timeline to reveal the inspector at the bottom of the screen.)
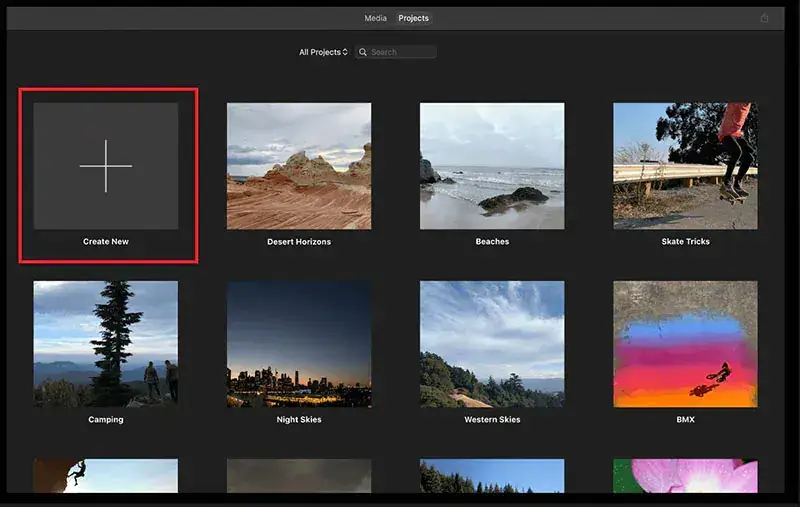
Step 2. Hit Filter to open various filters in iMovie.
Step 3. Pick your preferred filter effects and then preview each of them in the viewer.
Step 4. Save the effects and tap outside the filters to discard them.
| ✨The Verdict | |
| 😎WoW | 😒Oops |
|
|
How to Insert Filter Effects into a Video for FREE Online
This chapter will be suitable for those unwilling to download and install or use any offline software. A free online video editor will also be effective for video filter insertion. For instance, Clideo is such a remarkable tool.
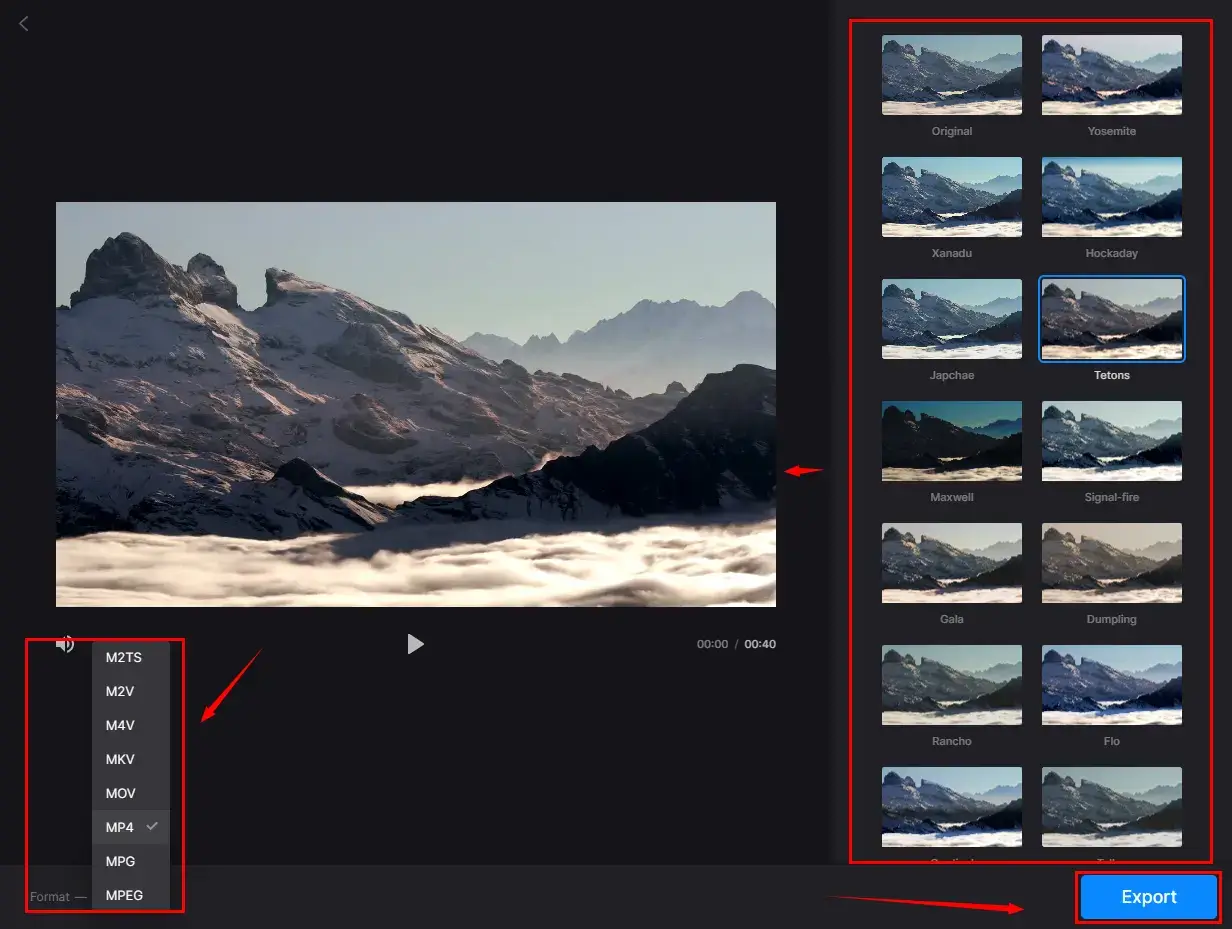
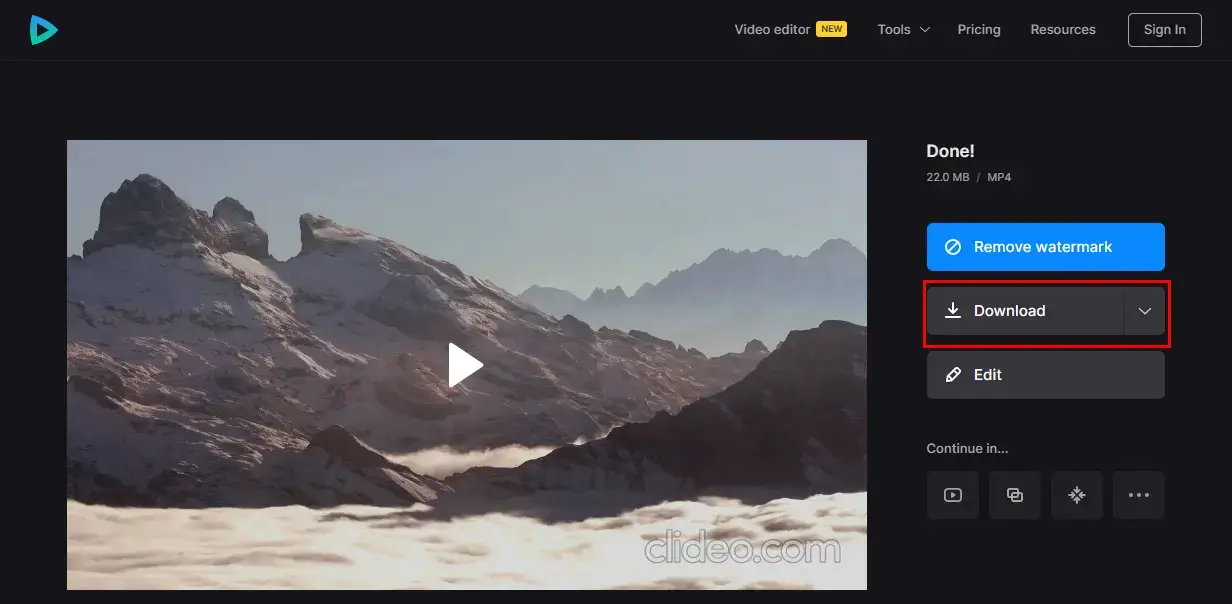
Clideo is an easy and free online video solution provider with an array of valuable tools, such as video merger, compressor, cutter, resizer, cropper, speed changer, meme maker and more. With its tool–Filter Video, you can put a filter on a video with great ease. 18 filters are equipped to meet your different needs. Moreover, it supports importing a clip from and exporting your output to a cloud storage device like Google Drive or Dropbox. Though it offers users a free version, limitations apply to it, such as output watermark and storage time limit. You must upgrade it to a pro version to access its full features.
Please read the following guidance on video filter effect insertion in Clideo:
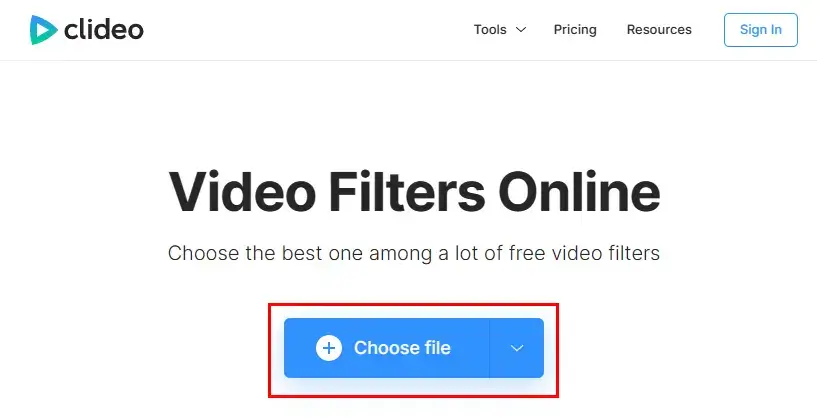
1. Open Clideo’s Filter Video tool and then click Choose file to import a video.
2. Select a desired filter and the video format, then press Export.
3. Hit Download to get your filtered clip.
| ✨The Verdict | |
| 😎WoW | 😎Oops |
|
|
Additional Words for Video Filter Addition
🎯How to Put a Filter on a Video with VLC?
VLC media player is a practical, free and open-source audio and video player. After several rounds of updation, it has become a handy audio and video editor able to satisfy your basic editing needs, including video filter addition. Additionally, VLC holds strong compatibility with almost all mainstream platforms like Windows, macOS and even Linux.
Please refer to the tutorial on putting a filter on a video with VLC:
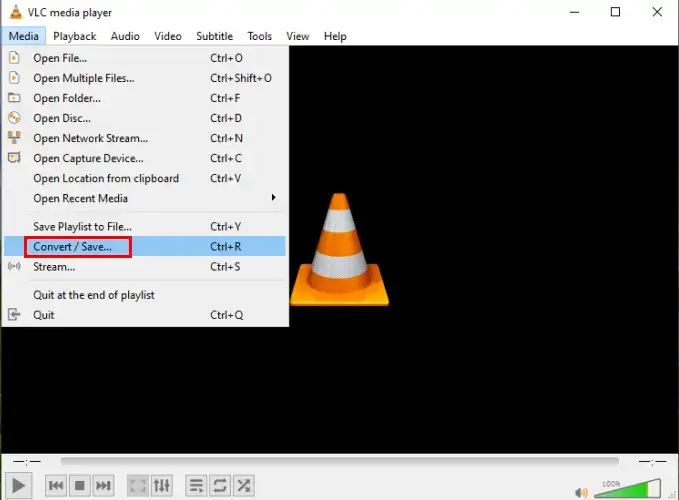
1. Launch VLC and then go to Media > Convert/Save.
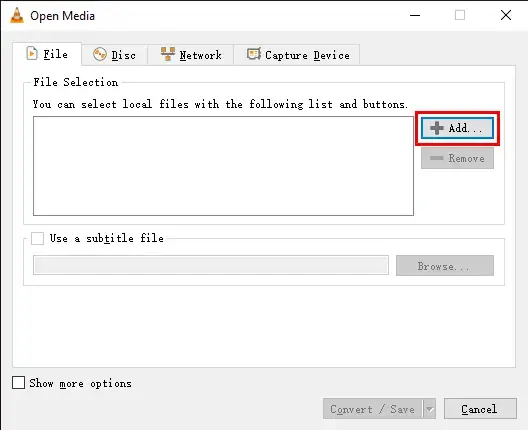
2. Click +Add to import your video and then Convert/Save.
3. Hit the wrench-like icon in the section-Settings to open its video adjustment console.

4. Navigate to Video codec > Filters > Save.
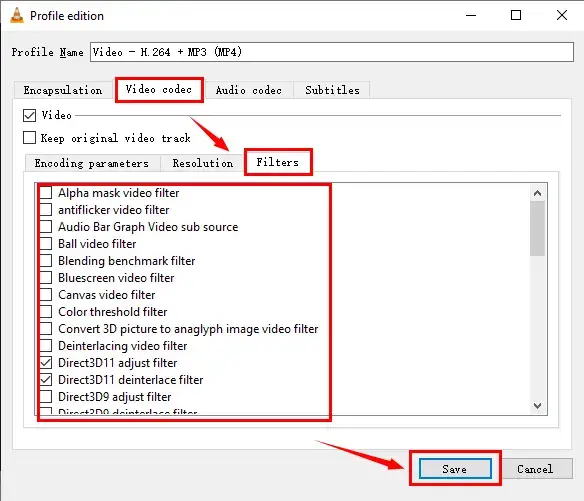
5. Click Media > Convert/Save to export your filtered clip.
Or you can
1. Go to Media > Open file to import your video.
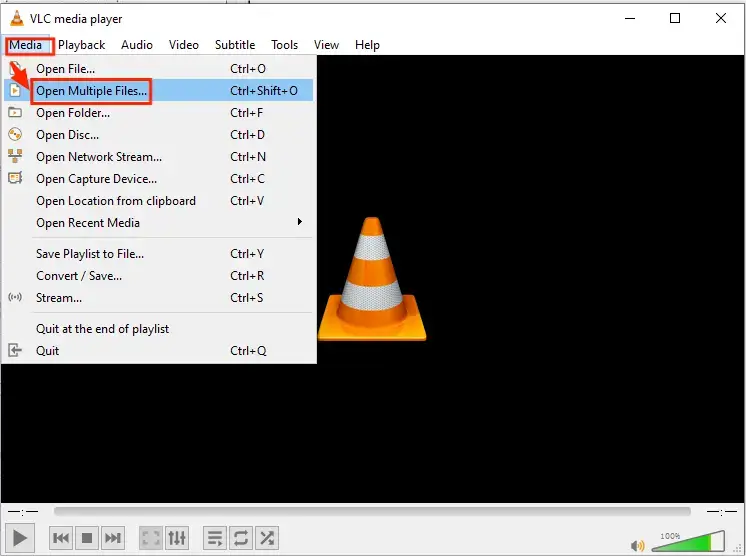
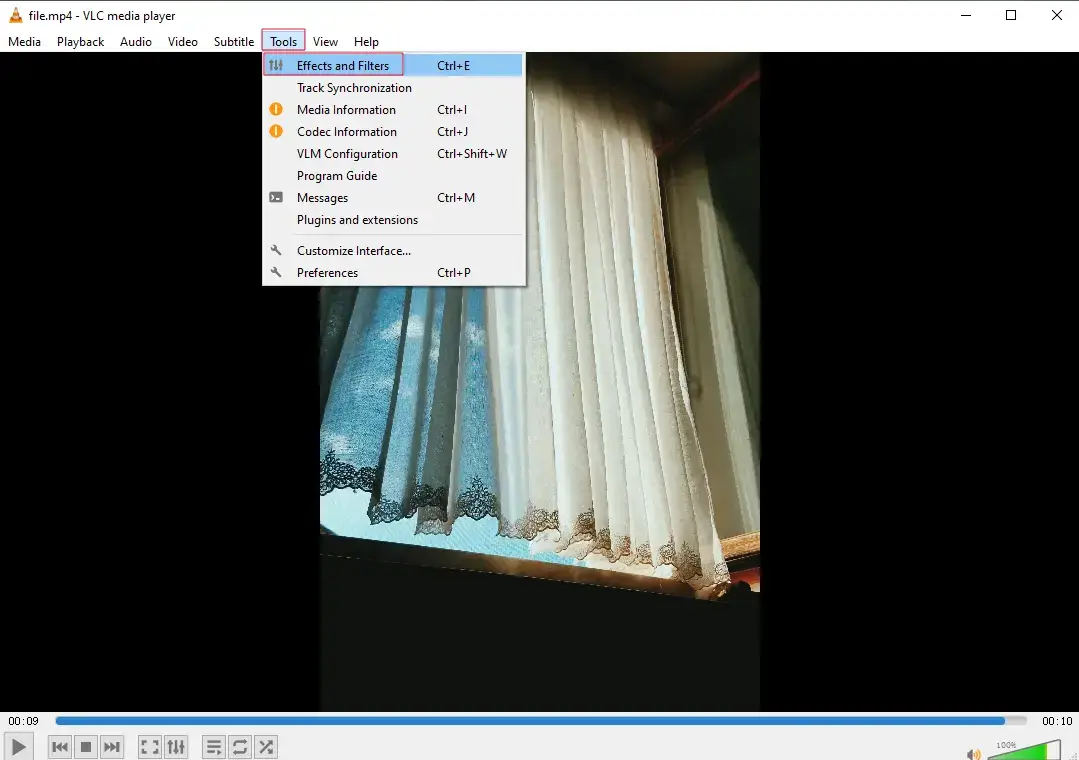
2. Then, choose Tools > Effects and Filters.
3. Navigate to Video Effects > Essentials (color adjustment) or Advanced (video filters) > Save.
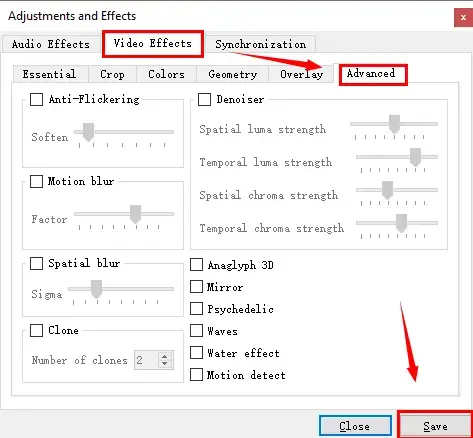
4. Hit Media > Convert/Save to get your new clip.
| ✨The Verdict | |
| 😎WoW | 😎Oops |
|
|
Final Words
Video filter addition is now quite a common technique in a modern society dominated by social media. We sincerely hope that you will gain a clear understanding of how to put a filter on a video on PC after finishing this article. All the aforementioned methods prove to be easy, helpful and free, so you are welcome to try any of them until a suitable one is located. However, it is strongly advisable to use WorkinTool VidClipper since it is convenient, user-friendly, powerful and free with no output watermark.
Now, are you ready to add filters to your videos?


