How to Make a Reaction Video on YouTube in 2024 [Easy]
Have you watched some videos with a small window or split screen displaying a viewer’s opinions on YouTube? This type of video is called a reaction video. These videos have gained immense popularity in recent years, allowing content creators to share their genuine and entertaining reactions to various media, such as sports videos, epic fails, gameplay, music and even online content. Whether you are a professional YouTuber or a random video maker simply looking to express your thoughts and emotions in a fun and engaging way, this article will show you how to make a reaction video on your computer for YouTube.
📌Windows–WorkinTool VidClipper
📌Mac/Online–Clicpchamp
🌟Creating a reaction video on YouTube can be a fun and engaging way to express yourself, connect with your audience and share your thoughts on various types of content. By using the app and following the steps outlined in this article, you can confidently embark on making reaction videos and adding your personal touch to them.
🧐However, if you are a Windows user willing to use a desktop app, WorkinTool VidClipper video editor is your perfect option. It is user-friendly, easy to use, reliable and highly multi-functional to solve many problems, more than just a reaction video creation. Now, please start your reading to learn about specific solutions and experience all of them by yourself.
How to Make a Reaction Video on YouTube in 2024 [Easy]
Have you watched some videos with a small window or split screen displaying a viewer’s opinions on YouTube? This type of video is called a reaction video. These videos have gained immense popularity in recent years, allowing content creators to share their genuine and entertaining reactions to various media, such as sports videos, epic fails, gameplay, music and even online content. Whether you are a professional YouTuber or a random video maker simply looking to express your thoughts and emotions in a fun and engaging way, this article will show you how to make a reaction video on your computer for YouTube.
Now, please join us to dive into the exciting world of reaction videos and unleash your creativity in the digital realm.
Before Editing a Reaction Video
📌What is a reaction video?
A reaction video is a type of video content where an individual or a group of people record their genuine reactions while watching or experiencing a particular media, such as a video, movie, TV show, music or online content. The main focus of a reaction video is capturing the individuals’ emotional responses, commentary and facial expressions as they engage with the media.
Creators often add their own commentary, insights and personal touch to the reaction video to enhance the viewer’s experience. Some reaction videos may also include additional elements like on-screen graphics, subtitles or split-screen views to provide context or emphasize specific moments.
Reaction videos have been extremely prevalent on various platforms, particularly video-sharing ones like TikTok and YouTube. They offer a unique form of entertainment that allows viewers to experience others’ reactions and share their emotional journey. Reaction videos can be humorous, insightful or even thought-provoking, depending on the content being reacted to and the creator’s personality.
📌Why do reaction videos exist?
Reaction videos exist for several reasons. Besides, their popularity can be attributable to a combination of factors. Here are some key reasons listed below:
- Entertainment Value: Reaction videos offer entertainment value by letting viewers witness and share the genuine reactions of others.
- Social Connection: Reaction videos can foster a sense of belonging and create a space for like-minded individuals to connect and engage.
- Exploration of Content: Reaction videos allow viewers to discover new content through others’ perspectives, helping them decide whether they want to engage with the media independently.
- Commentary and Insights: The content in reaction videos adds additional value to the videos to enhance the viewing experience, spark discussions and provide a fresh take on the content.
So, how can I make reaction videos? Please read on to learn about specific solutions on different computer platforms.
How to Make a Reaction Video on Windows
Since doing reaction videos is an advanced editing technique, you need a handy video editing app to help you with this goal. Here, please take a look at WorkinTool VidClipper.
✅WorkinTool VidClipper
VidClipper Video Editor is an acclaimed and valuable tool from the WorkinTool software family. Aspiring to present a practical tool for everyone, the WorkinTool team has upgraded VidClipper to a super multi-functional app with the following (but not limited to) features:
Hence, it saves you the trouble of finding and installing them individually, which is time-saving and efficiency-boosting.
Additionally, VidClipper can serve as your first video editing software that makes your editing career take off. Thanks to its simple and intuitive interface with several useful quick editing tools, beginners will find it convenient and easy to cope with their basic editing tasks. Professionals can rely on its editing console to create professional-looking or movie-like videos with the help of its advanced editing features. Hence, it is an ideal alternative to Adobe Premiere Pro, which is more straightforward and lightweight.
(📃More info: WorkinTool VidClipper Review)
💡How to Make a Reaction Video Using WorkinTool VidClipper
To realize this goal, VidClipper video editor offers users three ways.
- Add a picture-in-picture effect.
- Make a split-screen video or a video collage.
- Screen record your reaction.
Here are the specific instructions.
If you have already shot a video clip demonstrating your reaction before, you can resort to the first two methods to make a video response in VidClipper.
Method1️⃣. Add a picture-in-picture effect in VidClipper
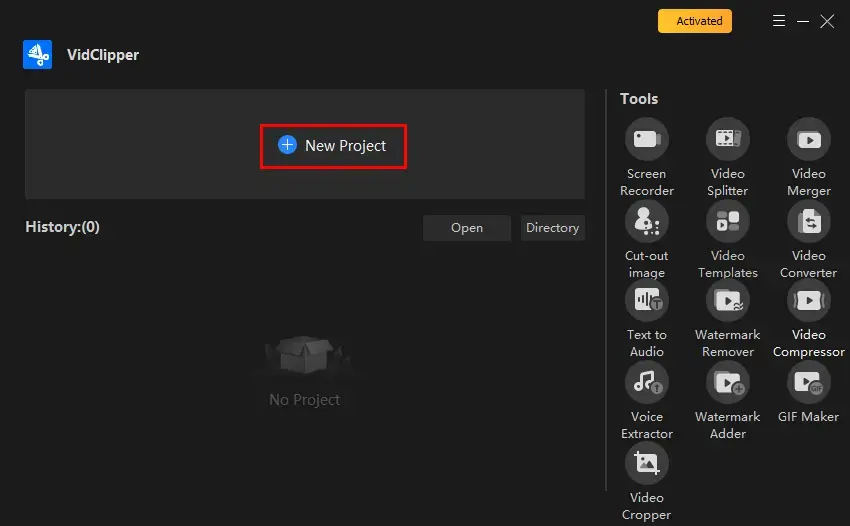
Step 1. Launch VidClipper and then click + New Project to activate its editing console.
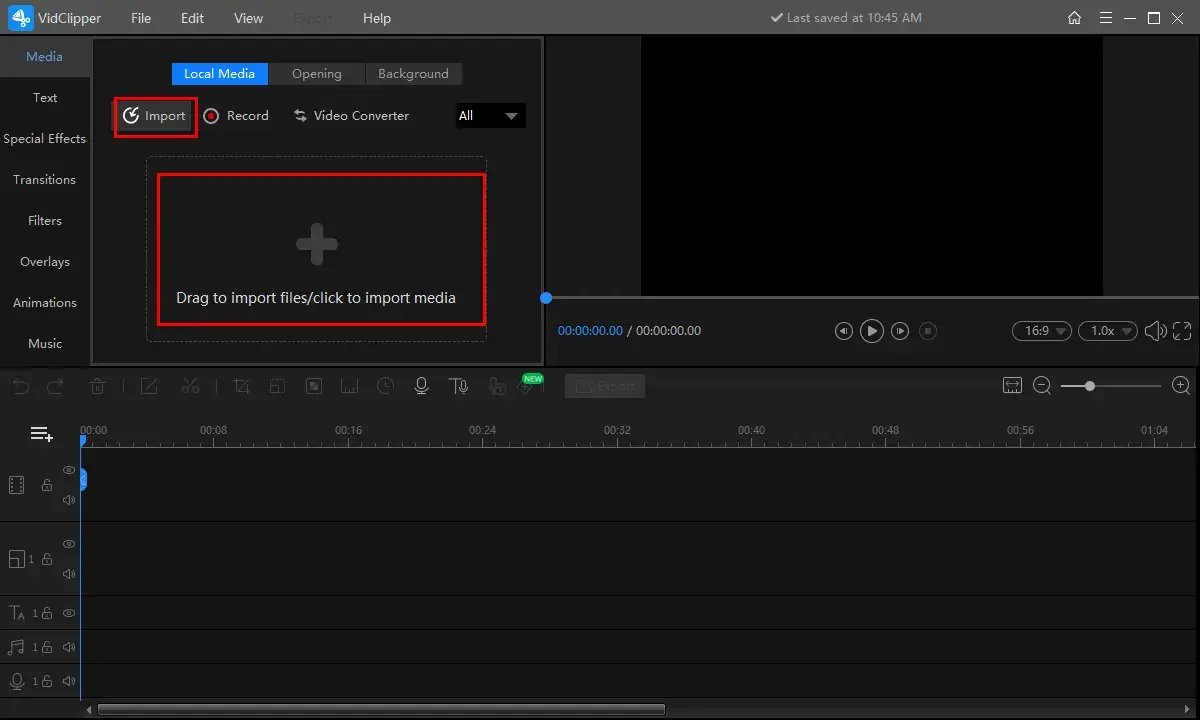
Step 2. Hit Import to add your recorded reaction video and the original footage.
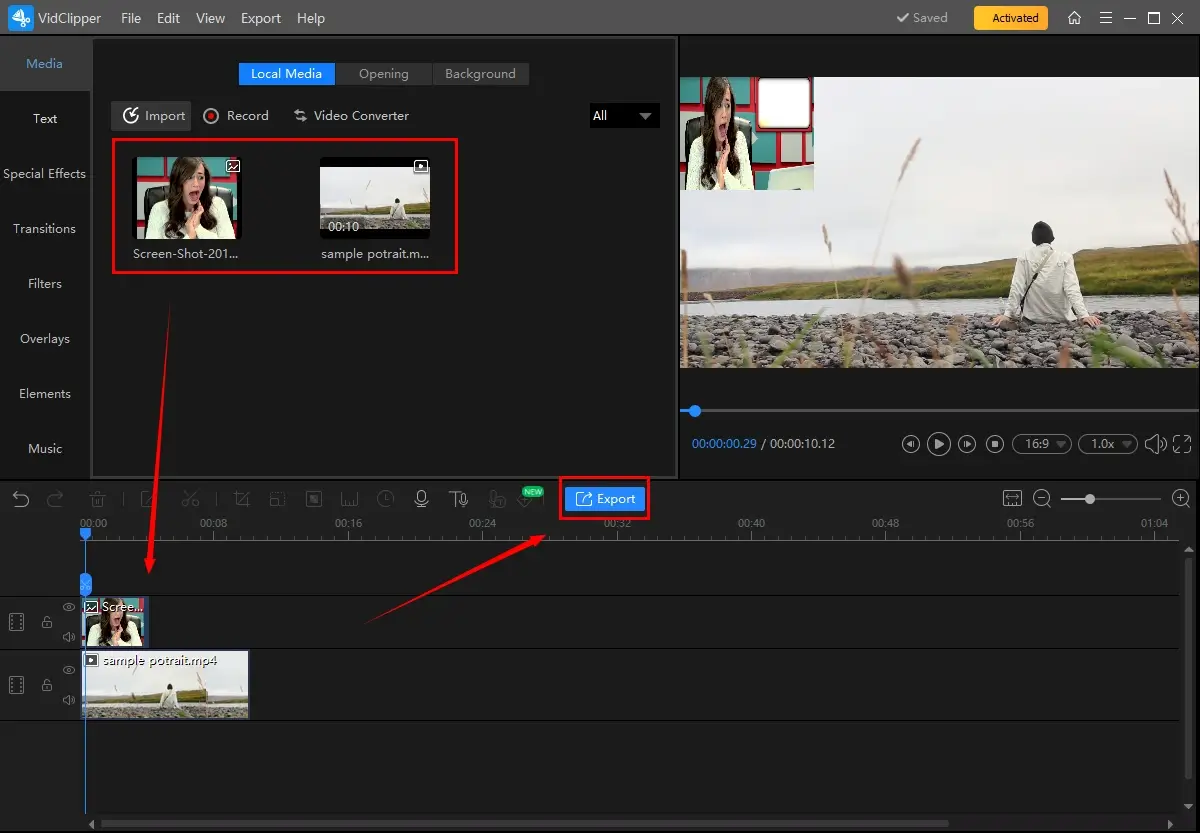
Step 3. Drag the original footage to the timeline first and then your reaction video onto the one above the first video.
Step 4. Adjust the video on canvas, press the Play button on the monitor to preview it and then click Export.
Step 5. Choose the video format/quality, change the settings if necessary and then hit Export.
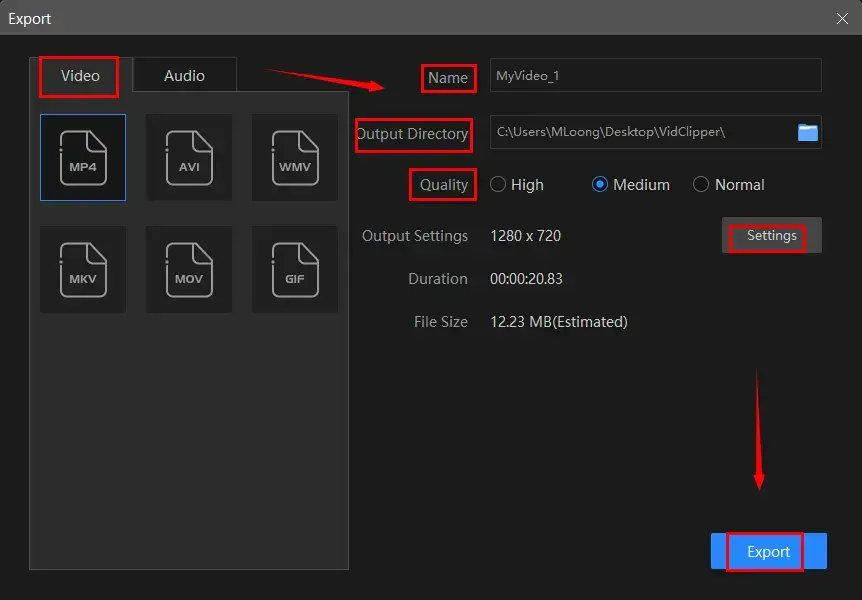
Method2️⃣. Make a split-screen video or a video collage in VidClipper
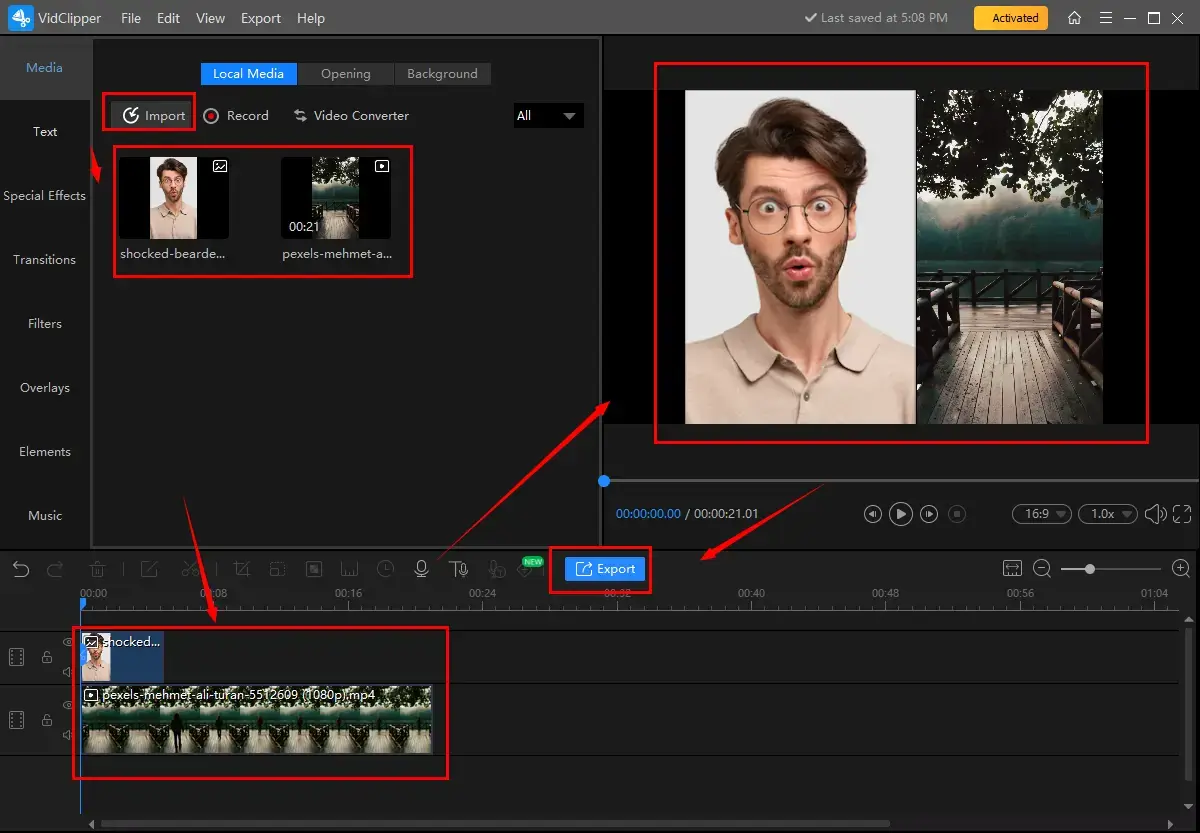
Step 1. Follow the first two steps.
Step 2. Drag both videos to the timeline and then adjust their sizes to fill up each half side of the canvas.
Step 3. Preview the final effect on the monitor and then click Export.
Step 4. Do as the last step above instructed.
If you have no recorded reaction video yet, please don’t worry. VidClipper’s inbuilt screen recording tool–Capture Screen Recorder allows you to effortlessly capture a clip with your genuine reaction.
Method3️⃣. Screen record your reaction in VidClipper
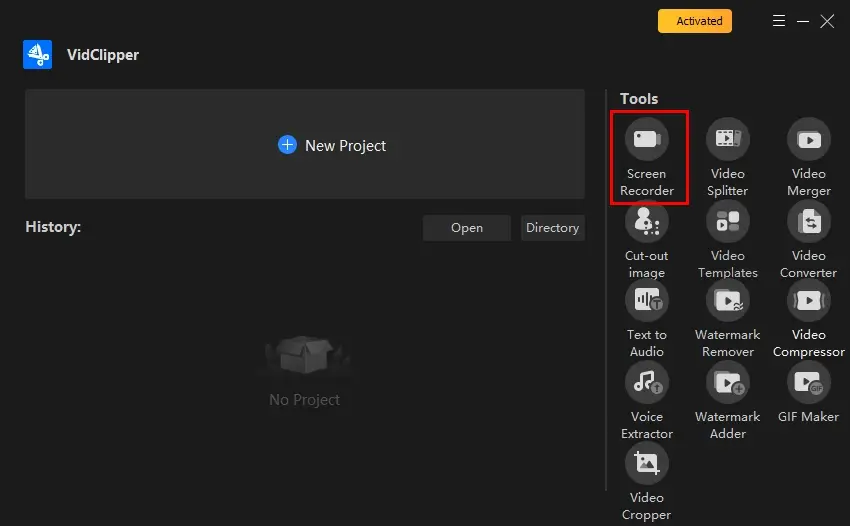
Step 1. Open VidClipper and then click Screen Recorder on the right menu.
Step 2. Confirm your recording options (recording area, audio, quality and format) and select your camera from the drop-down box to record video from Webcam.
(Advice: entire screen + all audio + high definition + MP4)
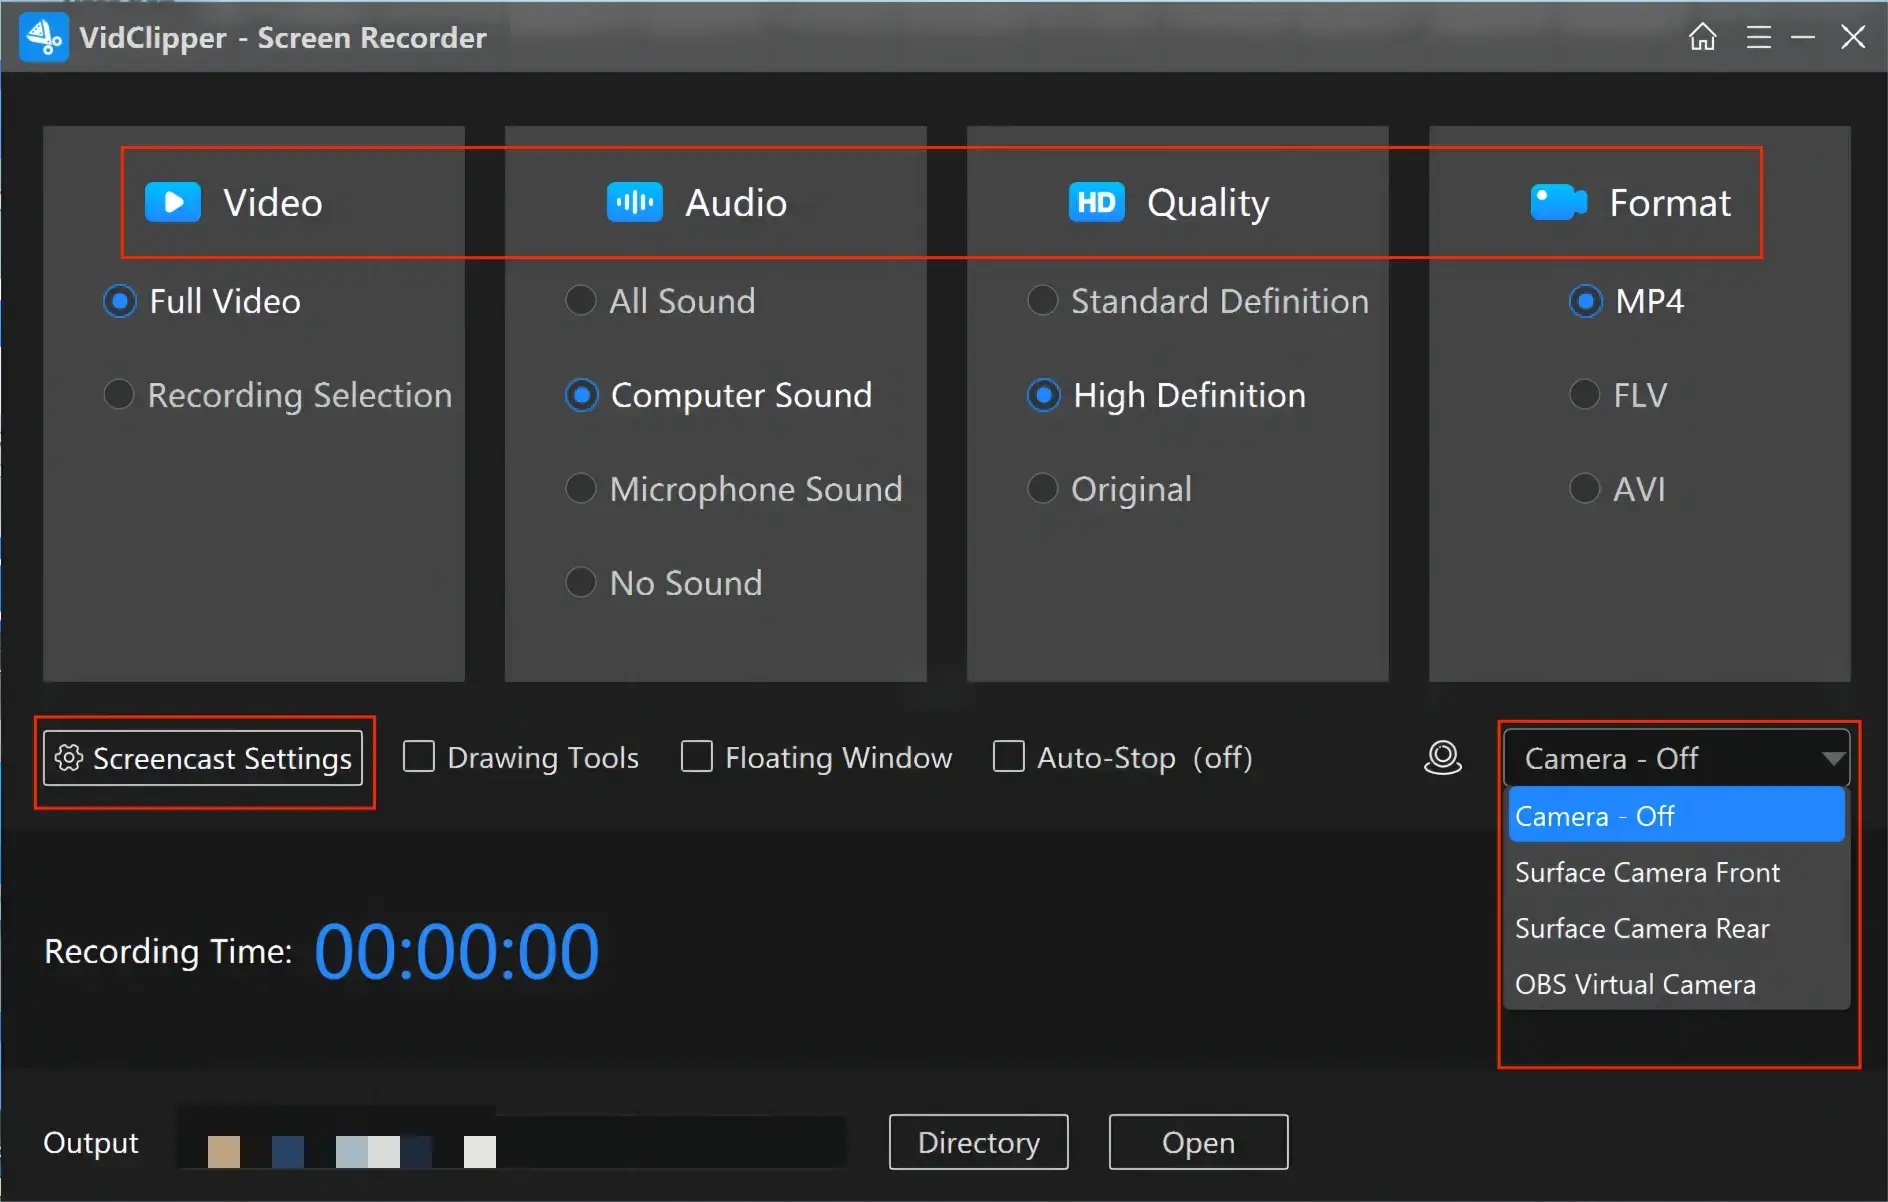
Step 3. Adjust the screencast settings if needed and then hit Start (shortcut key-Alt+F1).
Step 4. Activate the drawing toolbar to help you annotate or add lines/shapes to your recording.
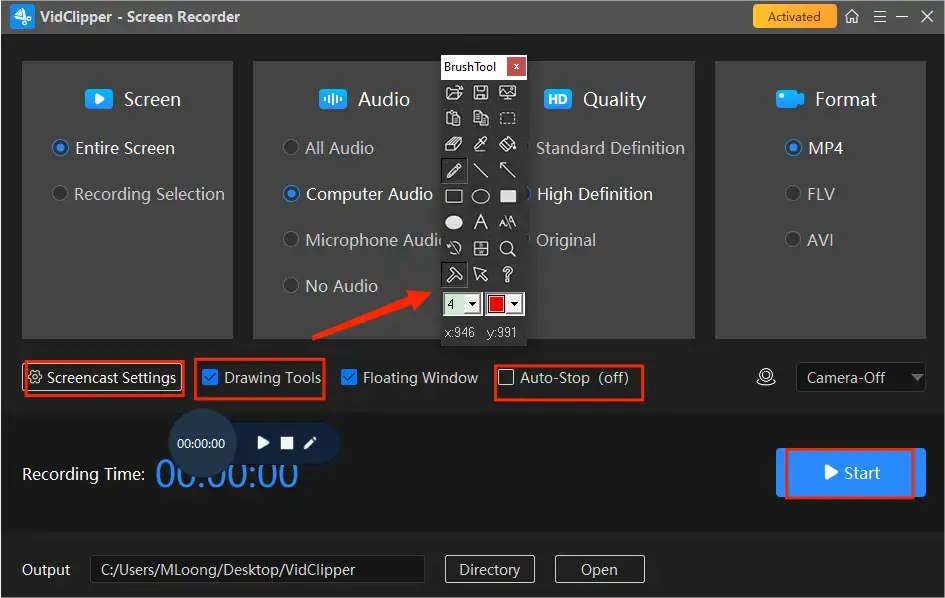
Step 5. Press the Pause or Stop icon on the floating window or the recording page to suspend or end and save your recording.
(Normally, doing this will give users a reaction video directly.)
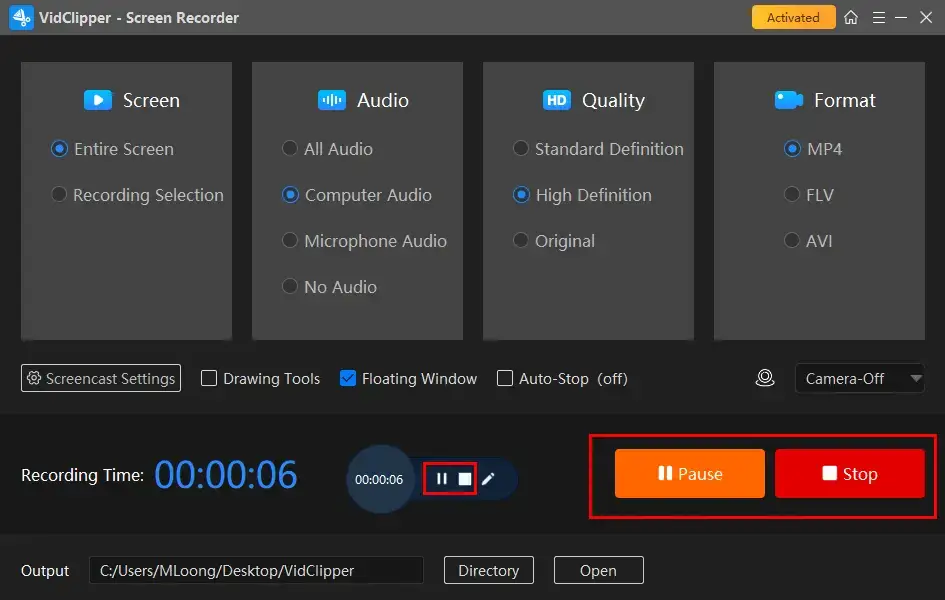
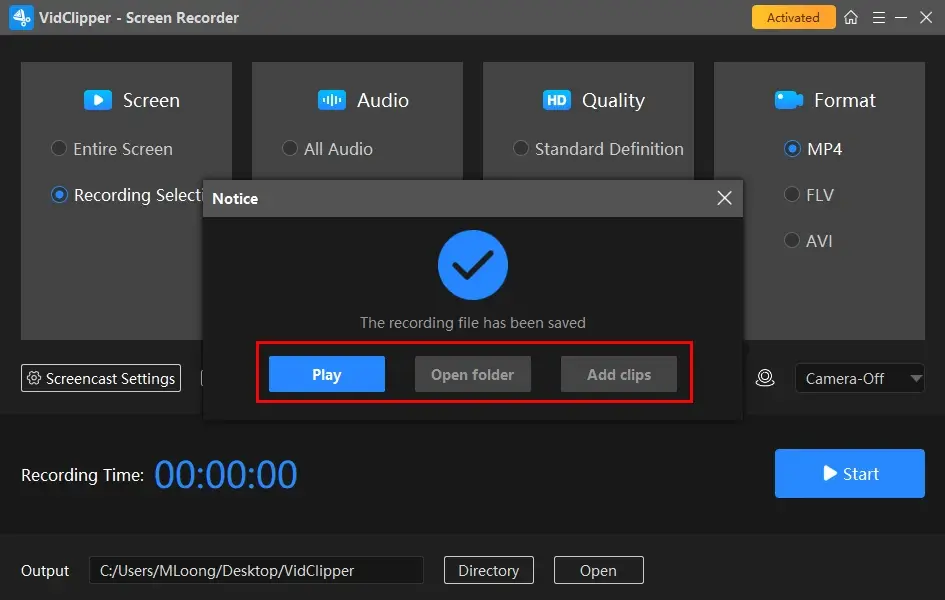
If you need to edit your reaction video further or you just record yourself only and need to add it to the video you plan to react to:
Step 6. Choose Add clips to move your recording to the VidClipper video editing console directly.
Editing Feature Examples:
Step 7. Follow the instructions mentioned in the first two methods to complete your reaction video.
🙋🏻♀️Bonus Tips: How to Make a Reaction Video for YouTube Shorts in VidClipper?
After all your videos are imported, you just need
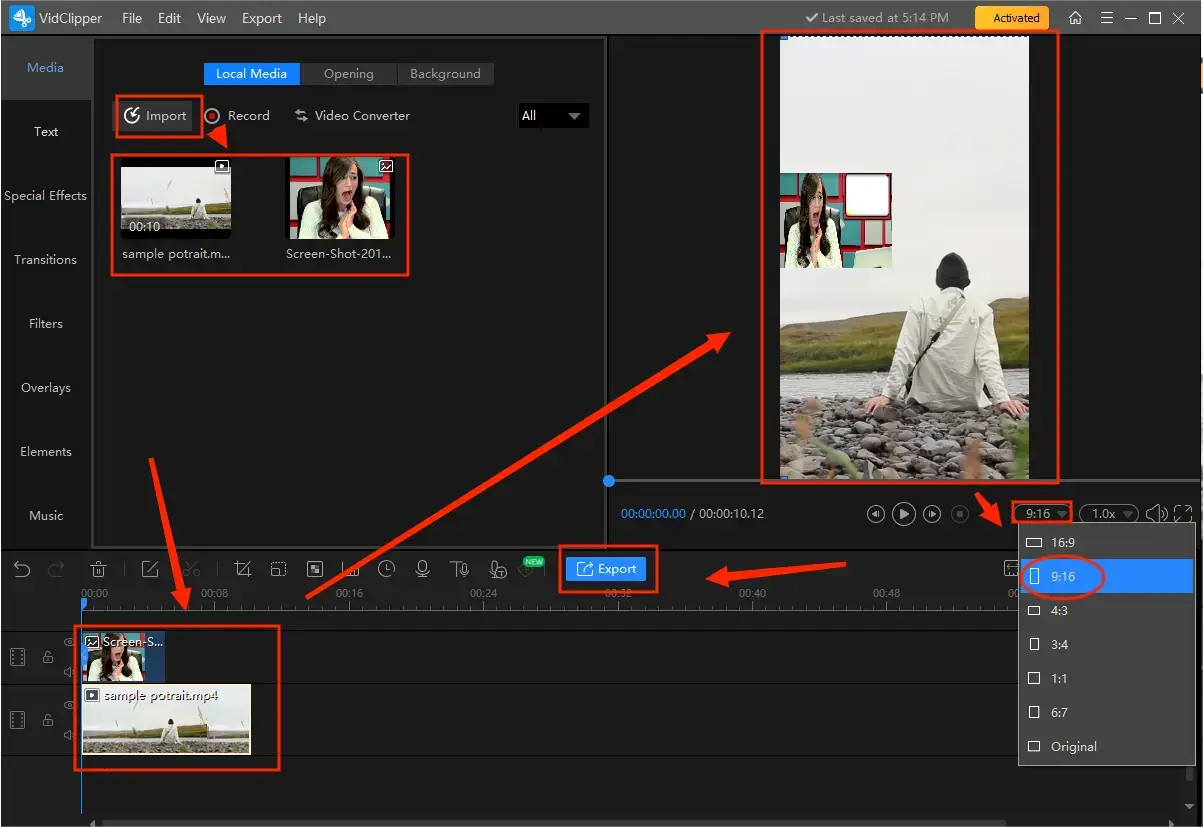
- Find the drop-down box representing aspect ratio and then select 9:16 to convert your landscape video to portrait.
- Adjust the video with your reaction content to fit the original footage with a new aspect ratio.
- Click Export.
You May Also Like
How to Do a Reaction Video on Mac/Online
If you are a Mac user or unwilling to use a desktop app, a free all-in-one video editor online can be your ideal option. Here, it is advisable to try Clipchamp.
✅Clipchamp
Clipchamp is an online platform that offers a set of various web-based tools for video creation and editing. The platform enables users to make and edit a video directly from their web browsers without software installation or downloading.
It supplies users with a free online video editor and screen recorder to create reaction videos. The two mentioned tools both prove to be easy and convenient, which are beginner-friendly and can be accessible online solutions for video making and editing needs. Users can make use of the tools for personal or professional purposes based on their requirements. Also, it supports one click to share your edited videos to your cloud drives, such as Google Drive and OneDrive, and social media, including YouTube and TikTok.
However, the screen recorder can only offer users a maximum of 30-minute recording.
💡How to Do a Reaction Video on Mac/Online in Clipchamp?
If you have a recorded reaction video, you need to:
1. Open Clipchamp and then sign in to your account.
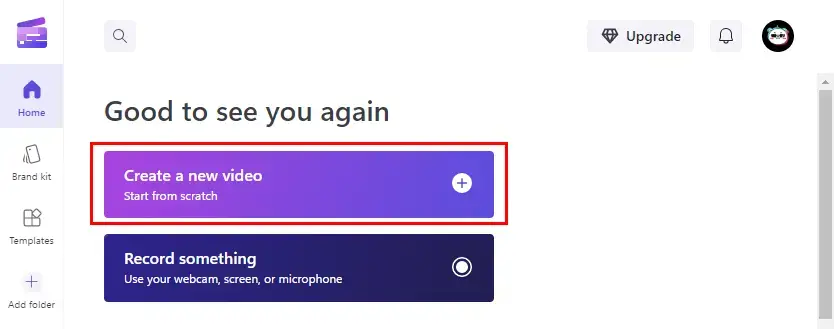
2. Click Create a new video to open its video editor.
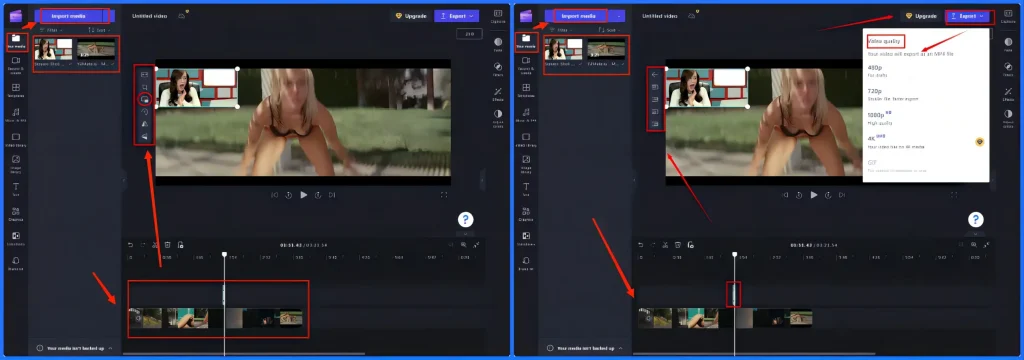
3. Go to Your media > Import media to upload your original footage and recorded reaction video.
4. Drag your original footage to the timeline first and then your video response.
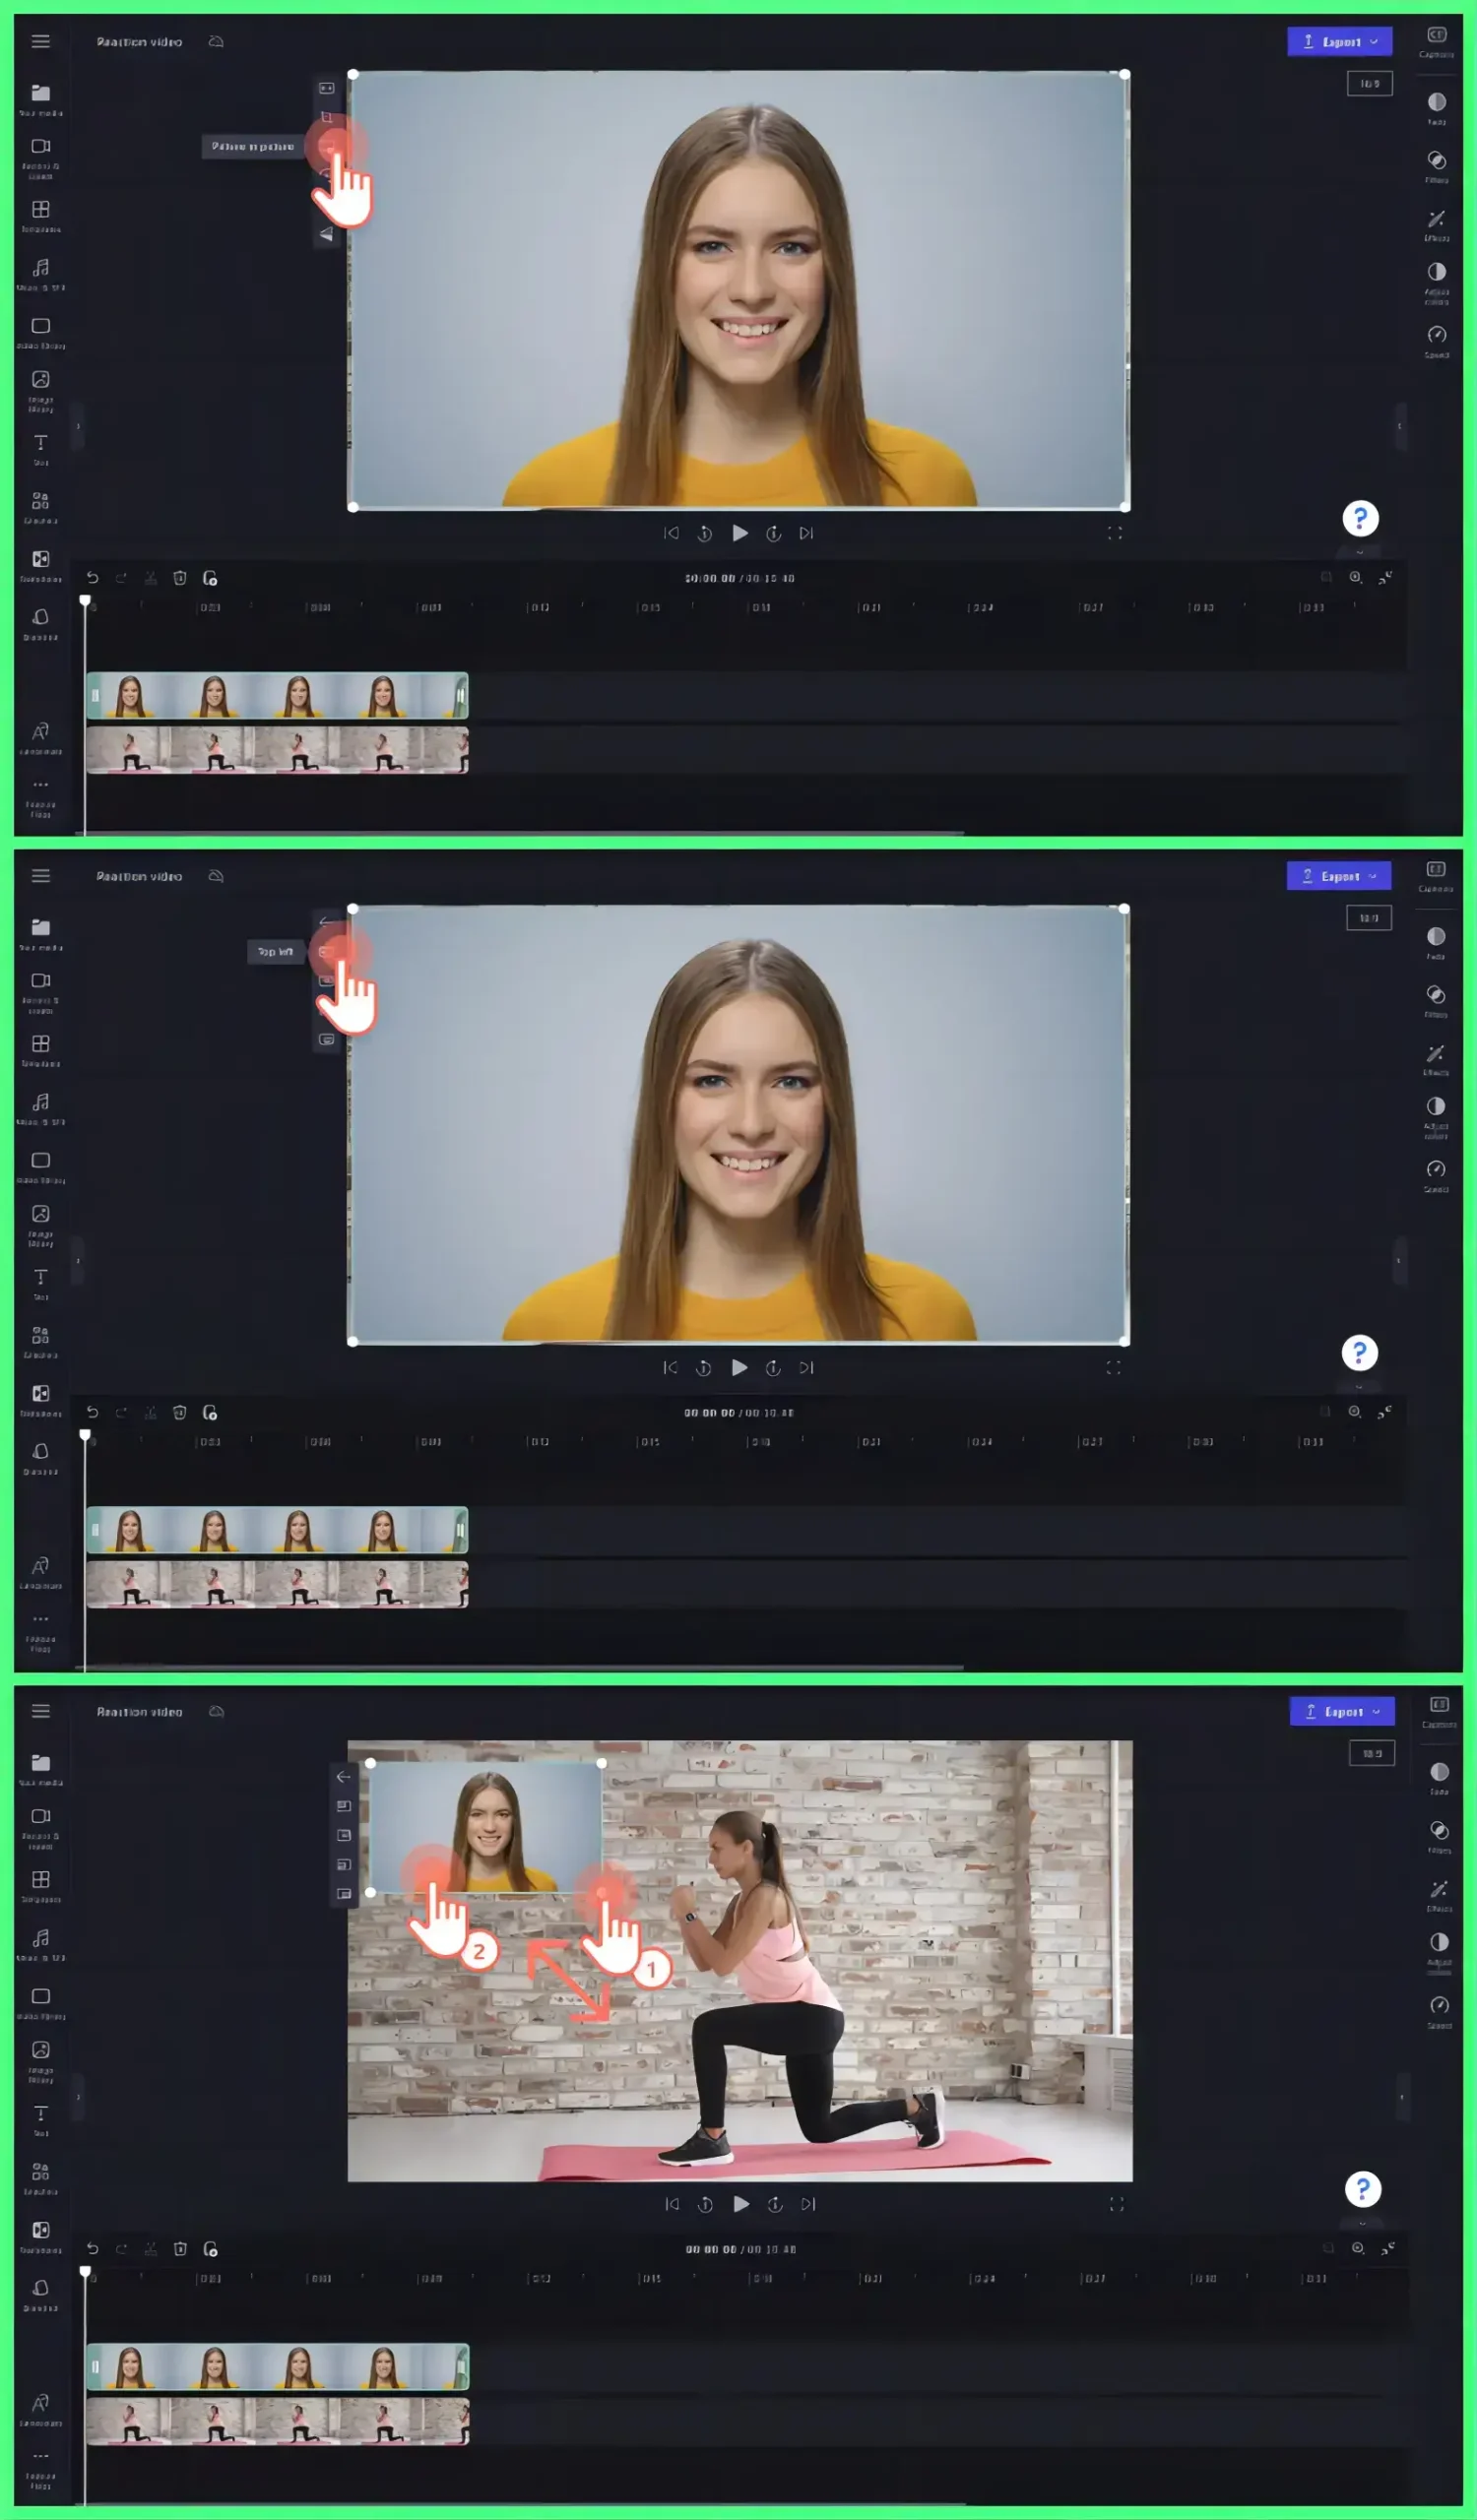
5. Single-click your reaction video to activate the left-side menu on the monitor and then select picture-in-picture.
6. Choose the desired location and then adjust the size and length if you want to.
7. Click Export and then pick the wanted quality.
(Your video will then be saved to your computer.)
If you don’t have a recorded reaction video, Clipchamp is also a good solution. You should:
1. Follow the first three steps (1-3) mentioned above.
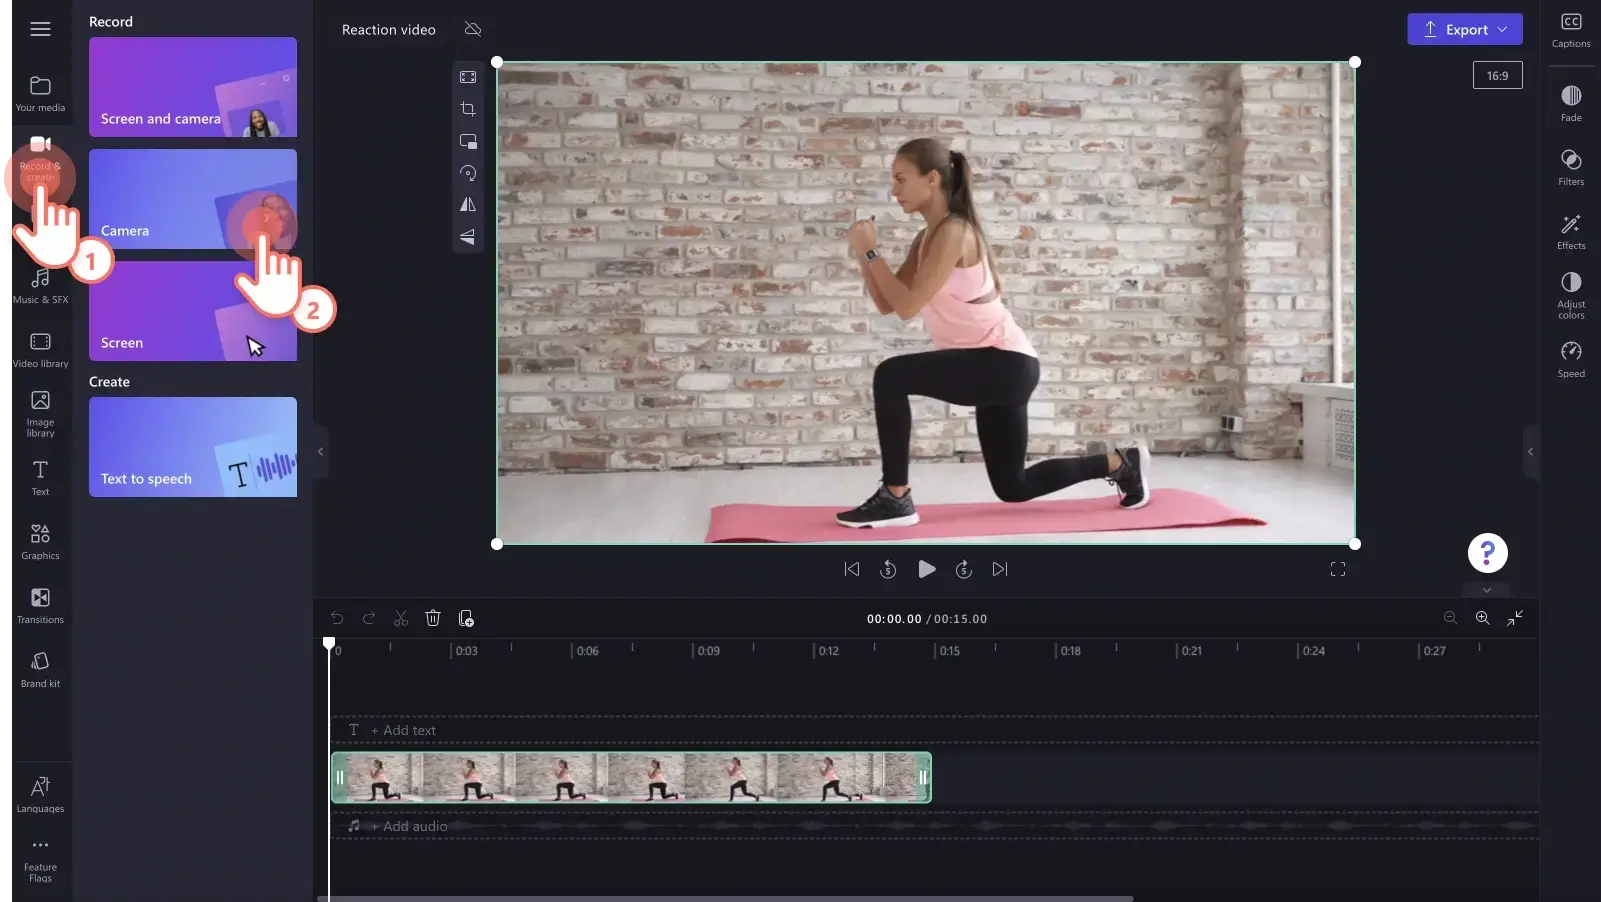
2. Go to Record & create > Camera to capture the content from your Webcam.
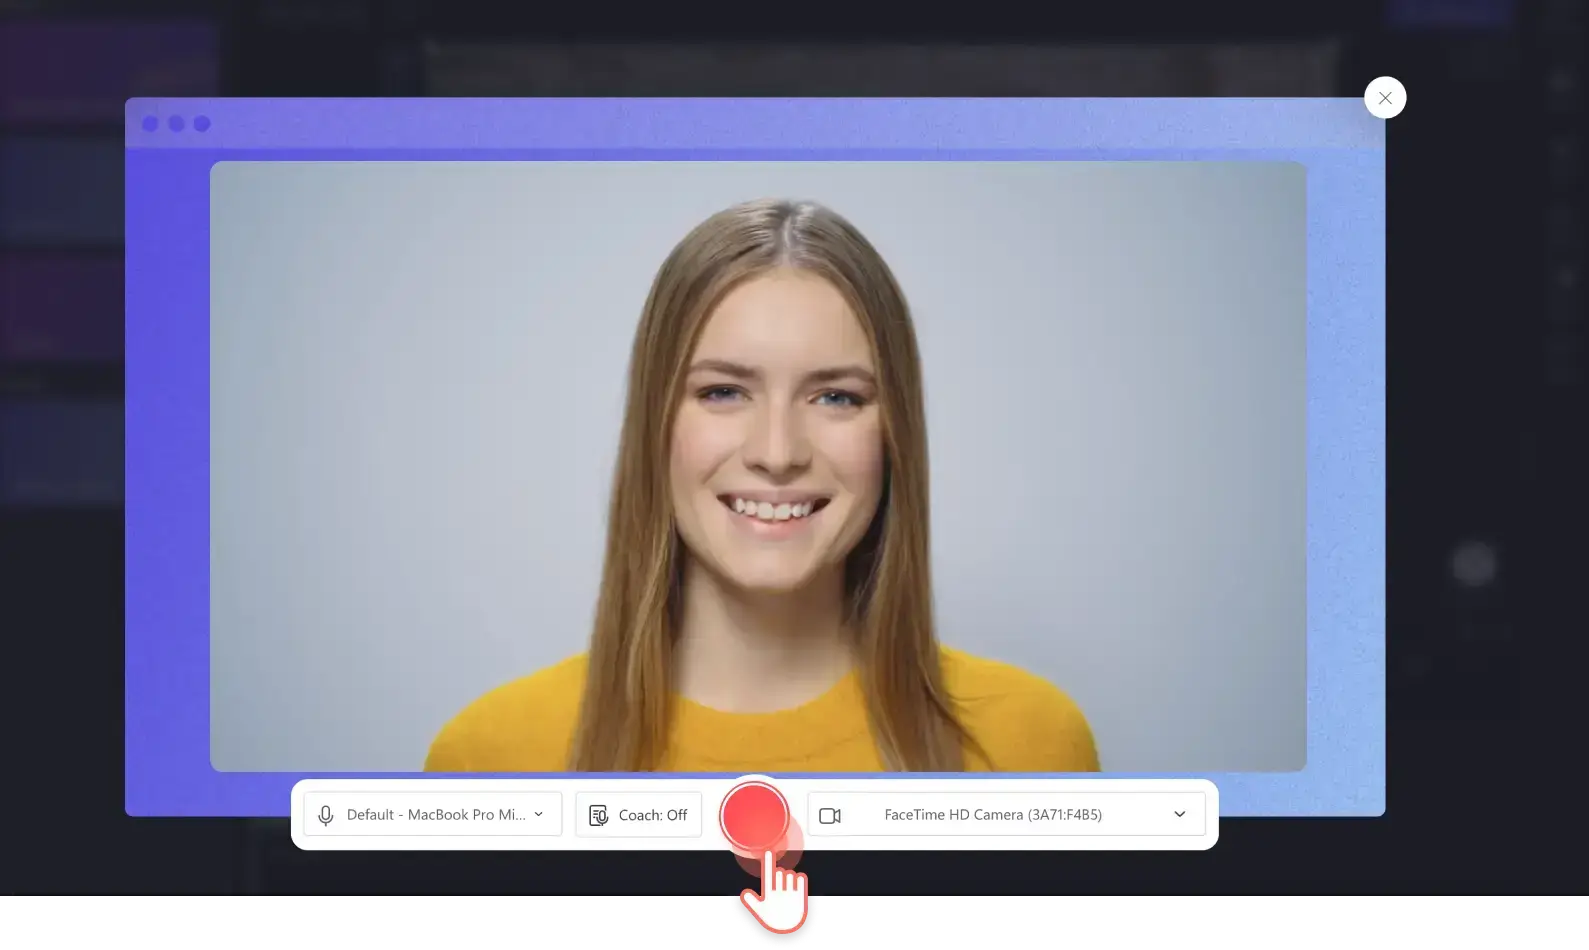
3. Click on the big red Recording icon to begin your recording.
4. Hit the record button again to stop your recording.
(Your recording will be automatically added to its video editor.)
5. Drag and drop the recorded video to the timeline above your original footage.
6. Do as the last three steps (5-7) instructed.
🙋🏻♂️Bonus Tips: How to use the screen recorder in Clipchamp to create a reaction video?

- Navigate to Record & create > Screen and Camera.
- Choose your microphone and camera.
- Press the red Record button to start your recording.
- Select the content (Tab: an online scorce/Window: a desktop source) to share with Clipchamp and then hit Share.
- Click the record button on the recording page or Stop sharing to end and save your recording.
📣PS: This feature enables users to do a reaction video directly.
More to Share
🎯What Apps Can I Use to Make Reaction Videos?
Plenty of apps can help you create reaction videos. For example, WorkinTool VidClipper (Windows), iMovie (Mac) and Clipchamp (Online). You can take advantage of these apps to fulfill the purpose of making reaction videos. You can refer to the instructions mentioned above to learn how to do a reaction video with them.
🎯Is it illegal to make reaction videos on YouTube?
If you plan to create a reaction video using other YouTube creators’ content from YouTube, it is important to know potential copyright issues. It may give rise to a copyright strike if you upload a video without getting permission from the original creator or owner.
To avoid this, you are recommended to seek permission before downloading any YouTube videos for your reaction content. While creating reaction videos on YouTube is not inherently illegal, unauthorized use of content can lead to consequences such as video takedowns or demonetization.
However, there are still some ways to avoid copyright infringements while doing reaction videos:
- Always mention and credit the original creator in the description of your video.
- Remove the sound of the original video.
- Change the pitch of the original footage.
- Divide the video into several segments with less than 30 seconds each.
📢Please remember: These deeds cannot serve as a 100% guarantee of getting rid of illegal issues on YouTube.
🎯How to make a reaction video on TikTok?
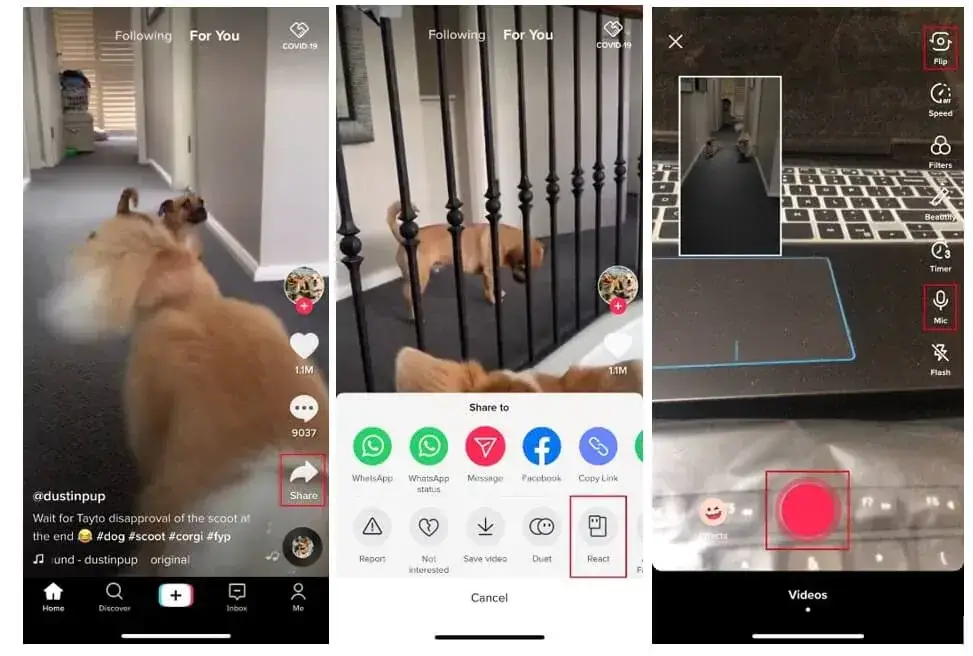
The easiest way to make reaction videos on TikTok is to use its built-in React feature. Here is what you should do:
1). Locate the video you intend to react to and then tap Share.
2). Find React to open the shooting page and then tap the red Record icon to capture your reaction.
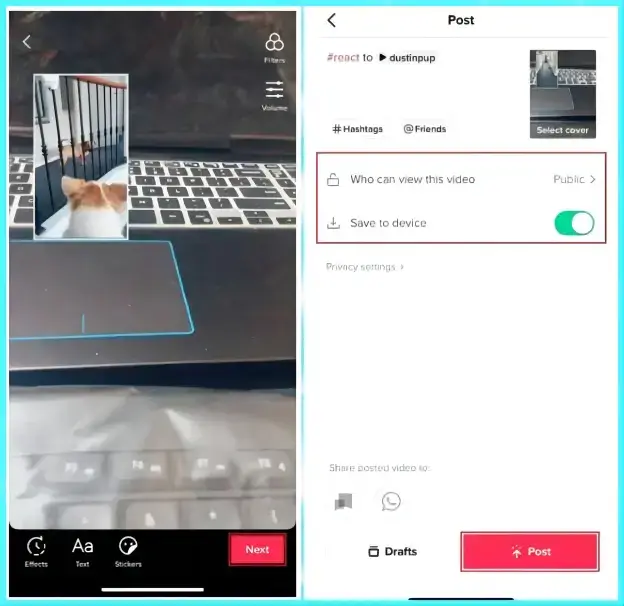
3). Apply the filters and manage the audio if needed.
4). Tap Next to open the video-publishing page.
5). Write a copy if you want to and then tap Post.
Final Thought
This chapter concludes our discussion on how to make a reaction video on YouTube. In conclusion, creating a reaction video on YouTube can be a fun and engaging way to express yourself, connect with your audience and share your thoughts on various types of content. By using the app and following the steps outlined in this article, you can confidently embark on making reaction videos and adding your personal touch to them.
However, if you are a Windows user willing to use a desktop app, WorkinTool VidClipper video editor is your perfect option. It is user-friendly, easy to use, reliable and highly multi-functional to solve many problems, more than just a reaction video creation.
Now, are you ready to make a unique reaction video by yourself?


