How to Compress Videos for YouTube on PC | 4 Solutions
Uploading high-quality videos to YouTube can be challenging due to file size limitations and slow internet speeds. This is where the art of video compression comes into play. In this article, we will show you how to compress videos for YouTube without losing quality. Specifically designed for PC users, we will explore several tools and the attached techniques that will help you reduce the size of your video while keeping its original quality.
📌Windows–WorkinTool VidClipper
📌Mac–QuickTime Player
📌Windows/Mac–VLC Media Player
📌Online–FreeConvert
🙋🏻♀️In general, mastering video compression techniques allows you to enjoy a faster and smoother video-uploading experience on YouTube. Please feel free to try all the solutions mentioned in this article. However, if a Windows user prefers a desktop app, WorkinTool VidClipper is your ideal option. It is user-friendly, easy to use, reliable and multi-functional to deal with plenty of issues.
🙋🏻♂️Now, please start your reading and experience all of them by yourself.
How to Compress Videos for YouTube Without Losing Quality on PC | 4 Solutions
The swift technological advancement has brought video creation and sharing to a great population, especially when YouTube comes into being. Therefore, video content has recently become a powerful communication tool and exceptional opportunities are available for everyone to showcase their works to a global audience with the help of platforms like YouTube. However, uploading high-quality videos to YouTube can be challenging due to file size limitations and slow internet speeds. This is where the art of video compression comes into play.
In this article, we will show you how to compress videos for YouTube without losing quality. Specifically designed for PC users, we will explore several tools and the attached techniques that will help you reduce the size of your video while keeping its original quality. Whether you are a content creator, filmmaker or vlogger, understanding video compression is essential to ensure your videos are optimized for online streaming without sacrificing their overall quality.
| 💻Windows | 📍WorkinTool VidClipper [🔥Recommended] |
| 💻Mac | 📍QuickTime Player |
| 💻Windows/Mac | 📍VLC Media Player |
| 💻Online | 📍FreeConvert |
If you are ready to learn the secrets of efficient video compression on your PC, let’s dive in and unlock the full potential of your YouTube uploads.
Before Video Compression for YouTube
📌What are the general video size limitations of YouTube?
The duration and file size limits for YouTube uploads vary depending on your account verification status.
- For verified YouTube accounts: The maximum duration is 12 hours and the acceptable largest size is 128 GB.
- For unverified YouTube accounts: The normally acceptable duration is 15 minutes or less while the file size limit remains unchanged.
📌What is the best YouTube video size?
Normally, the video size for a YouTube video is 1920 x 1080 (1080p video quality), with an aspect ratio of 16:9.
📌Should I compress a video before uploading to YouTube?
Since the file size is officially limited to 128 GB, you have to make your video smaller if it exceeds the limit. Also, if you have an unstable internet connection, a large video can be difficult to upload. Hence, you’d better compress it to ensure a smoother uploading process.
Then, how to reduce the file size of a video for YouTube? Please read on to learn about specific solutions.
How to Compress Videos for YouTube on Windows
To realize this goal, you should definitely need a handy video compressor or editor. Here, please take a closer look at WorkinTool VidClipper.
✅WorkinTool VidClipper
VidClipper Video Editor is an acclaimed tool from the WorkinTool software family. Inspired by the idea of practicability, the team has upgraded it to a super multi-functional app with the following (but not limited to) features:
Therefore, it saves you the trouble of finding and installing them individually, which is time-saving and efficiency-boosting.
VidClipper Video Editor is a powerful tool for everyone. Thanks to its simple and intuitive interface with several quick editing tools on its opening page, beginners will find it effortless and convenient to meet their basic editing needs. Professionals can create professional-looking or movie-like videos with the help of its advanced features in its editing console.
VidClipper Video Editor can serve as a video compressor. Supporting various formats, it allows you to reduce the size of your multi-formatted videos in batches. Besides, the app makes it possible to compress your videos to the chosen size with its compression settings. Therefore, you can fulfill multiple purposes other than YouTube; for example, you can compress videos for email, TikTok and more.
(📜More Info: WorkinTool VidClipper Review.)
💡How to Compress Videos for YouTube Using WorkinTool VidClipper?
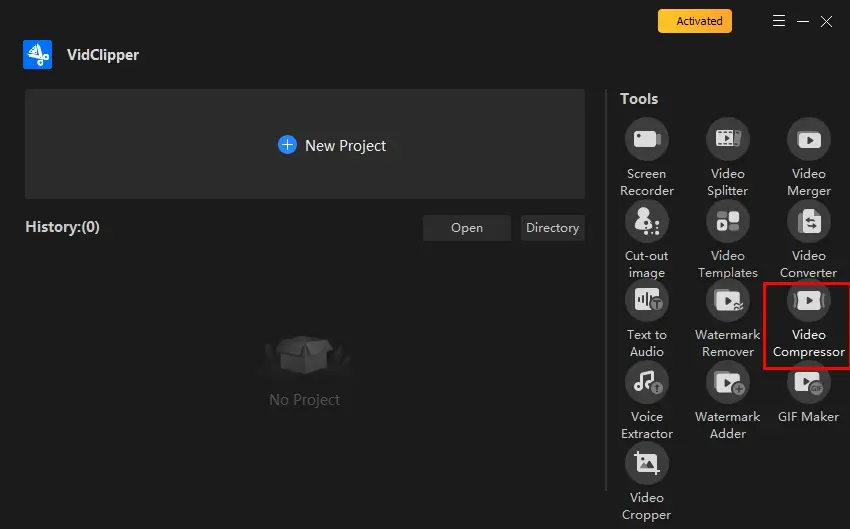
Step 1. Launch VidClipper and then choose Video Compressor on the right menu.
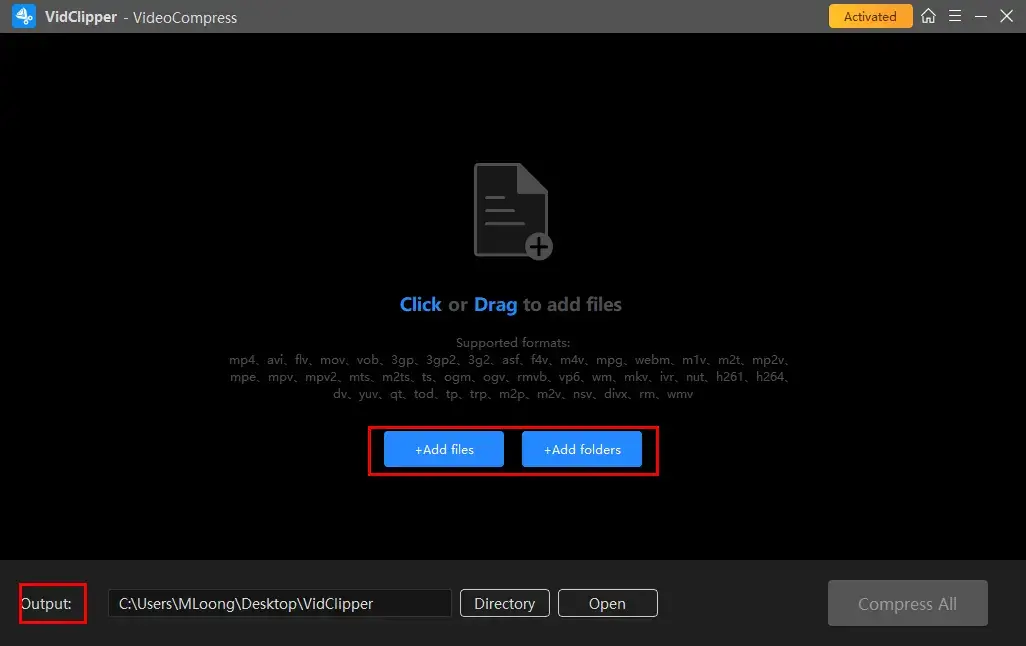
Step 2. Click Add files or Add folders to upload your video(s) and then change the output directory if needed.
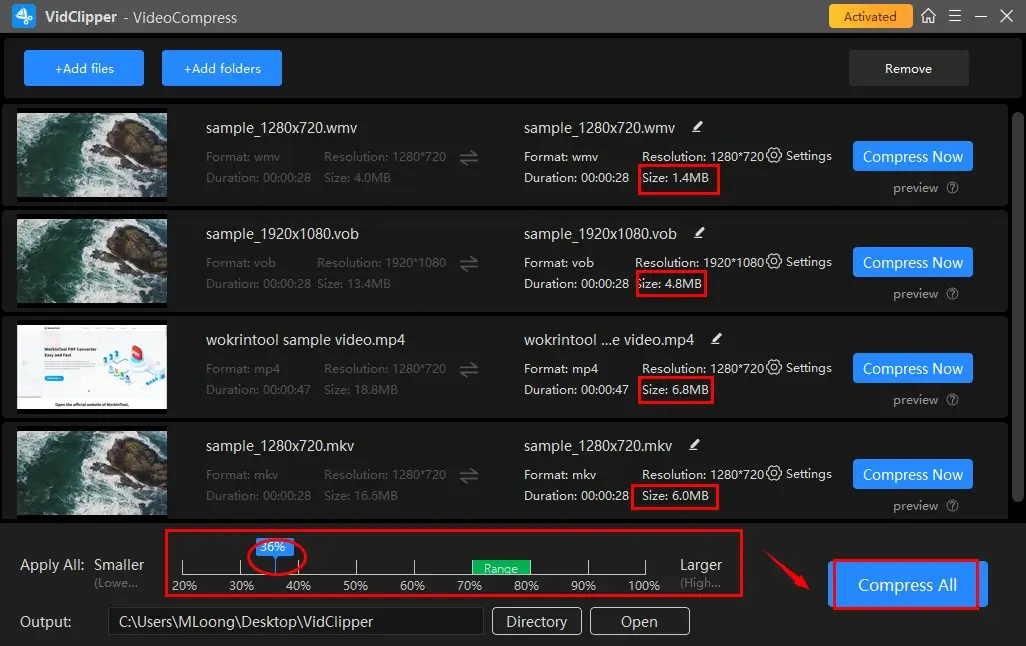
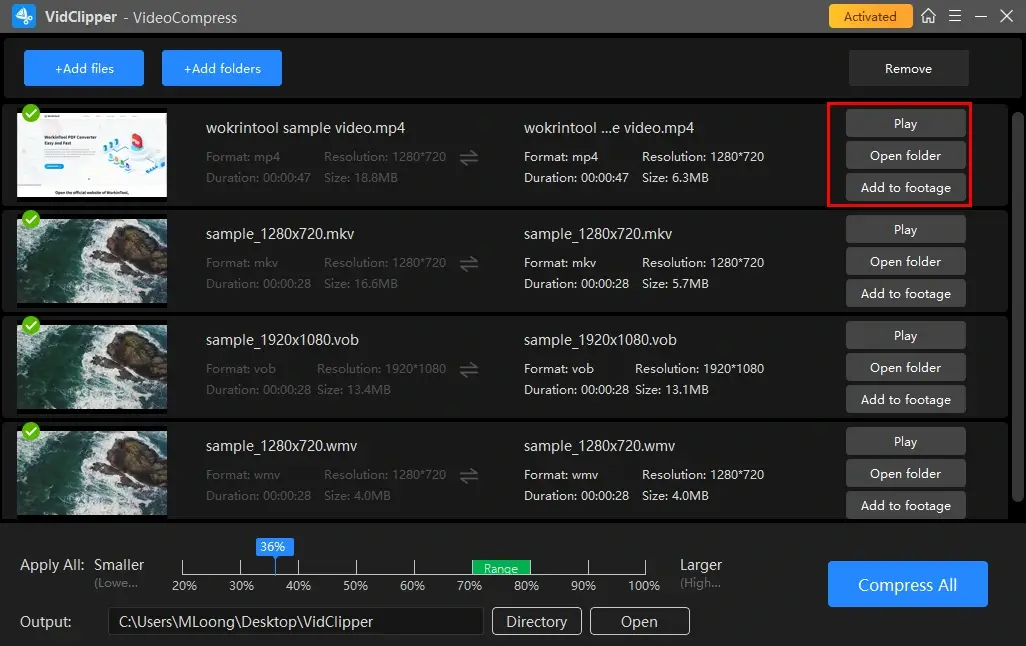
Step 3. Move the blue arrow forward and backward to determine the ideal compression ratio and then hit Compress All.
(The approximate reduced file size can be viewable in the section–Size.)
Step 4. Choose your next move.
🙋🏻♀️Additional Notes
📕How to compress your videos to different chosen sizes in WorkinTool VidClipper?
If you have imported several videos and intend to reduce them to different sizes, this goal can be achieved by WorkinTool VidClipper without hassle.
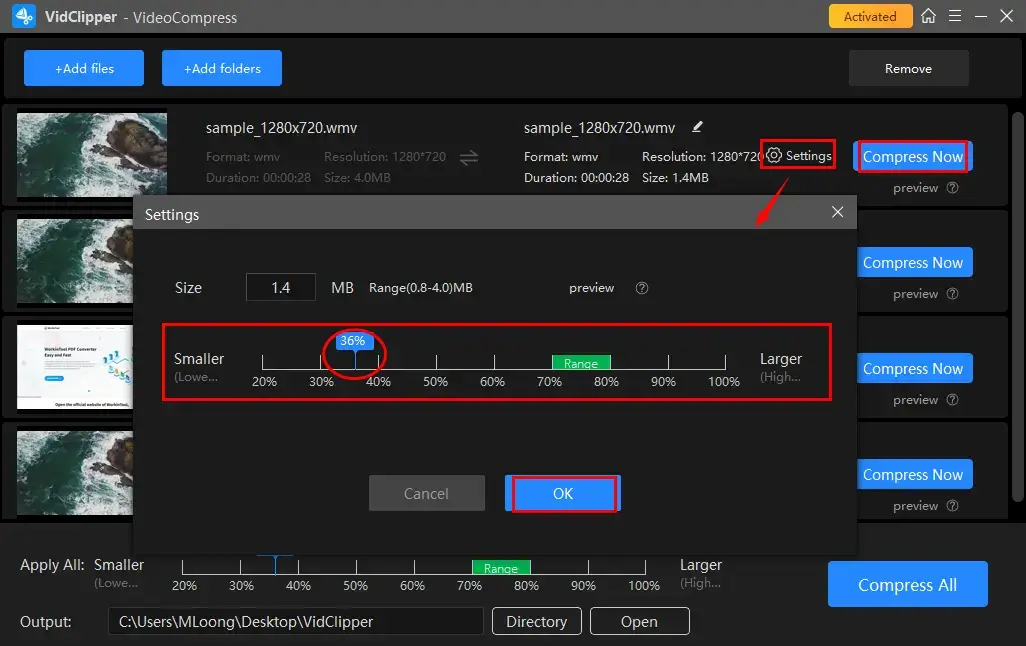
- Click Settings under your video name.
- Move the blue arrow backward forward and backward to determine the ideal compression ratio and then hit OK.
(The reduced MB of your video is viewable above the parameter line.) - Press Compress Now to reduce the select single video to the chosen size.
📕What is the feature-Add to footage?
Add to footage is a useful feature that helps you move your compressed video to the VidClipper video editor. You can undertake further editing there, including:
✨The Verdict
🙋🏻♂️You May Also Like
How to Compress Videos for YouTube on Mac
If you plan to make a video smaller on Mac, the easiest way is to use its inbuilt app–QuickTime Player.
✅QuickTime Player
QuickTime Player is the default multimedia player pre-installed on every Apple device. It is a lightweight app that is friendly to every user at no cost. In addition to its playback function, it also allows users to complete some basic video/audio editing tasks and even screen recording missions.
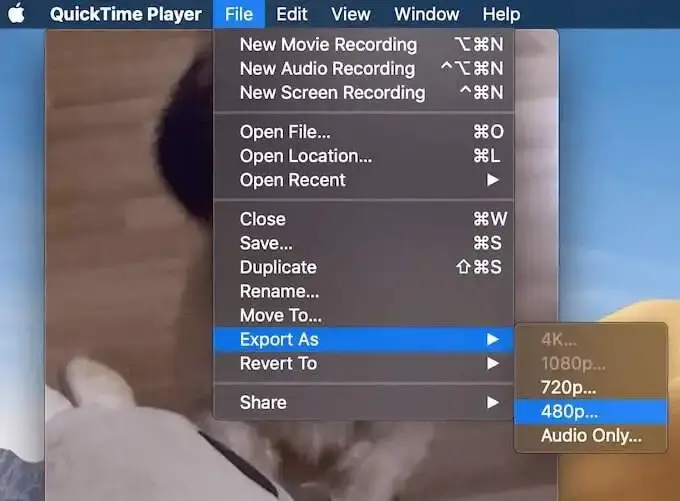
To reduce the MB of a video, you need its Export feature to change its resolution to a lower one. For instance, adjust a video from 1080p to one of 480p. However, it may result in slight quality sacrifice.
💡How to Reduce the Size of a Video for YouTube in QuickTime Player?
1). Open your video with QuickTime Player.
2). Go to File > Export As and then choose a resolution lower than your video (720p or 480p).
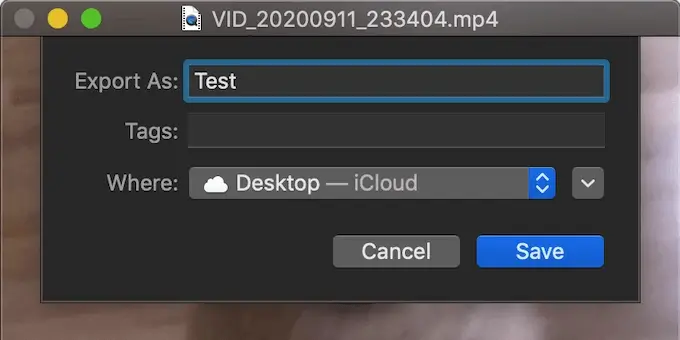
3). Name your project and then click Save.
✨The Verdict
How to Compress Videos for YouTube on Windows and Mac
Is there a way to compress a video file for YouTube on both Windows and Mac? Yes. The answer is VLC Media Player.
✅VLC Media Player
VLC Media Player is a free and open-source media player, converter and editor. It has become a globally renowned app due to its powerful features and cross-platform availability, enabling them to play and manipulate their audio and video files.
To use VLC as a video compressor, you need to go to its settings section to adjust the resolution or frame rate of your video in order to shrink its size. However, this method is slightly unfriendly for beginners.
💡How to Shrink a Video File Size Through VLC?
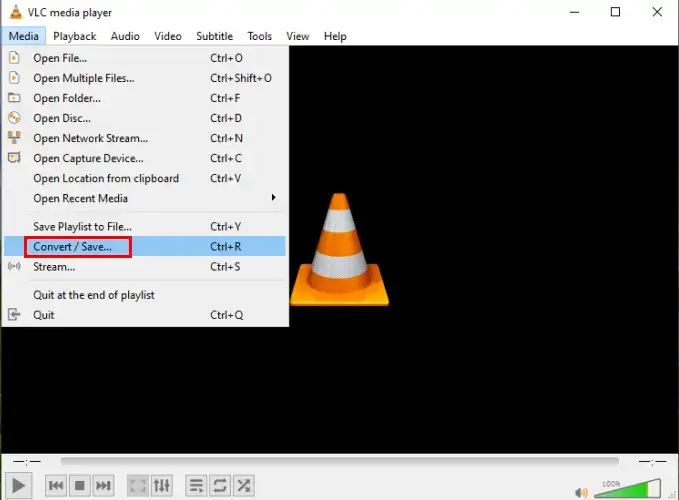
1. Open VLC and then navigate to Media > Convert/Save.
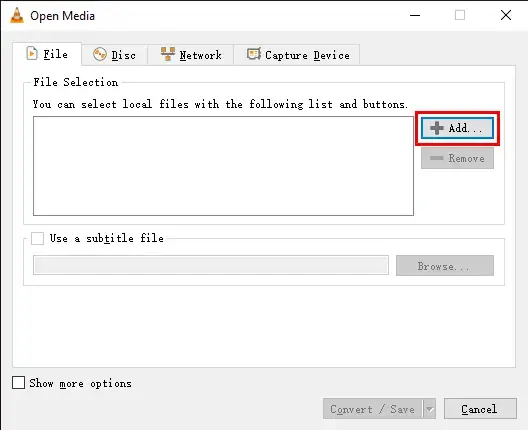
2. Click +Add to import your video and then hit Convert/Save.
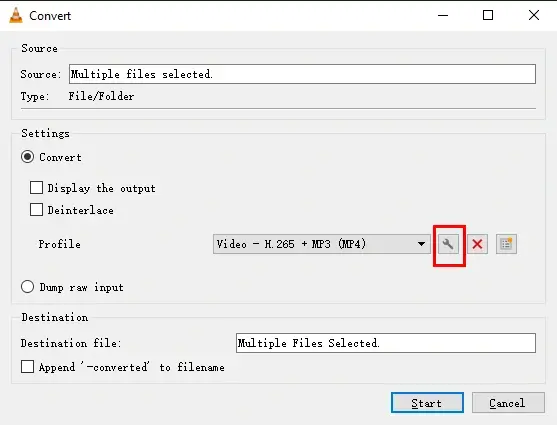
3. Press the wrench icon to open its settings page.
4. Compress your videos.
Method 1️⃣: Adjust their resolutions
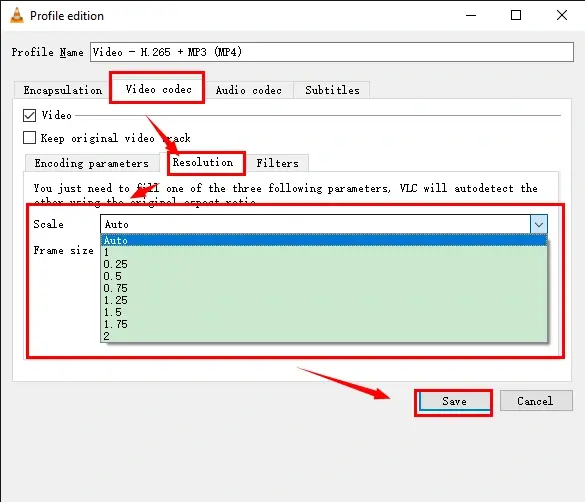
- Go to Video Codec > Resolution and then change the resolution from the drop-down box or manually change the width and height to smaller ones.
Method 2️⃣: Change their frame rates
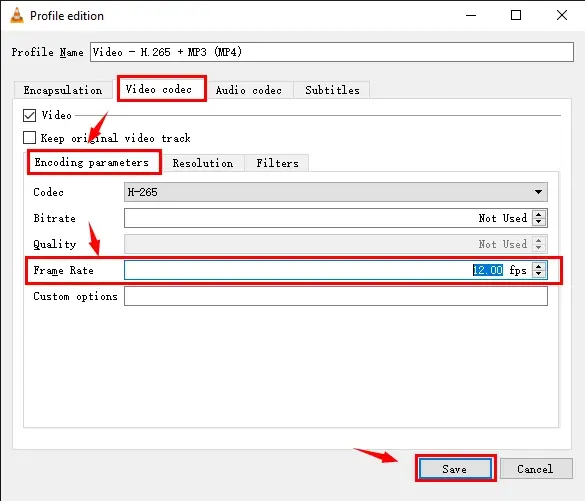
- Select Video codec > Encoding parameters > Frame rate and then choose a smaller parameter.
5. Hit Save to confirm your settings.
6. Press Start to begin your compression.
📣PS: You can also choose a preset video from the drop-down menu in the Profile section. However, the compression size cannot be selected.
✨The Verdict
How to Compress Videos for YouTube Online
If you are unwilling to install and use any desktop app, a free online converter will be the perfect solution. Here, we will introduce you to FreeConvert.
✅FreeConvert
FreeConvert is a free online service for document conversion and compression. Since it supports multiple file formats, from Microsoft Office documents, PDFs and images to videos, audio and more, users can depend on it to easily convert and/or compress their multi-formatted files without software download and installation. Additionally, it lets users upload their files from and export their output to a cloud device like Dropbox or Google Drive.
To reduce your video file size, you can turn to its tool–Video Compressor–for help. It boasts a simple and clear interface and an effortless compression process. Additionally, it allows users to compress their videos in batches and offers them settings to customize their video reduction, including video codec, compression method and target size.
Though FreeConvert is generally free to use, there are limitations. For instance, the maximum video size is 1 GB. Only 25 files are compressable per day, while only five can be processable in batches within one attempt.
💡How to Make a Video Smaller Online via FreeConvert?
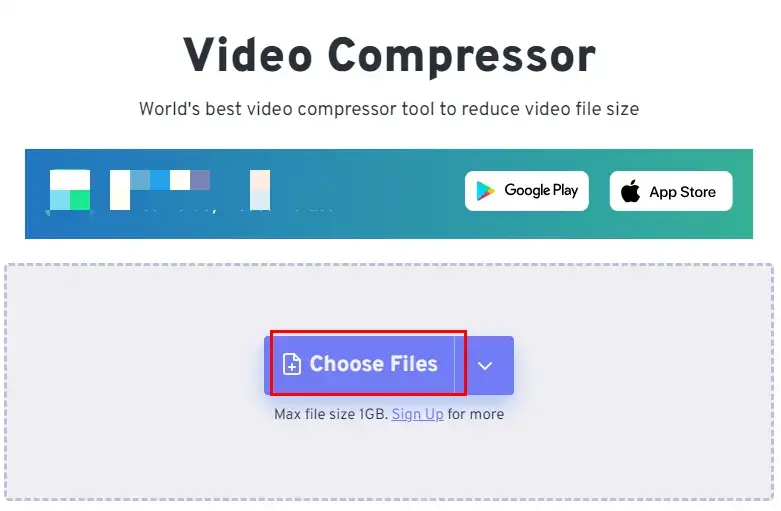
Step 1. Open FreeConvert Video Compressor and then click Choose Files to import your video(s).
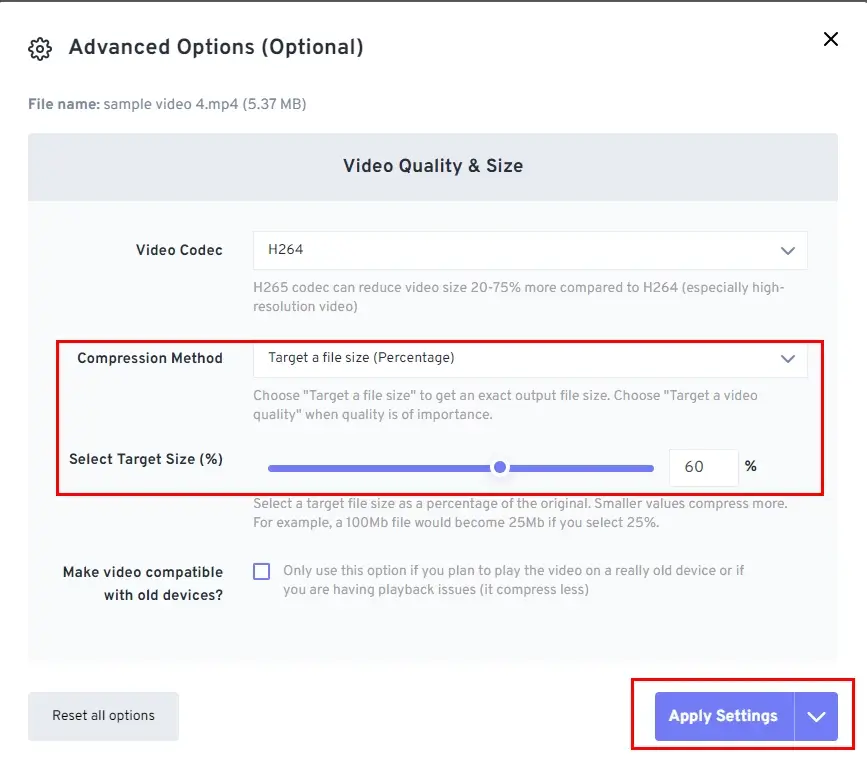
Step 2. Click the gear icon beside each video to adjust your settings to personalize your compression and then hit Apply Settings.
(For example, Move the slider forward or backward to decide the compression ratio if you choose Percentage.)
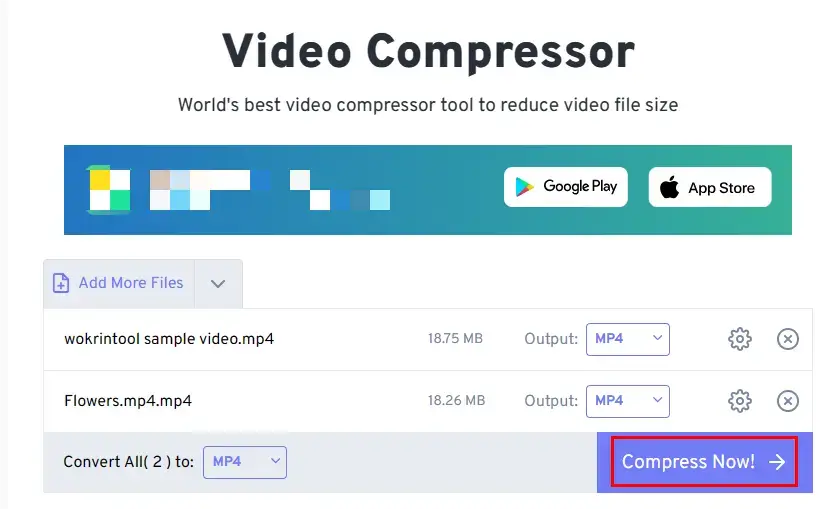
Step 3. Press Compress Now! to start your video compression.
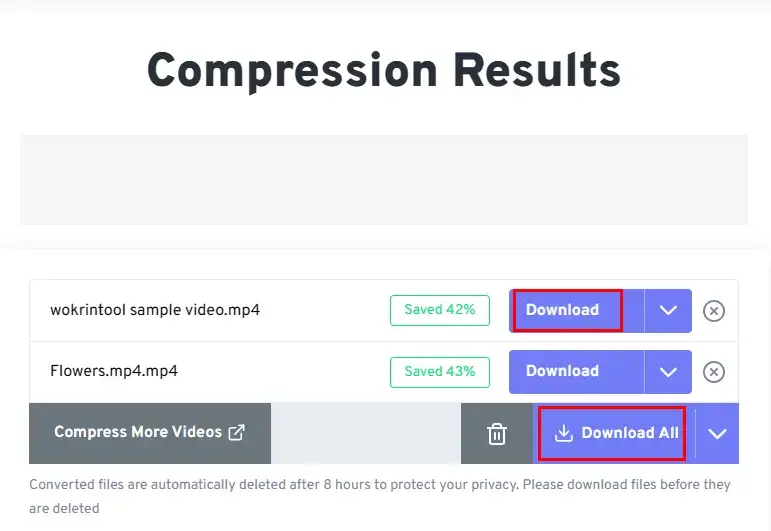
Step 4. Click Download (single file) or Download All (multiple files) to save your output.
✨The Verdict
More to Share
🎯How do I compress a 1080p video without losing quality?
You can resort to all the aforementioned approaches to solve this problem.
- Windows: WorkinTool VidClipper
- Mac: QuickTime Player
- Windows/Mac: VLC Media Player
- Online: FreeConvert
For the first two tools, you can enjoy the direct choice of changing the resolution of your video from 1080p to 720p and 480p.
🎯Are there any additional compression methods?
There are other methods of video compression; for example,
These objectives can all be achieved in WorkinTool VidClipper, an all-in-one app designed to cope with nearly all your editing issues.
Final Thought
Here is the end of our discussion on how to compress videos for YouTube without losing quality on your PC. In general, mastering video compression techniques allows you to enjoy a faster and smoother video-uploading experience on YouTube. Please feel free to try all the solutions mentioned in this article.
Remember, the key to successful video compression lies in finding the right balance between file size reduction and visual quality. Experiment with different settings, test your compressed videos before uploading them and seek feedback from your audience to ensure you are achieving the desired results.
However, if a Windows user prefers a desktop app, WorkinTool VidClipper is your ideal option. It is user-friendly, easy to use, reliable and multi-functional to deal with plenty of issues.
Now, are you ready to make your video smaller for YouTube purposes?


