How to Record on Blackboard Collaborate on PC | New Ways
If you join an important conference or class via Blackboard , you may want to keep it for future reference. Then, how can I record a meeting or session on Blackboard Collaborate effectively and without limitations? Please spare a few minutes for this blog post on how to record on Blackboard Collaborate as a student or moderator. All the methods prove to be simple and practical.
📌As a Student: 📍With Permission (Built-in Recording Feature in Blackboard Collaborate), 📍Without Permission (Windows–WorkinTool VidClipper, Mac–QuickTime Player, Online–Screen Capture)
📌As a Moderator: Built-in Recording Feature in Blackboard Collaborate
Following the solutions outlined in this article, you can easily record your Blackboard Collaborate sessions on various platforms and review them anytime. However, if you are a Windows user, please take a closer look at WorkinTool VidClipper since it is user-friendly, easy to use and super multi-functional. Now, please start your reading to learn about aforementioned methods and experience them by yourself.
How to Record on Blackboard Collaborate as a Student/Moderator in 2024
Blackboard Collaborate is a useful web-based platform for online meetings and lecture sessions. It gains fast popularity as remote communication becomes mainstream as a result of the pandemic outbreak. If you join an important conference or class via this tool, you may want to keep it for future reference. Then, how can I record a meeting or session on Blackboard Collaborate effectively and without limitations? Please spare a few minutes for this blog post on how to record on Blackboard Collaborate as a student or moderator. All the methods prove to be simple and practical.
| 🙋♀️As a Student | With Permission | 📍Built-in Recording Feature in Blackboard Collaborate |
| Without Permission | 📍Windows–WorkinTool VidClipper | |
| 📍Mac–QuickTime Player | ||
| 📍Online–Screen Capture | ||
| 🙋♂️As a Moderator | 📍Built-in Recording Feature in Blackboard Collaborate |
|
Now, let’s begin our journey.
Before Blackboard Collaborate Recording
📌What is Blackboard Collaborate?
Blackboard Collaborate is a web conferencing and virtual classroom platform that makes real-time collaboration and communication among remote participants possible. It is designed mainly for educational and business scenarios, including online classes, webinars, meetings, and training sessions.
Blackboard Collaborate offers features like video and audio conferencing, screen sharing, virtual whiteboards, polling, breakout rooms for small group discussions, and text-based chat. It can be accessed through a web browser or a mobile app, which integrates with learning management systems such as Blackboard Learn and Moodle. Therefore, it enables users to connect with others in a virtual space and engage in interactive learning or teamwork activities from anywhere with an internet connection.
📌How does Blackboard Collaborate work?
Here is a general overview of how Blackboard Collaborate works:
- Set up a session
- Join a session
- Audio/video/text-based real-time communication
- Learning and communication aided by collaboration tools.
- Recording and playback
📌Is it possible to record Blackboard Collaborate?
Suppose you are the moderator of or a participant with the moderator permission in a session. In that case, you can resort to the built-in recording feature to capture your meeting or lecture directly.
If you don’t have the moderator permission, you can’t access the recording tool equipped in Blackboard Collaborate and should seek assistance from a screen recorder.
Then, how can I effectively record on Blackboard Collaborate? Please read on to learn about specific solutions.
How to Record on Blackboard Collaborate as a Student/Participant
If you are a student or participant, two situations apply to you: with or without the moderator permission. In this chapter, we will discuss the detailed information for both scenarios.
💡With Moderator Permission
As this situation is similar to Blackboard Collaborate recording as a moderator. Please refer to the next chapter–How to Record on Blackboard Collaborate as a Moderator.
💡Without Moderator Permission
If you don’t have this permission, you should rely on a handy screen recording tool to record a meeting or lecture session on Blackboard Collaborate. Here, we will discuss how to achieve this goal on multiple PC platforms, including Windows, Mac and online. Please continue your reading to learn more.
✅How to Record on Blackboard Collaborate in Windows?
If you are a Windows user, I recommend using WorkinTool VidClipper, an ideal choice for easy and convenient screen recording.
WorkinTool VidClipper was initially designed as a video editor. However, following several rounds of upgrading, it has now become a super multi-functional tool that has won wide recognition in the market. Therefore, by installing it on your computer, you will enjoy various useful features, such as
Additionally, Vidclipper video editor and capture screen recorder boasts a simple and clear interface, making beginners feel convenient to operate. Besides, all operations will be completed within a few steps. Hence, users don’t have to be tech-savvy to try it.
When it comes to screen recording, you can capture your computer screen (the entire screen, a web browser and operating windows) and even the content from your Webcam or camera. Here are more reasons for picking this app.

|
|
🧐Use WorkinTool VidClipper to Record on Blackboard Collaborate in Windows.
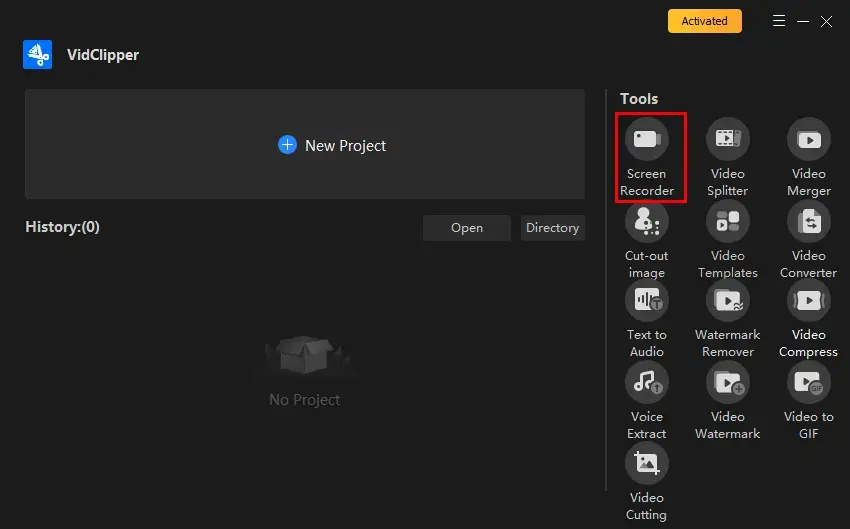
Step 1. Launch the tool and then click Screen Recorder on the right menu.
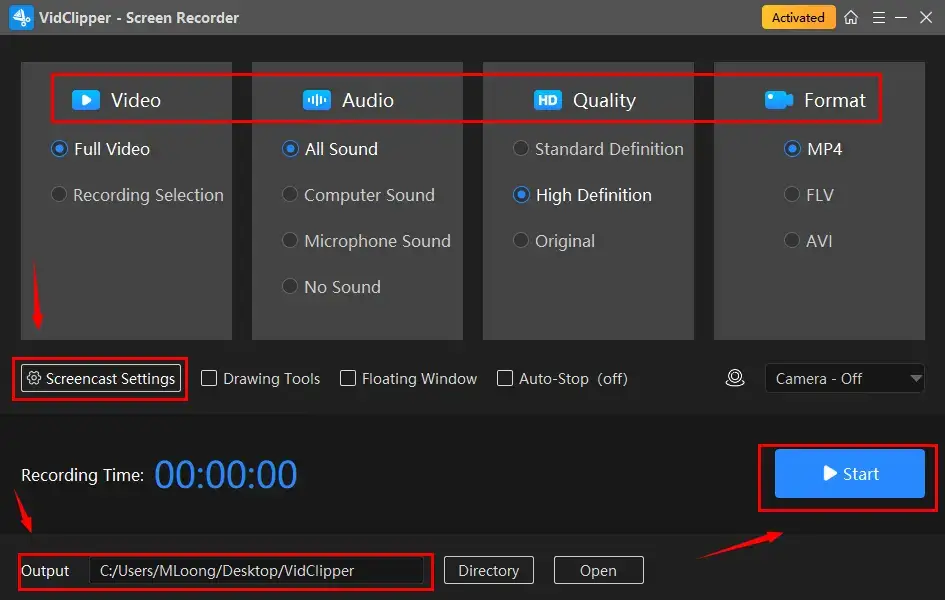
Step 2. Make your choice for the recording area, audio, quality and format, adjust the *settings, determine the output directory and then hit Start (shortcut key–Alt+F1) to begin your Blackboard Collaborate recording.
*Inside the screencast settings?
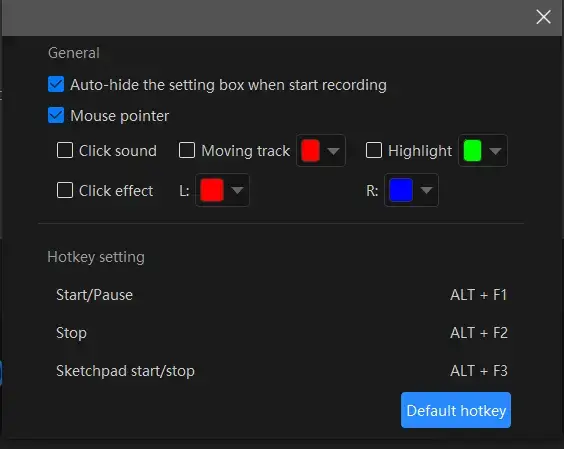
- Auto-Hide: Tick this choice to hide the settings box when your recording starts.
- Mouse Pointer: Mark this option to individualize the color of several operations like Moving track, Highlight and Click effect (left and right click).
- Click Sound: Activate or mute the sound of every click.
- Click Effect: “Colorize” your cursor, both left and right.
Step 3. Activate the drawing toolbar or auto-stop feature if you want to.
Drawing Toolbar |
|
| A drawing toolbar is available to draw lines or shapes and type text on your recording directly. Therefore, you save the cumbersome process of having to complete the relevant operations after your recording. | You can activate it by
|
Auto-Stop Feature |
|
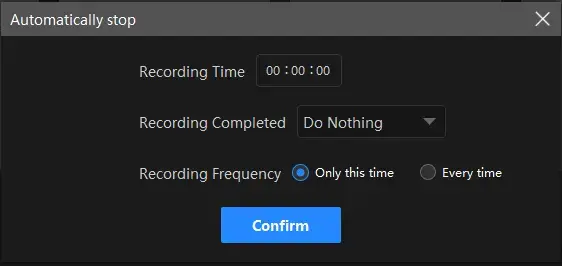
| Auto-Stop is a feature that aims at the automatic ending of your recording after the full recording length is set. Therefore, you don’t have to worry about your recording, even when being away from your computer. | |
 |
|
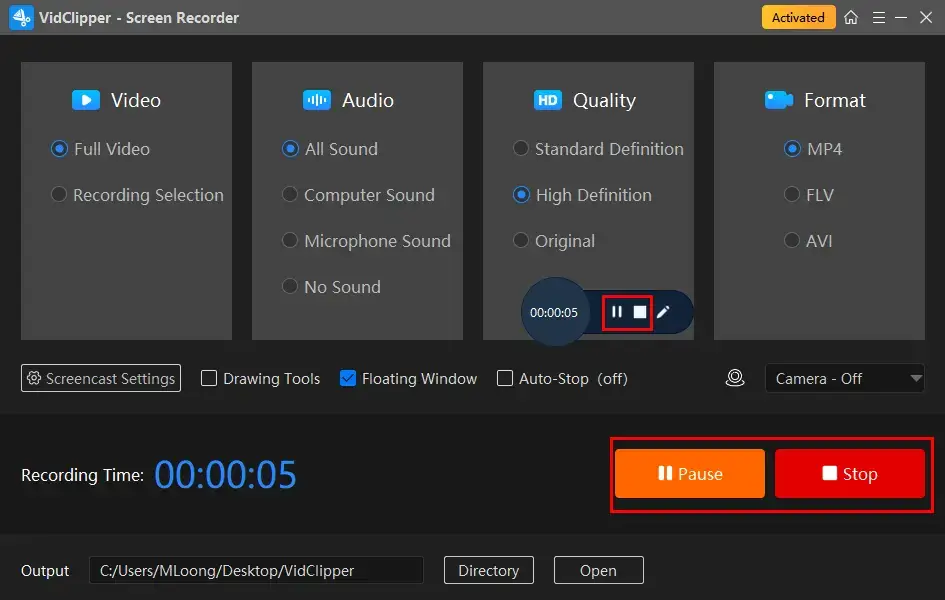
Step 4. Click the Pause or Stop icon on the floating window or the recording page to suspend or end and save your Blackboard Collaborate recording.
(Shortcut keys: Pause/Resume–Alt+F1, Stop–Alt+F2)
Step 5. Choose your next-step operation.
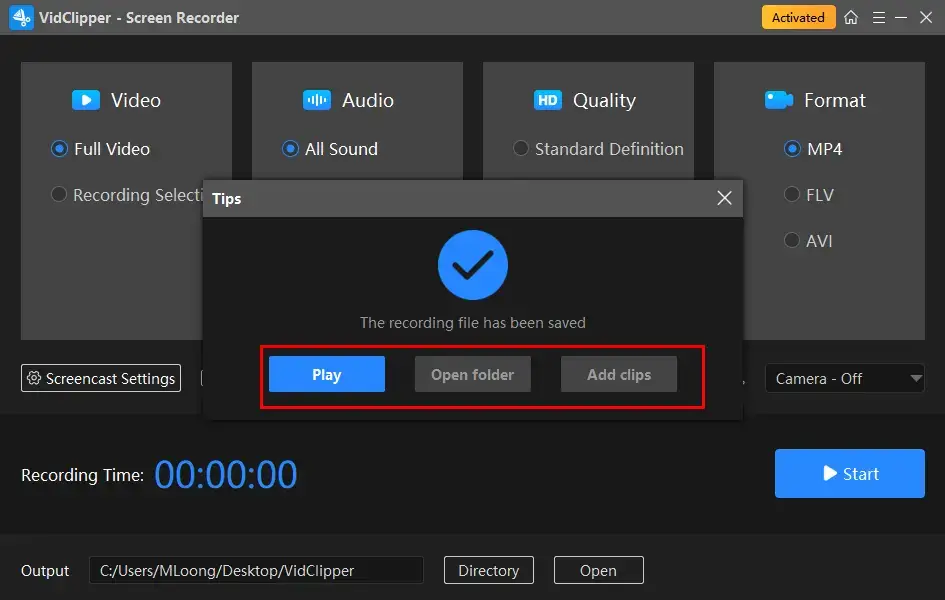
*Add clips is a useful feature that enables you to move your Blackboard Collaborate recording to the editing page directly. Then, you can edit it as you like, including adding filters, text, subtitles, transitions, effects and animations, color correcting, brightening, sharpening, removing background noise and more.
📝PS: What other digital meeting/lecture platforms can WorkinTool VidClipper record?
| Online Meetings | Zoom meetings | Google Meet | Teams meetings |
| Webex meetings | A Webinar | Zoho meetings | |
| Lecture Sessions | Speedpaint | Record yourself drawing on the computer | Record video from Webcam |
✨For your reference
✅How to Capture Content on Blackboard Collaborate on Mac?
If you use a macOS-powered computer or laptop, the easiest way is to use its built-in app–QuickTime Player.
QuickTime Player is the default media player on every Apple device, which can play a wide variety of audio and video formats, including MP3, MOV, MPEG-4, and AVI. In addition to playing audio and video files, it allows you to create and edit videos, record audio and video, and stream media over a network. For its screen recording feature, it boasts a simple recording process, which will never frighten a beginner. You can also record your screen with or without your microphone sound. However, the default output format will be MOV.
🧐Rely on QuickTime Player to Capture Blackboard Collaborate Content.
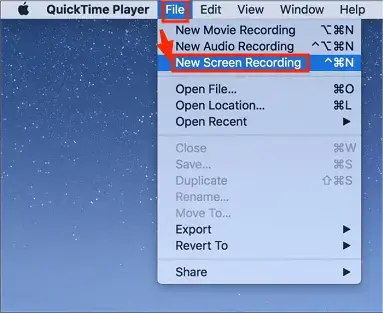
1). Open QuickTime Player and then go to File > New Screen Recording.
2). Change the settings (microphone on/off and mouse click on/off) and then hit the red Record button in the pop-up window.
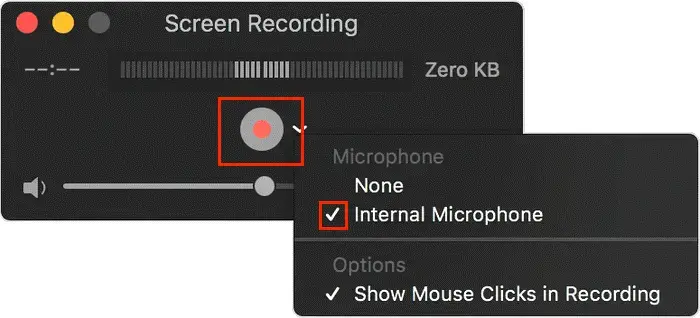
- Simply click anywhere on your computer to record the entire screen.
- Alternatively, drag the cursor to create a selected recording area and then hit Start Recording.
3). Press the Stop button when you plan to stop recording.
(Shortcut key–Command+Control+Esc)

✨For your reference
✅How to Make a Recording from Blackboard Collaborate Online?
If you are a user finding it inconvenient to install and use any desktop software, you should read this section carefully. Here, Screen Capture may be an ideal option for you.
Screen Capture is a free online platform that offers professional screen recording services. With its simple interface, everyone is able to create a recording from their computer screen effortlessly. Additionally, you can capture the content from your computer and/or camera while recording your computer audio with(out) microphone sound. Moreover, all operations can be done within one interface. Meanwhile, it provides an extension for Chrome, which will facilitate your recording. However, if you choose its free version, you must tolerate the fact that a watermark will be added to your recording.
🧐Depend on Screen Capture to get a Blackboard Collaborate recording.
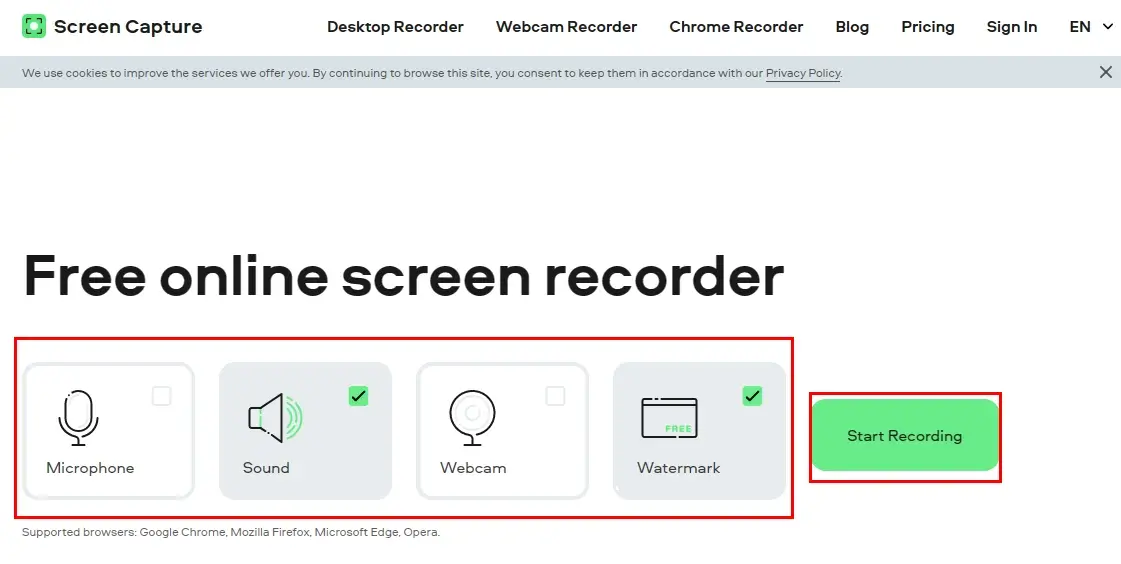
1. Open Screen Capture, mark your options (screen and sound) and then click Start Recording.
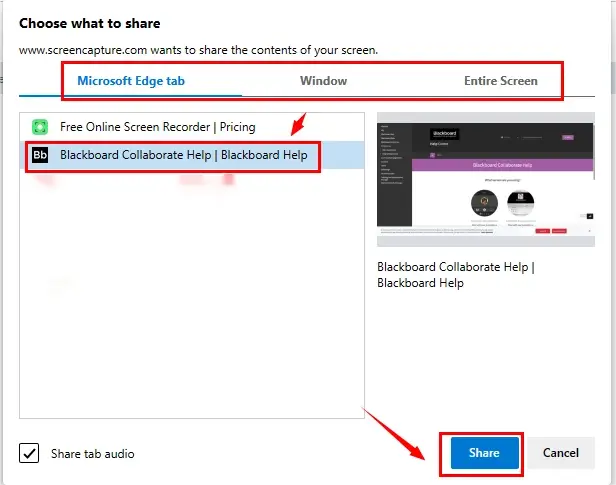
2. Decide on the content to share with Screen Capture and then hit Share.
(Tab for Blackboard Collaborate online while Window for its app.)
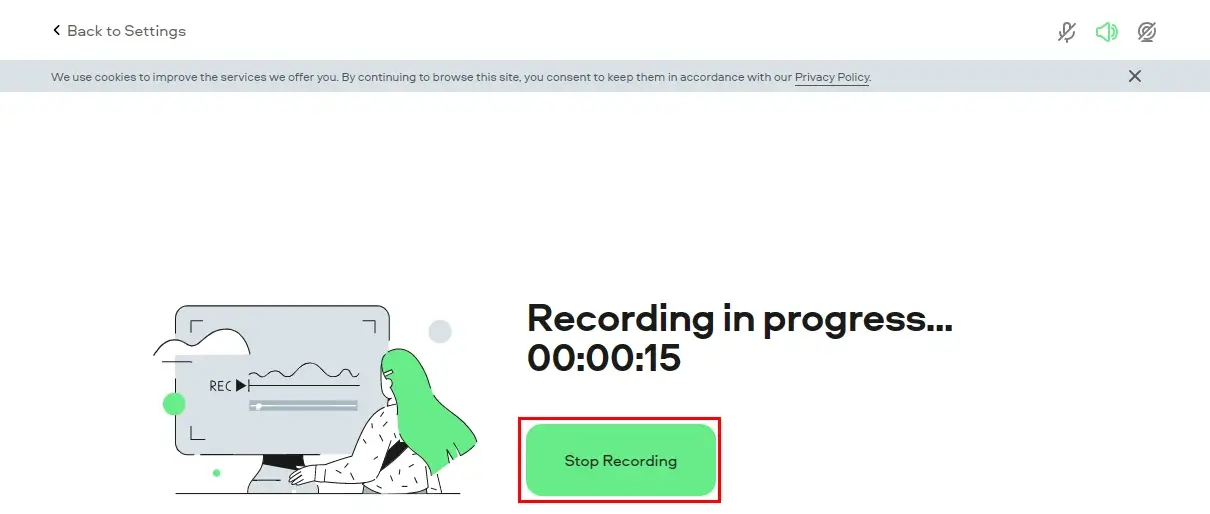
3. Click Stop sharing on the targeted page or Stop Recording on the recording page to end your recording.
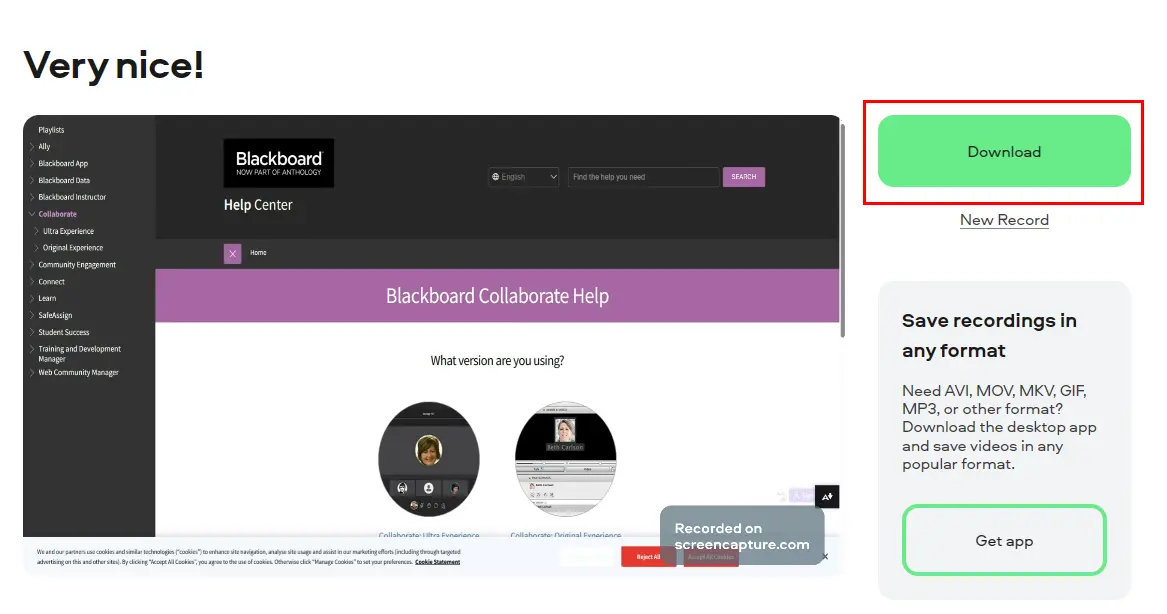
4. Press Download to export your Blackboard Collaborate recording.
✨For your reference
How to Record on Blackboard Collaborate as a Moderator
As a moderator or participant/student with the moderator permission, you are entitled to the built-in recording feature in Blackboard Collaborate. Here is what you need to do.
✅Use the Built-in Recording Tool to capture a meeting/lecture on Blackboard Collaborate.
Step 1. Open your meeting/course on Blackboard Collaborate.
Step 2. Click on Collaborate Ultra on the left navigation area.

Step 3. Click Blackboard Collaborate Ultra and then choose Collaborate Ultra Main Room/Group Room.
 Step 4. (Moderator only) Upload and share your created documents.
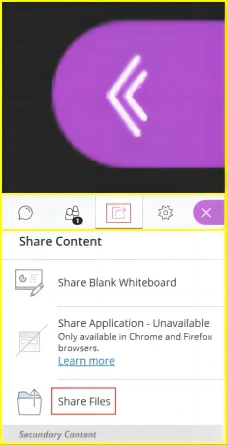
- Find the Collaborate Ultra panel and then hit the pink tab on the bottom right.
- Press the Share Content icon.
- Choose Share Files > Add files Here to import your files.
- To show your documents on the main screen, go to the uploaded document, hit Share Now button and then click on the first slide/page.
Step 5. Click on Open Session Window > Start Recording on the left menu to begin your recording.
(Activate your microphone and video based on your needs.)
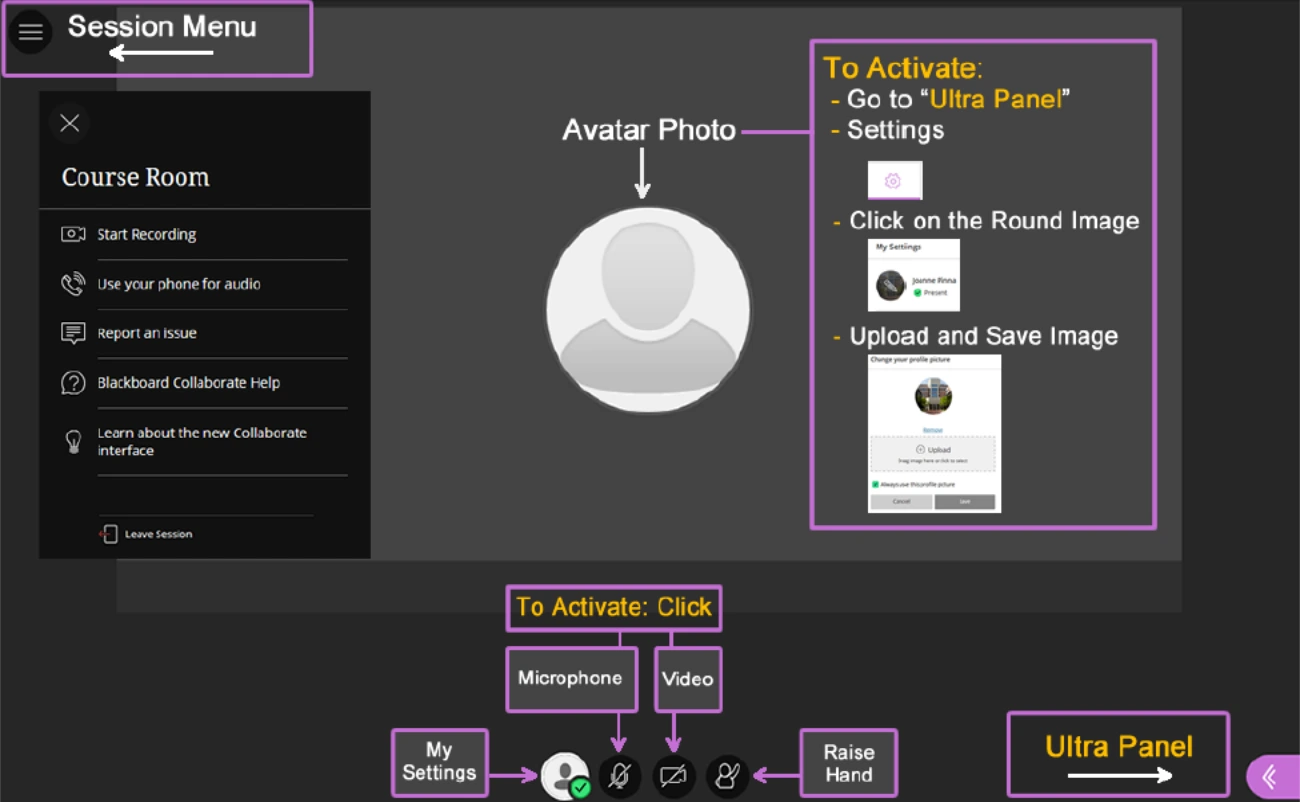
Step 6. Hit Stop recording to end your recording.

✨For your reference
Additional Words
🎯How to access Blackboard Collaborate recordings?
To view your recordings in Blackboard Collaborate, you should
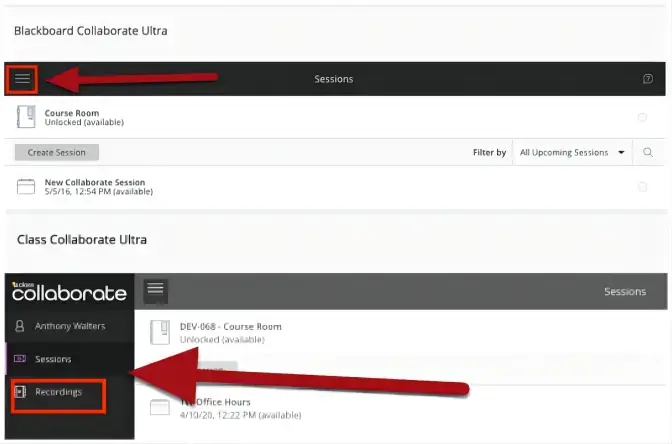
- Click on the three-dot icon to open a new menu.
- Find Recordings to access your recordings.

📣PS: If this is a new recording, it may take up to 20 minutes to post.
🎯How to download Blackboard Collaborate recordings?
Different institutions will adopt different Blackboard Collaborate systems, so you need to figure it out first by yourself in order to download it.
For a common Blackboard Collaborate system, you can do as follows.

1). Open your Blackboard Collaborate.
2). Find and click on the title of the desired recording to open it in a new browser tab.
3). Click on the Session Menu in the top left.
4). Choose Download Recording.
Final Words
How to record on Blackboard Collaborate? We hope it is now less challenging to answer as a student/participant or a moderator. With the ability to record lectures or meetings, students or participants can revisit the content at their convenience, ensuring they don’t miss out on any important information. Following the solutions outlined in this article, you can easily record your Blackboard Collaborate sessions on various platforms and review them anytime.
However, if you are a Windows user, please take a closer look at WorkinTool VidClipper since it is user-friendly, easy to use and super multi-functional.
Now, are you ready to capture a lecture or meeting on your Blackboard Collaborate?


