How to Change DPI of an Image on Windows and Mac
In today’s digital age, knowing how to change the DPI of an image is becoming increasingly crucial, especially with the prevalence of digital media. This article offers you four effective solutions to change the DPI of an image on both Windows and Mac platforms using AI-powered tools. Among them, WorkinTool Image Converter stands out as the most efficient tool for 8 common DPI choices. Be sure to give it a try for the best results.
😍 1. Change DPI from 72 to 1000 as you desire.
🤩 3. Easy operating steps with AI technology.
😎 4. Support up to four images to change DPI together.
🥳 5. Cover all the features that you can on the market and interesting filters.
😊 6. Available for image conversion, compression, matting, watermark, and more.
How to Change DPI of an Image on Windows and Mac
In today’s digital world, images play a vital role in communication, marketing, and design. Ensuring optimal image quality is crucial for both print and digital media. One essential aspect of image quality is its resolution, often measured in dots per inch (DPI). This article will guide you through the process of how to change DPI of an image to achieve the best possible results. You’ll learn what DPI means, how to check an image’s current DPI and the easiest ways to modify it for printing photos, designing graphics, or sharing online. With a better understanding of DPI and how to improve it, you’ll be editing images with professional results in no time.
🧨 What is DPI, and Why Does It Matter?
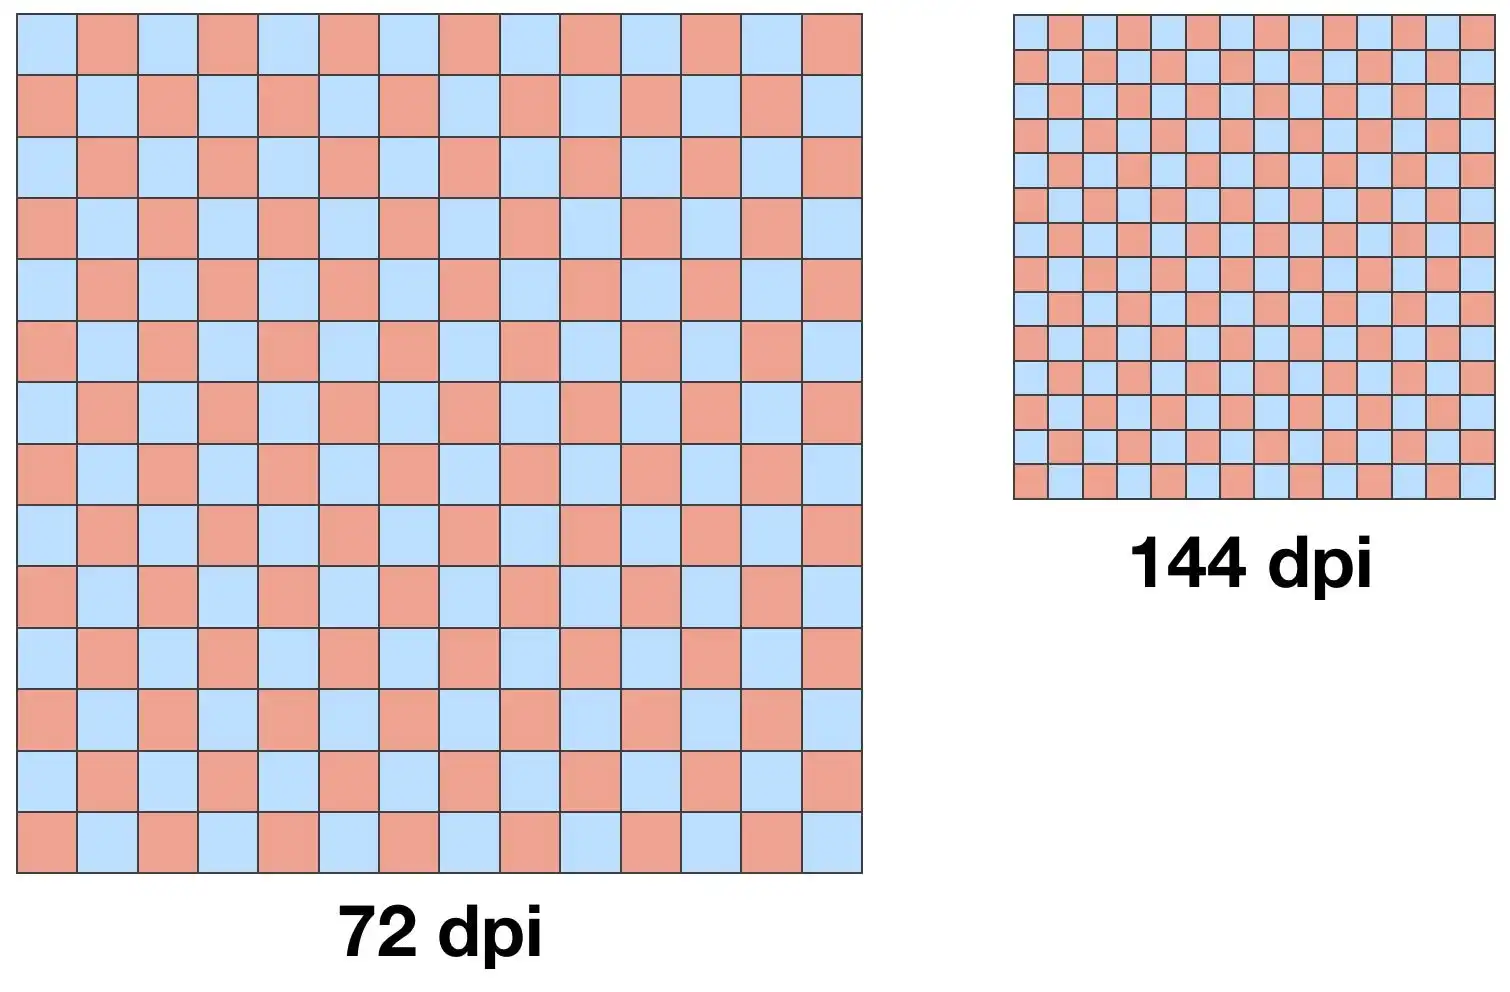
DPI stands for dots per inch. It measures image resolution. It refers to the density of dots in an image. You can understand this as a higher DPI means a higher resolution, which brings better image quality and more detail to the original picture. This is especially vital when it comes to printing images, as a higher DPI will visually make the print photo look sharper and cleaner.
DPI Matters for Several Reasons:
| Higher DPI means higher image quality: | Images with a higher DPI will have more details and look more natural, which is vital for high-quality prints. |
| Higher DPI allows you to enlarge an image: | It will look pixelated when expanding a low-resolution picture. But with high DPI, you can enlarge it while it remains sharp. |
| Higher DPI impacts file size: | The higher DPI, the more dots, and the larger the image file size. High DPI images can result in enormous file sizes. |
| DPI relates to PPI: | PPI refers to the pixel density of a digital display on a screen. A higher PPI means graphics and text will look sharper on phones or computers. Many modern shows now feature 200 PPI or higher. |
What DPI Should You Use? What is the Best DPI to Print at?
The best DPI for printing depends on the type of printing you want to do:
(Image: Glenn Fleishman)
For basic desktop printing like documents, flyers, and casual photos, 150 to 300 DPI is already good enough. Of course, for a 300 DPI image, the quality will be obviously better than 150. So, 300 DPI is great to aim for.
• For high-quality photo prints, 600 to 1200 DPI is recommended. When it comes to 600 DPI and above, prints will have more details and crisp text. Actually, many photo printing services recommend uploading files of at least 600 to 800 DPI for the best quality.
• For artwork or professional photography reproduction, 1200 DPI or higher is best. For museum-quality prints or prints that will be viewed up close, you will definitely need as high resolution as possible. Some printers recommend at least 1200 to 2400 DPI for the highest quality art and photographic prints.
In summary, 300 DPI is suitable for most everyday printing needs. Check with the printer for professional photos or art prints for their specific recommendations. A higher DPI, 600 and above, will produce better results. But only crank up the DPI with also improving the actual resolution of your image files. The DPI is important, but the number of pixels in your image ultimately determines how sharp the final print can be. So make sure any image destined for a high-DPI print starts with enough pixels to justify it. A higher DPI can make a real difference with the correct source files, but it’s not a fix-all by itself.
How to Check Your Image’s Current DPI
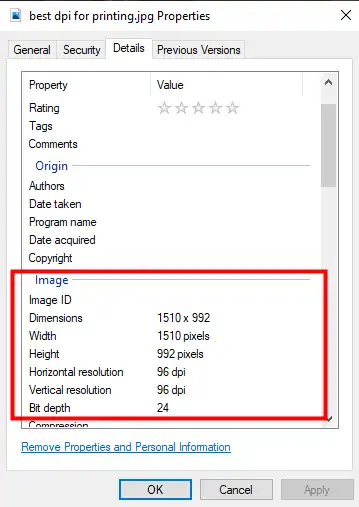
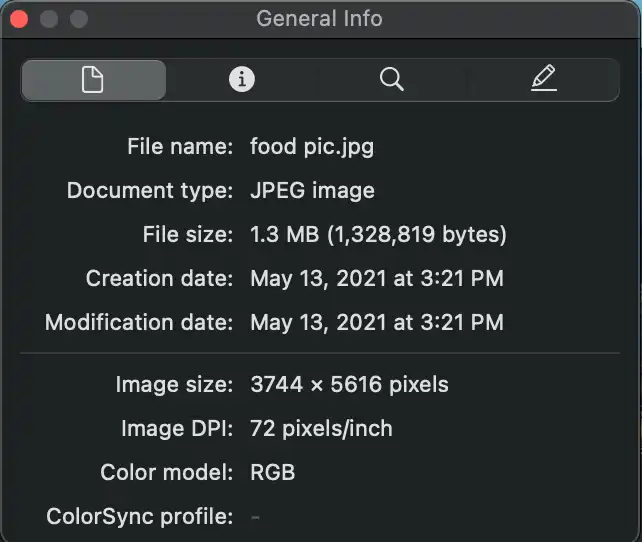
Before changing the DPI of an image, it’s essential to know its current resolution. In fact, if you want to query the DPI of the picture, you do not need special image processing software. This can be done simply by using the system’s built-in image preview software. Now whether it is Windows or MacOS system has its own feature to help users quickly see all the information in the picture.
Using File Properties on Windows
- Right-click on the image on your Windows computer.
- Select ‘Properties‘ from the drop-down menu.
- Go to the ‘Details‘ tab and check the DPI in the ‘Image‘ section.
 Using General Info on Mac
- Right-click the file and select Open With > Preview.
- Continue to click Tools > Show Inspector.
- Check the Image DPI in the information.
How to Change DPI of an Image in WorkinTool
You can change an image’s DPI in most graphics apps. And you’ll definitely need an application considering Windows doesn’t come with a built-in tool to do that natively. But you can change the resolution in Preview on a Mac. And for people who use the Windows system, WorkinTool Image Converter might be an excellent choice to higher the DPI of a picture.

AI-powered WorkinTool Image Converter is a professional image editing software on Windows. It provides various features for users to apply. For image format conversion, it supports more than 100 different types to change. Besides that, it also brings functions like compression, editing, applying or removing watermarks, text, filters, stickers, etc. And if you want to use it to change the DPI of an image, there are eight options for you to select, ranging from 72 DPI to 1000 DPI. It also supports users to change four pictures together at once.
With simple clicks, you can easily higher the DPI of your picture without losing image quality. With the help of AI technology, It is easy to use but powerful for Windows. You can see every step for each function on the homepage, so all users can quickly learn to use it.
- Customize to enlarge or compress images
- Add or remove photo watermarks
- Change or remove the image background
- More than 65 image filters to apply
How to change DPI of an Image using WorkinTool:
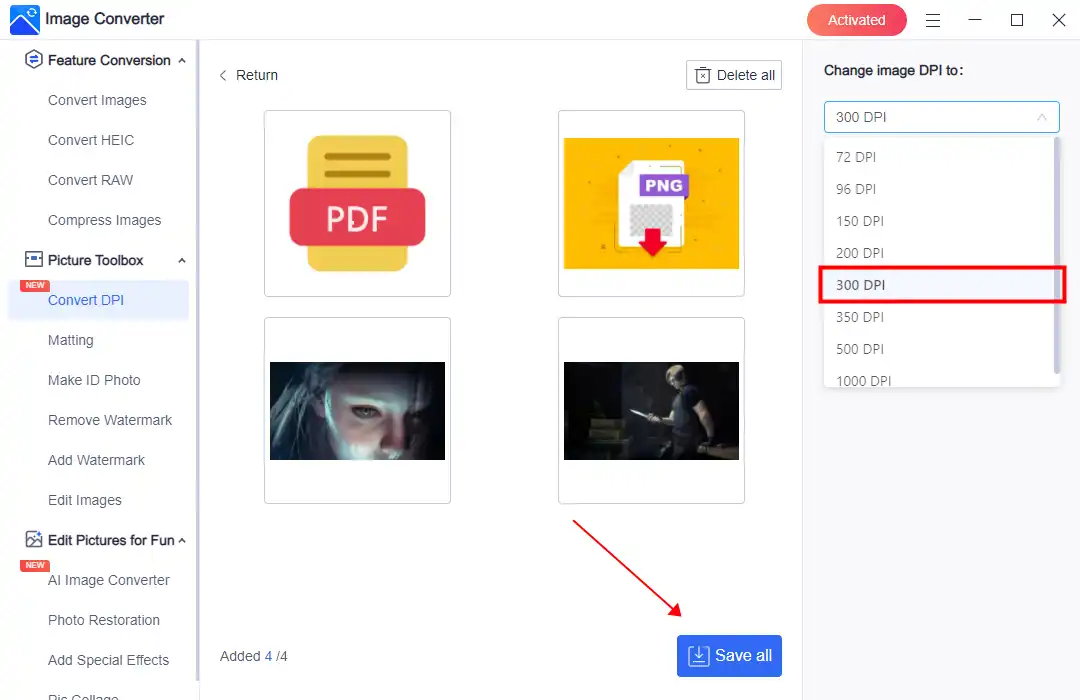
Step 1. Open WorkinTool Image Converter and tap the Convert DPI option to add your pictures.
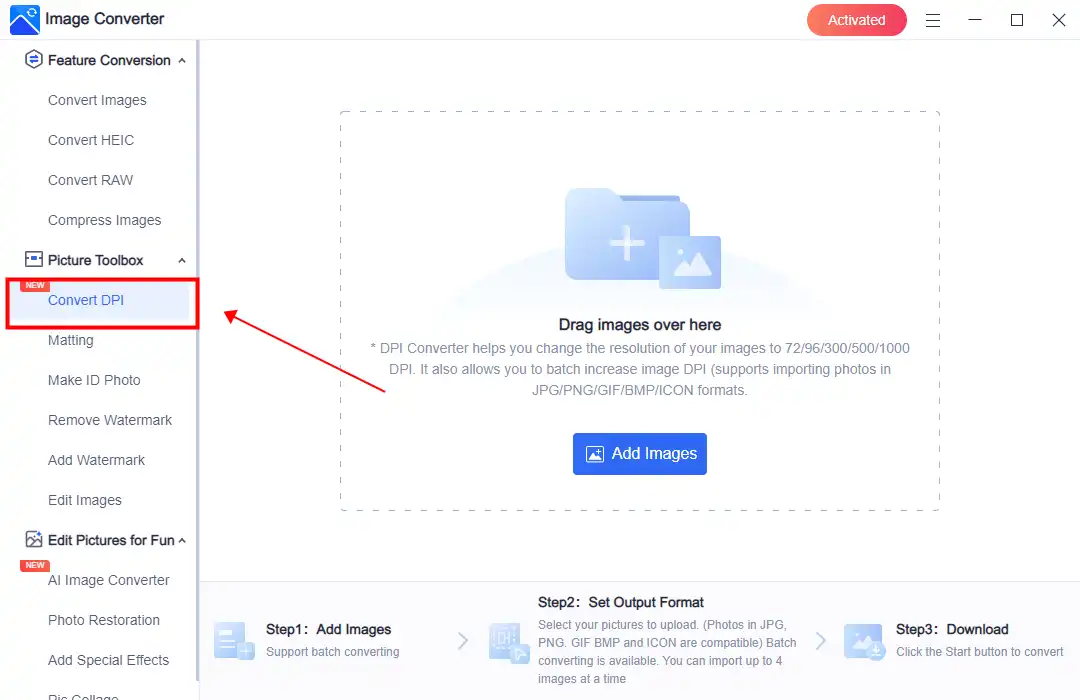
Step 2. Add up to four pictures at a time, and select a DPI from the drop-down menu.
Step 3. Lastly, click Save All and check the converted image DPI from the saving folder.
💖 More Additional Features for WorkinTool Image Converter 💖
How to Change DPI of an Image in Preview
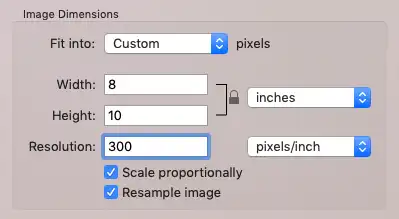
As we mentioned earlier, on the Mac, the built-in Preview software makes it easy to change the DPI of an image. Unlike WorkinTool, it does not provide DPI options but instead manually enters resolution figures. Here is how to use it.
- Open your pictures with Preview.
- Click ‘Tools‘> ‘Adjust Size.’ And the Resolution option is the DPI you want to change.
- We suggest you uncheck the ‘Resample Image’ checkbox because it will automatically change the inches in Width and Height to the resolution you put in. Also, try to set the DPI above 300 to ensure the quality of the print picture.
- When everything is done, save this image and check the result.
Increase the DPI using Adobe Photoshop
In addition to WorkinTool, there are many professional image processing software on the market that can help users modify the DPI of an image. Since we are talking about professional processing software, we have to talk about Adobe Photoshop.
Adobe Photoshop has powerful image processing functions. It supports a variety of advanced painting features. What differentiates Photoshop from other image tools is that it offers a layer structure that allows you to process the same image multiple times without overlaying each other. However, this product can be expensive. If you haven’t tried it, use the 7-day free trial to experience a little before any decisions.
- Open Photoshop and find your target image.
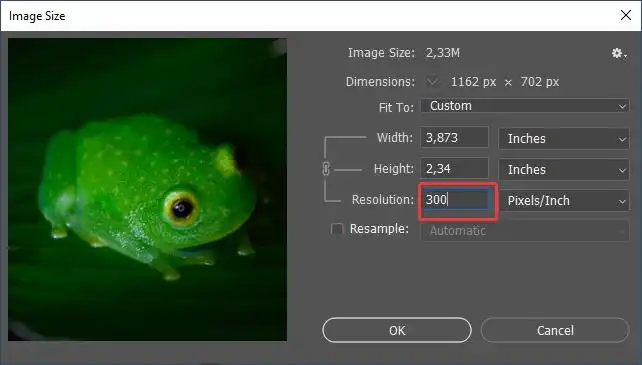
- Click ‘Image‘> ‘Image Size.’
- Uncheck the ‘Resample‘ box, and input desired DPI into the ‘Resolution‘ box.
- Then click OK and save the image.
Tips for Increasing DPI and Maintaining Image Quality
When Increasing the DPI of an image, be aware of the following tips that might help you to ensure quality:
- Always prepare a copy of the original image to avoid accidents.
- It’s best to start with a high-resolution image and reduce the DPI because over-increasing a low-resolution picture might cause pixelated.
- When the goal is to print, a 300 DPI is commonly recommended to set for good quality. And if it is only for digital media, a PPI of 72 is generally sufficient.
Conclusion
Changing the DPI is a crucial skill if you work with digital images, whether for print or digital media. This guide offers you the knowledge and tools how to change DPI of an image using various software. By following the tips and best practices provided in this article, you can ensure that your photos maintain the ideal quality and resolution for your intended use via WorkinTool Image Converter.
Feel free to experiment with different DPI settings to locate the optimal balance between file size and image quality for your projects. Remember, the more you work with images, the more proficient you will become at adjusting their resolution to achieve the best possible outcomes. So, keep practicing to improve your image manipulation skills.
