How to Equalize Audio Easily On PC | 3 Solutions
What can you do if you are unsatisfied with its poor sound quality that greatly affects your listening experience? One essential way to solve this problem is audio equalization. Whether you want to fine-tune the tonal balance, normalize audio or create unique sound effects, knowing how to equalize audio can make a significant difference. In this article, we will show you how to equalize audio effortlessly on your computer. All the methods outlined here will be fast and easy, even friendly for beginners. So, you avoid having to find an audio engineer or resort to expensive professional equipment to get started.
📌Windows–WorkinTool VidClipper
📌Mac–Audacity
📌Online–123 Apps (Audio Equalizer)
🙋🏻♀️Mastering the art of audio equalization opens up a world of possibilities for enhancing your listening experience and improving the quality of your audio projects. In this article, we have explored the fundamental EQ elements and provided practical tips to help you get started.
🙋🏻♂️Please feel free to try all the aforementioned solutions. However, if you are a Windows user, WorkinTool VidClipper is your ideal option. It is user-friendly, easy to use, reliable and multi-functional to do more than music volume equalization. Now, please start your reading and experience all of them by yourself.
How to Equalize Audio Easily On PC | 3 Solutions for Beginners
In the modern era typical of digitization, digital music or audio has now taken a large share of our lives due to its convenience. What can you do if you are unsatisfied with its poor sound quality that greatly affects your listening experience? One essential way to solve this problem is audio equalization. Whether you want to fine-tune the tonal balance, normalize audio or create unique sound effects, knowing how to equalize audio can make a significant difference.
In this article, we will show you how to equalize audio effortlessly on your computer. All the methods outlined here will be fast and easy, even friendly for beginners. So, you avoid having to find an audio engineer or resort to expensive professional equipment to get started.
| 💻Windows | 📍WorkinTool VidClipper [🔥Recommended] |
| 💻Mac | 📍Audacity |
| 💻Online | 📍123 Apps (Audio Equalizer) |
With the right software and a basic understanding of equalization principles, you can unlock the potential of your audio and achieve the desired sonic results.
Now, let’s start our journey and discover tips for easy audio equalization.
Before Moving on to Audio Equalization
📌What is audio equalization?
Audio equalization, commonly known as EQ, is the process of adjusting the balance of frequency components within an audio signal. It involves manipulating the amplitudes of different frequencies to achieve a desired tonal balance or to enhance specific aspects of the sound.
In audio production and playback systems, sound is composed of various frequencies that contribute to the overall character and quality of the audio. These frequencies can range from
- Low frequencies: Bass
- Mid-range frequencies: Vocals and instruments
- High frequencies: Treble
Equalization makes it possible to adjust these frequency components to shape the sound based on the desired artistic or technical goals.
📌What is an audio equalizer?
An audio equalizer is a device, an app or a software plugin that provides control over specific frequency bands. It usually divides the audio spectrum into frequency bands and allows users to independently adjust the volume of each band. This adjustment can involve boosting (increasing the volume) or cutting (decreasing the volume) of specific frequencies within their respective bands.
Audio equalizers can come in different configurations, such as:
- Graphic Equalizers: Those with fixed frequency bands and adjustable gains.
- Parametric Equalizers: Those with adjustable frequency, gain and bandwidth controls.
- Shelving Equalizers: Those can selectively boost or cut frequencies above or below a defined threshold.
- High-Pass/Low-Pass Equalizers: Those allow only frequencies above or below a selected cutoff point.
Normally, the following elements are included in an audio equalizer:
It is important to note that the specific elements and controls within an audio equalizer can vary depending on the model, design and software implementation. Understanding these elements will help you effectively equalize volume and achieve the desired tonal balance or sound enhancement.
📌Why should you equalize audio?
Audio equalizers serve a range of purposes, including:
- Corrective Equalization: Compensate for deficiencies or anomalies in the sound system or recording environment.
- Tonal Balance Control: Adjust specific frequencies to achieve the desired tonal balance.
- Instrument and Vocal Separation: Enhance clarity and separation among different elements in a mix by adjusting the frequency content of individual instruments or vocals.
- Sound Design: Make unique and artistic effects by manipulating specific frequency ranges.
Then, can I achieve audio equalization by myself? How can I do that? Well, you can. All you need is your computer with any of the following tools. Please read on to learn about specific solutions.
How to Equalize Audio Easily on Windows
To equalize sound without hassle on Windows, you need an easy and handy audio equalizer or editor. Here, please take a look at a practical app–WorkinTool VidClipper.
✅WorkinTool VidClipper
VidClipper Video Editor is an acclaimed tool developed by a promising SaaS brand–WorkinTool. Inspired by the idea of simplicity and practicability, the team has upgraded it to a super multi-functional app with the following (but not limited to) features:
Therefore, you save the trouble of finding and installing them individually, which is time-saving and efficiency-boosting.
🙋🏻♀️Why WorkinTool Vidclipper?
WorkinTool VidClipper can serve as the first video editing software for everyone. Thanks to its simple and intuitive interface, beginners will find it effortless to meet their basic editing requests with the quick editing tools that require no learning curve on the opening page. For professionals, they will find it useful to create professional-looking or movie-like videos through advanced features inside its editing console. Hence, it can also be considered an ideal alternative to Adobe Premiere Pro.
Used as an audio or sound equalizer, VidClipper boasts both manual adjustments designed for professionals and 14 predefined presets (bass, pop, classical, dance, country music and more) for beginners. Therefore, both cohorts can expect an effective bass booster that ensures an easy equalization process. In addition to being a music equalizer, VidClipper can also be a video equalizer that helps to equalize the audio of a video. Furthermore, it supports a range of audio formats, from mainstream MP3, AAC, WAV, WMA and FLAC to less mainstream APE, OGG, M4R, etc.
(📃More info: WorkinTool VidClipper Review)
💡How to Equalize Audio Using WorkinTool VidClipper?
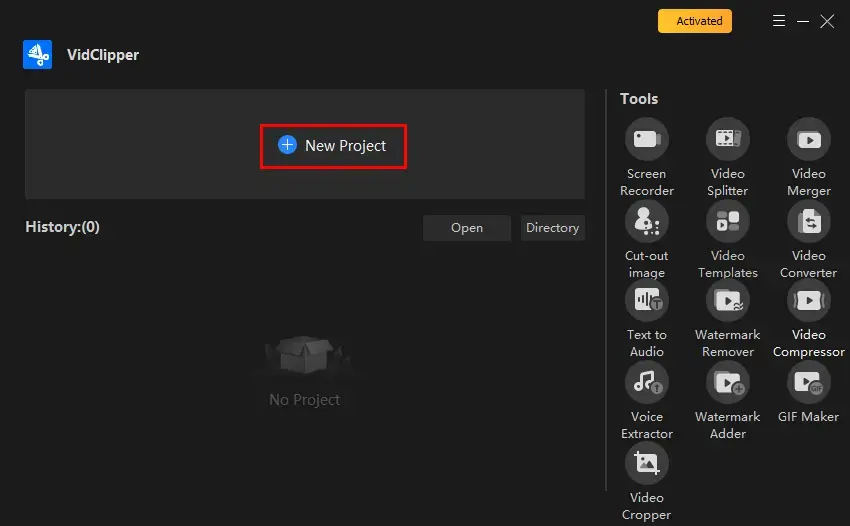
Step 1. Launch VidClipper and then click + New Project to open its editing console.
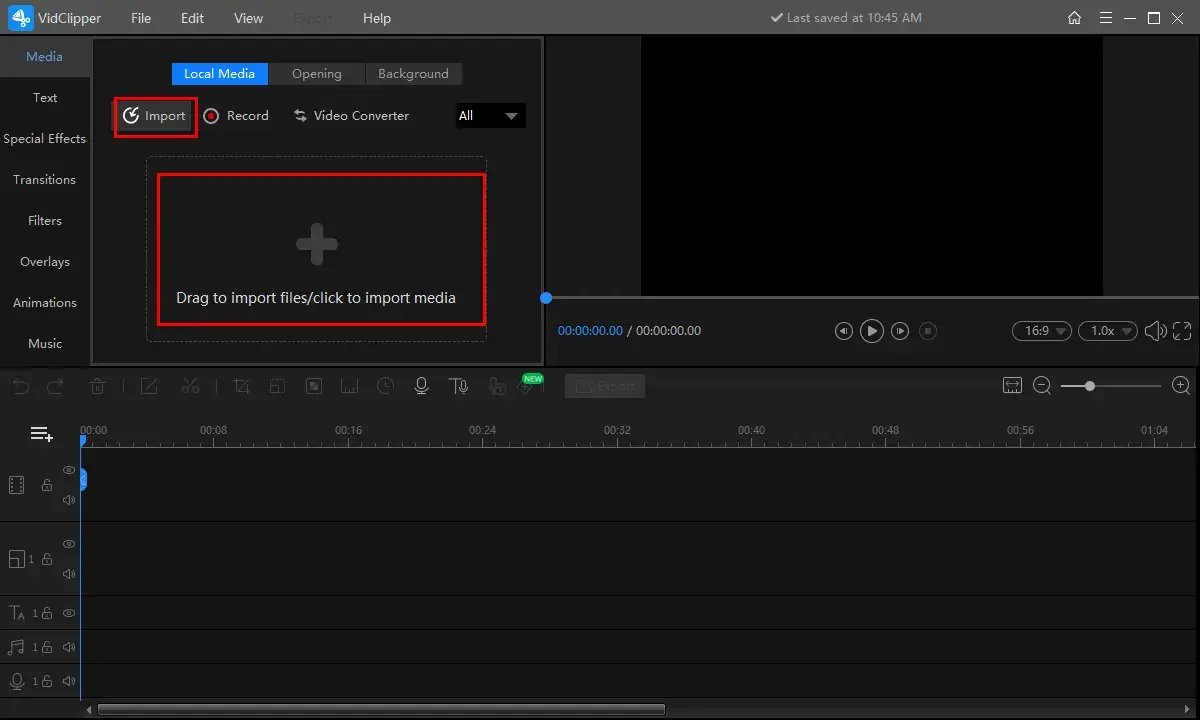
Step 2. Hit Import to add your music file or video and then drag it to the timeline below.
Step 3. Complete your audio equalization.
🎼Audio Files
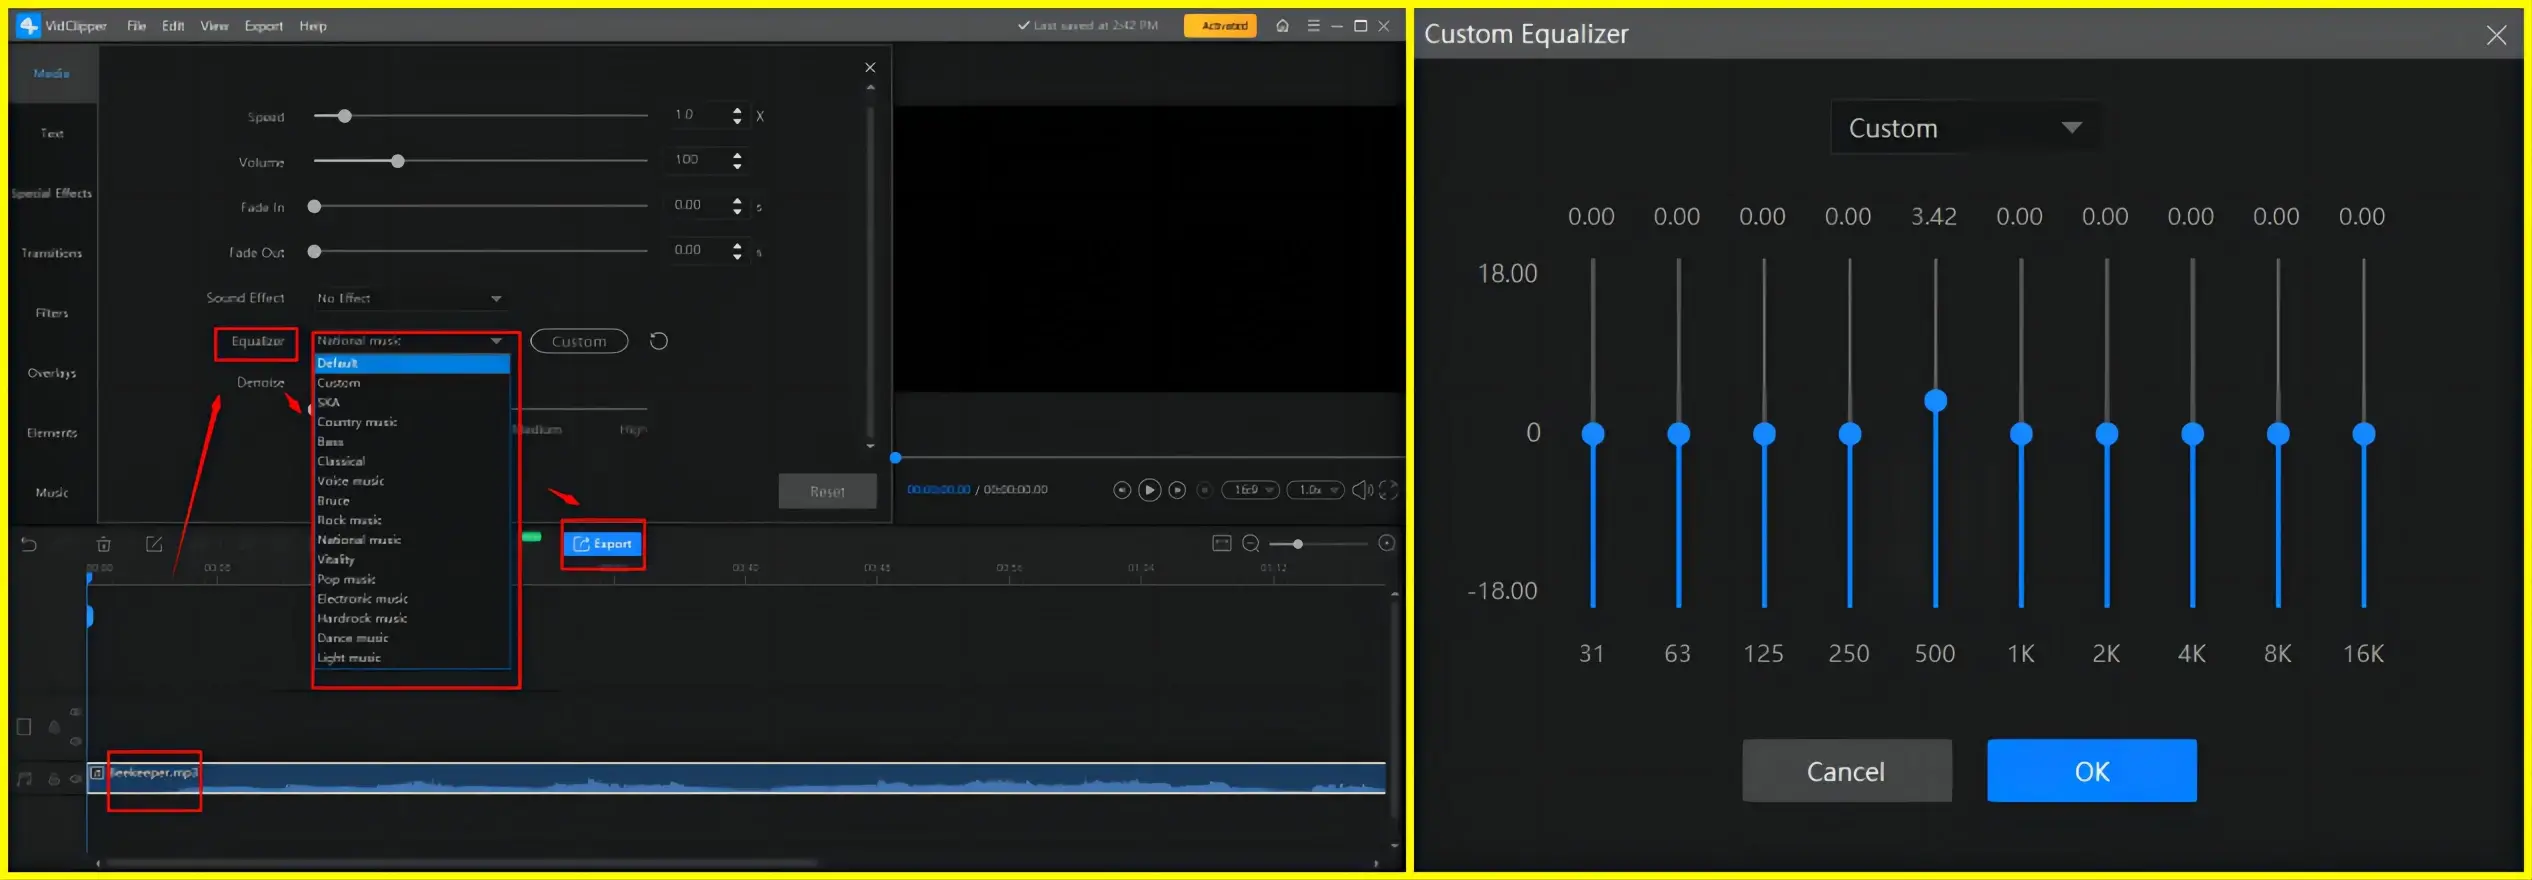
- Single-click the audio on the timeline to activate the audio adjustment console.
- Find Equalizer, either choose one of the presets from the drop-down box (automatic EQ) or click Custom to adjust each band inside the equalizer by yourself (manual EQ).
🎬Videos
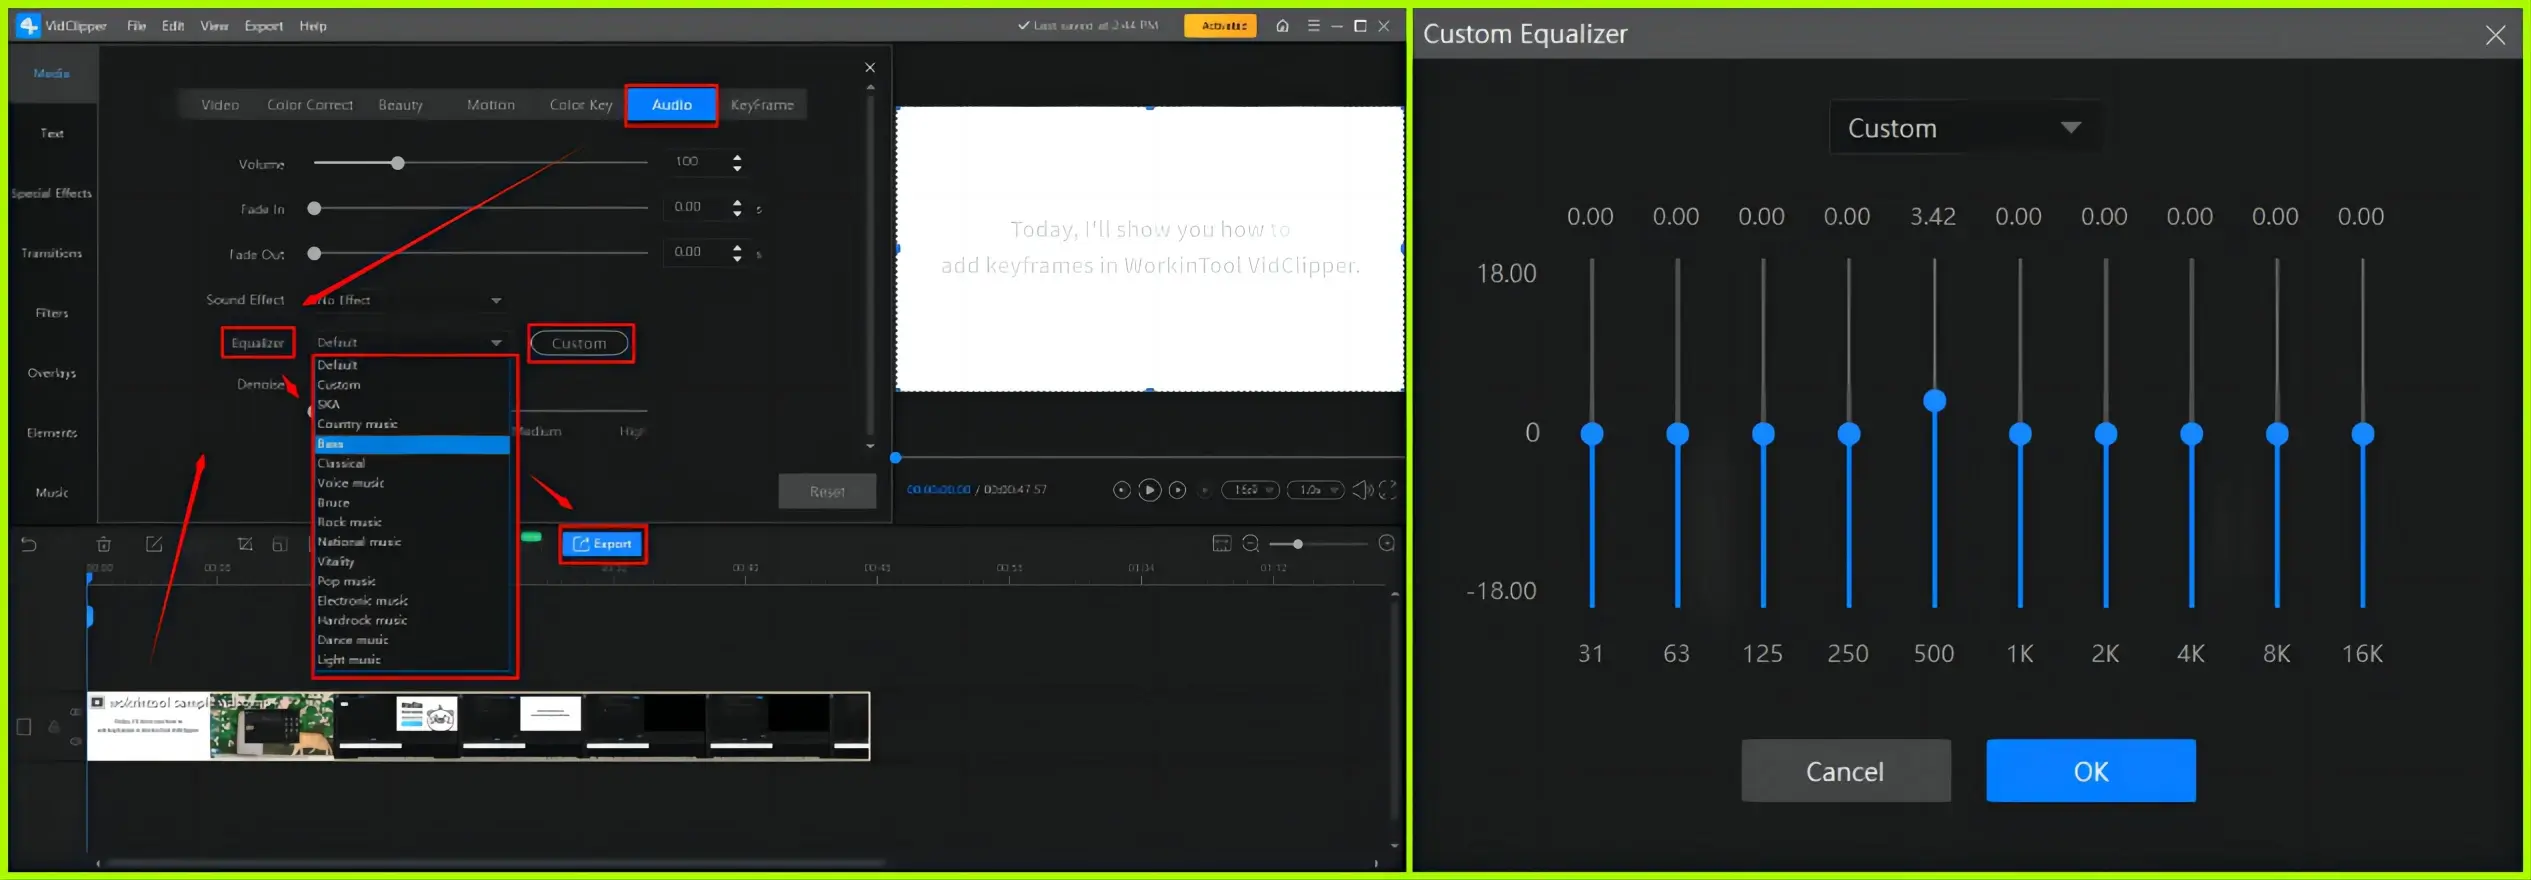
- Single-click the video on the timeline to activate the video adjustment console.
- Go to Audio > Equalizer.
- Either select one of the presets from the drop-down box (automatic adjustment) or press Custom to adjust each band inside the equalizer on your own (manual adjustment).
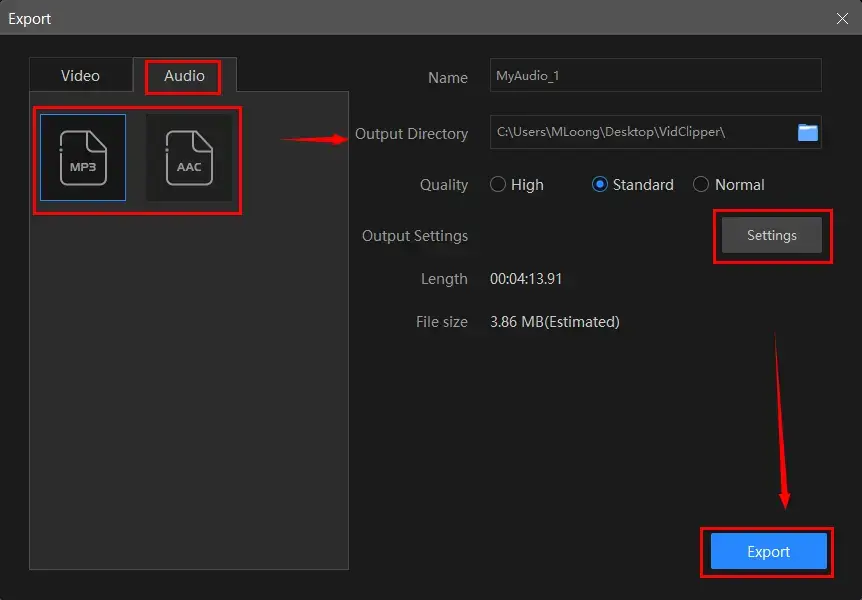
Step 4. Click Export.
Step 5. Choose the format/quality, name your project, adjust the settings if needed and then press Export.
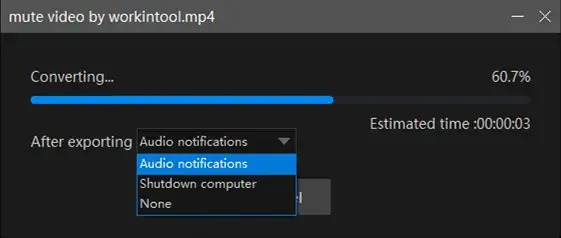
📣PS: The reminder or post-export status can be personalized when your video/audio with crossfade effects is under processing, including a ringtone reminder, PC shut down and no further operation.
✨Our Verdict
🙋🏻♀️You May Also Like
How to Equalize Sound on Mac
Mac users can realize this goal with the assistance of a globally renowned audio editor–Audacity.
✅Audacity
Audacity is a free and open-source program designed for audio playback and editing. As a professional audio-related tool, Audacity supports a wide range of audio formats, including MP3, WAV, AIFF, OGG and more. Besides, it captures users’ minds with its professional audio manipulation features and cross-platform availability.
Owing to its multiple editing features, Audacity can be used as an audio equalizer. Users can either resort to the EQ presets to enjoy the automatic EQ process or go to its section-Effects and use the filters to adjust their audio files manually. More importantly, it enables them to add extra plugins to facilitate equalization. However, Audacity supports audio equalization only.
💡How to Equalize Audio in Audacity?
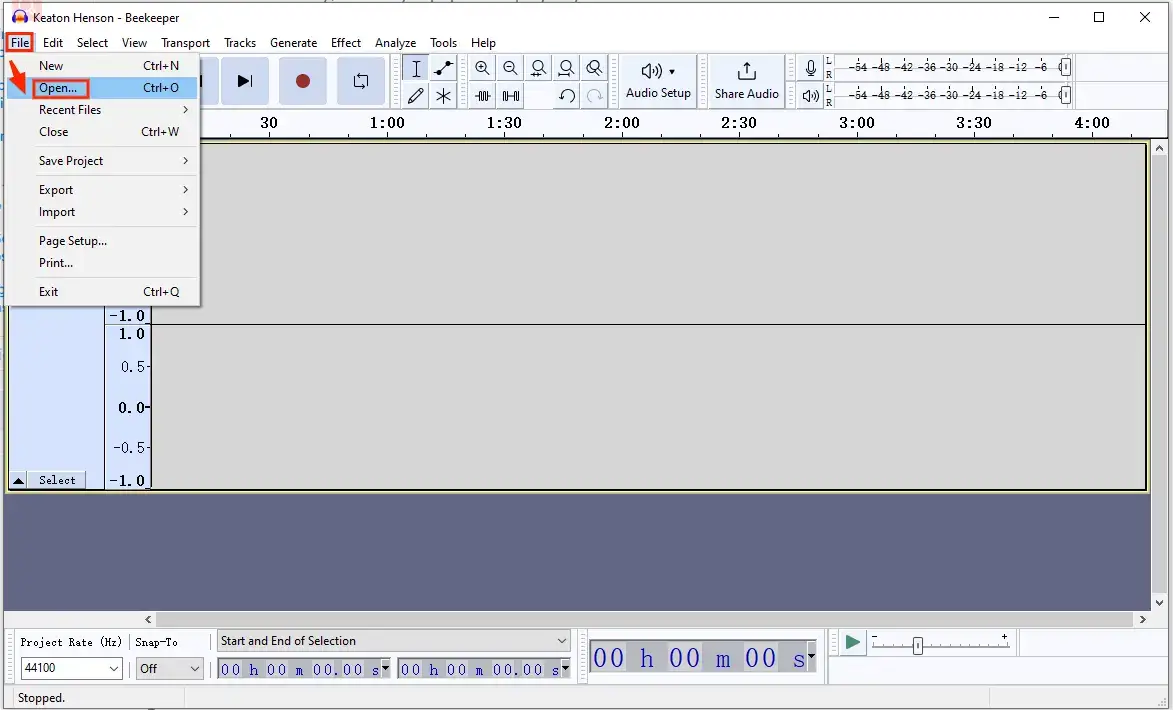
1). Open Audacity and then go to File > Open to upload your audio.
2). Use the shortcut key-Alt+A to select your audio file.
3). Begin your sound equalization.
🎉Automatic EQ

- Find Effects on the left menu and then click it.
- Hit Add effect > Audacity and then select the desired equalization effect.
(For more filters, please click Get more effects to download and install the wanted ones from the Audacity website.)
🎉Manual EQ
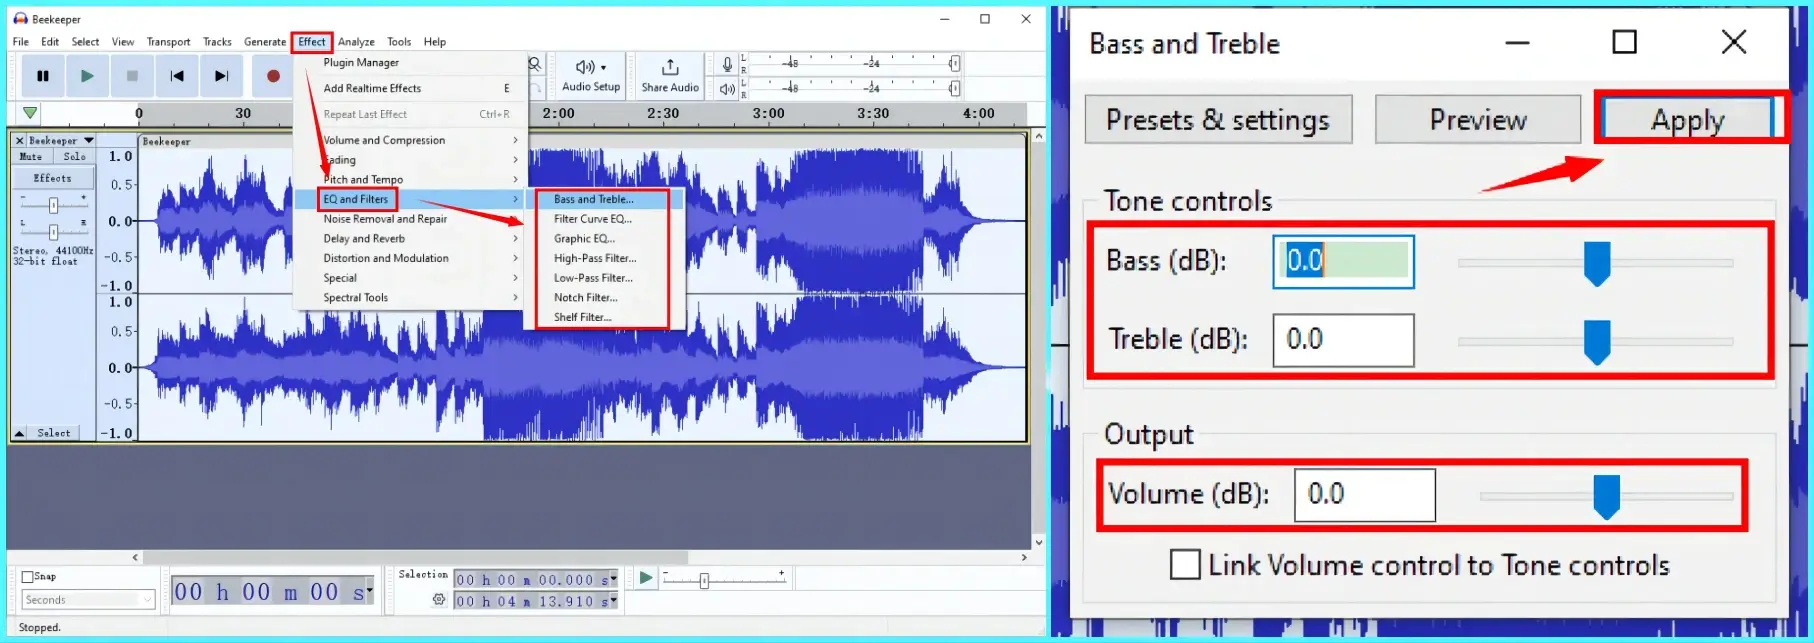
- Go to Effects > EQ and Filters and then select the desired effect.
(Take Bass and Treble as an example.) - Adjust the blue sliders to equalize your audio manually.
- Then, hit Apply to confirm your settings.
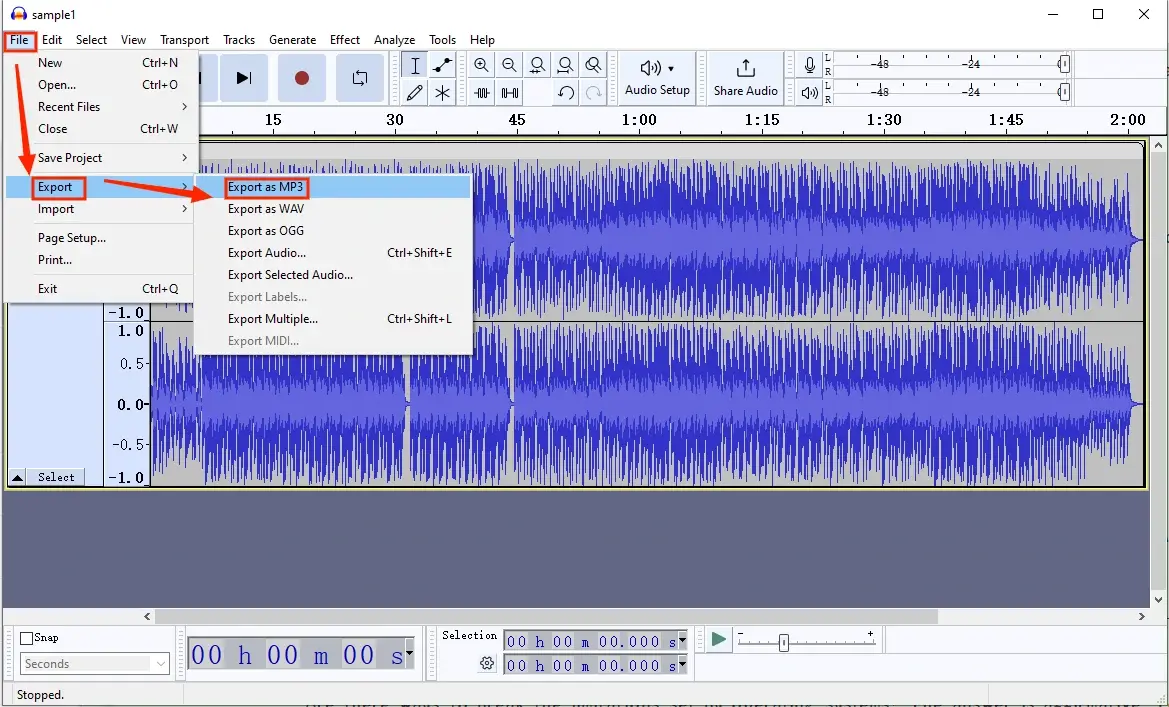
4). Navigate to File > Export to save your equalized audio.
✨Our Verdict
How to Equalize Volume Online
To fulfill this purpose online, the easiest way should be the online audio equalizer presented by 123 Apps based on our research.
✅123 Apps
123 Apps is a website that offers a collection of free apps to convert and edit different documents, particularly PDFs, images, videos and audio files. With its help, users can finish plenty of file conversion and editing missions without the need for software download and installation. Also, the OS limit will not be a problem since it is a browser-based toolbar.
There is an online audio equalizer in 123 Apps. It boasts a simple and clear interface with all the necessary equalization elements. Meanwhile, it supports both manual EQ and preset EQ templates, giving different users customized equalization options. Moreover, it can serve as an audio and video equalizer. Additionally, five mainstream audio formats are supported, including MP3, M4A, M4R, FLAC and WAV. However, the output can only be saved as an audio file, even though the input is a video.
💡How to Equalize Sound Online via the Online Audio Equalizer of 123 Apps?
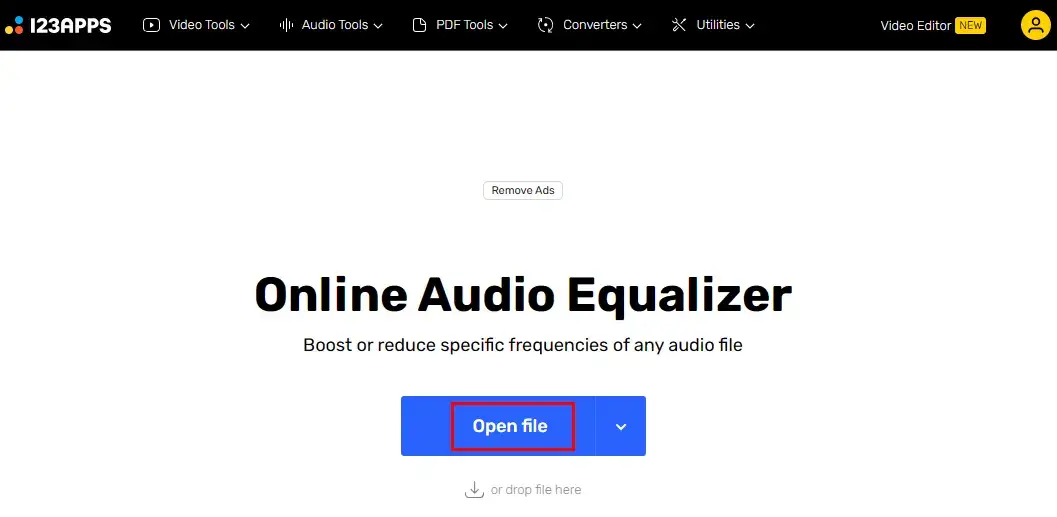
1. Open the online audio equalizer of 123 Apps and then click Open file to add your audio or video file.
2. Start your audio or video EQ.
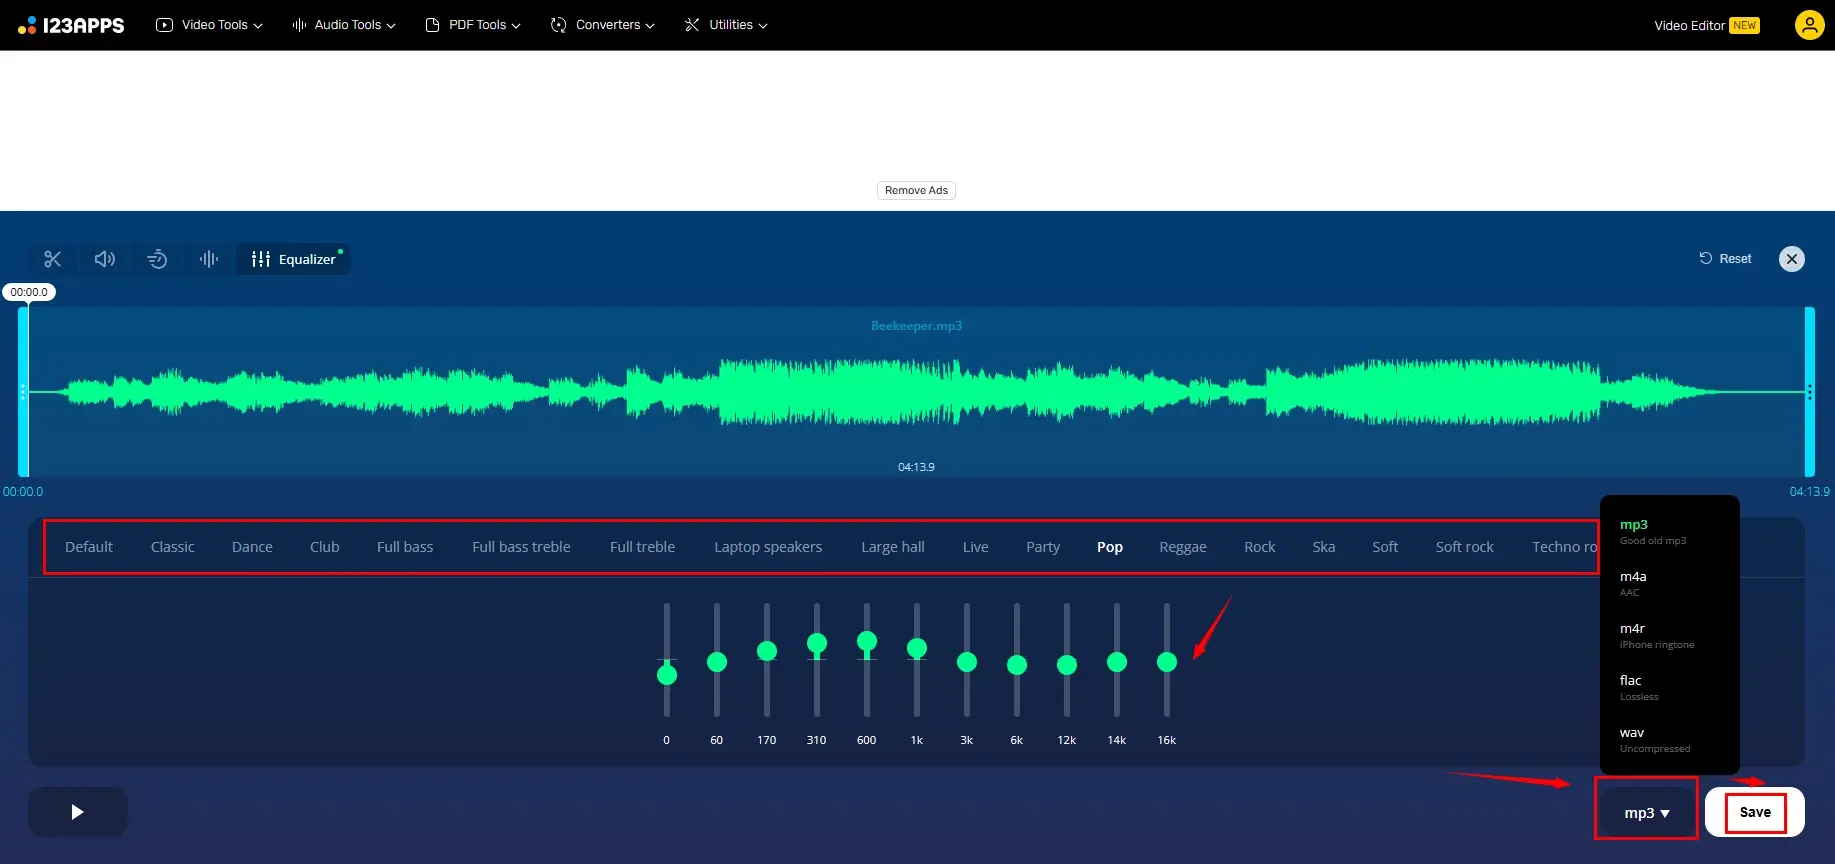
- Use the EQ presets to automatically equalize your audio.
- Or adjust the bands in the default mode to complete manual equalization.
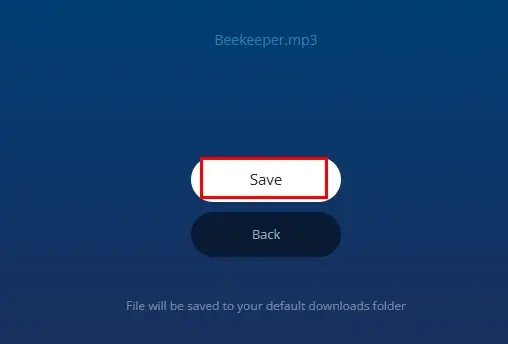
3. Press Save.
4. Hit Save to get your output.
✨Our Verdict
More to Share
🎯Are there any other ways to equalize audio?
Yes. You can undertake audio equalization through the following methods:
- Remove background noise from audio
- Change audio bitrate
- Adjust sample rate
All the tasks above can be effortlessly completed in WorkinTool VidClipper.
🎯Does Windows 10 have an audio equalizer?
Yes. An inbuilt audio equalizer is available on Windows 10, allowing you to boost or reduce specific frequencies of your audio file. Here is what you should do:
- Find the volume icon at the right bottom and right–click it.
- Locate and hit the option–Sound.
- Go to Playback, find your device and then right-click it to select Properties.
- Choose Enhancements, mark Equalizer, select an EQ mode from the drop-down menu and then hit OK.
🎯Is there an equalizer in Windows Media Player?
Yes. An equalizer is equipped inside the Windows Media Player. You can activate and use its equalizer by following the guidance below:
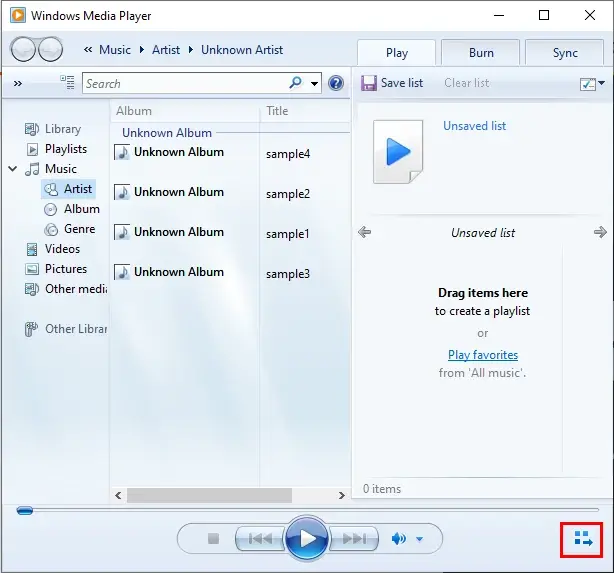
1). Open Windows Media Player and then click the icon representing Switch to Now Playing.
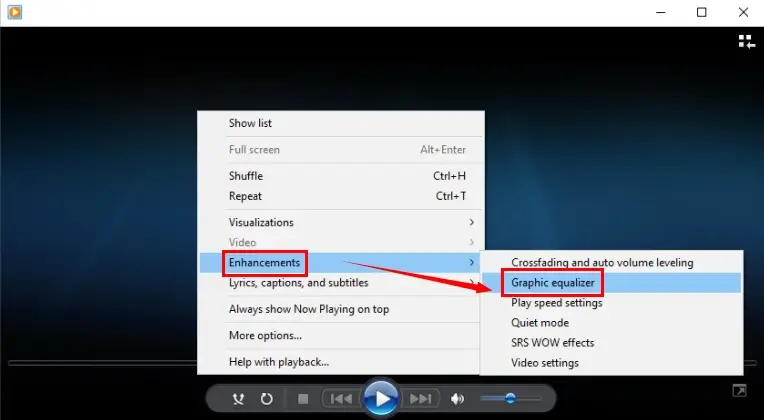
2). Right-click on the player to activate a pop-up menu and then choose Enhancements > Graphic equalizer.
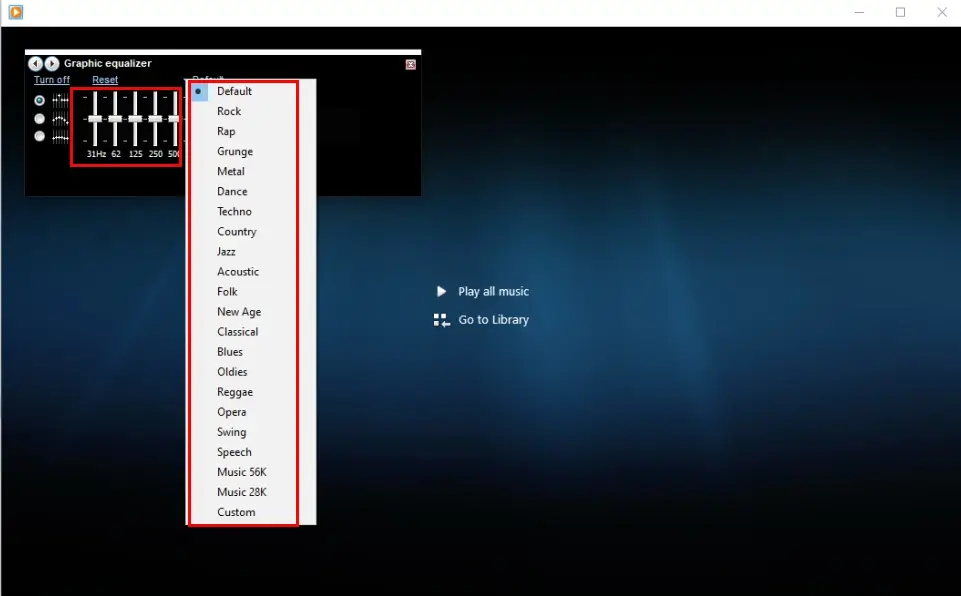
3). Adjust the bands in the Default mode to manually equalize audio or click the Default to open the drop-down box and then pick the desired EQ mode.
Final Thought
Here is the end of our discussion on how to equalize audio on your PC (Windows, Mac and online). Mastering the art of audio equalization opens up a world of possibilities for enhancing your listening experience and improving the quality of your audio projects. In this article, we have explored the fundamental EQ elements and provided practical tips to help you get started.
Please feel free to try all the aforementioned solutions. However, if you are a Windows user, WorkinTool VidClipper is your ideal option. It is user-friendly, easy to use, reliable and multi-functional to do more than music volume equalization.
So, fire up your PC, grab your favorite equalizer software and start exploring the exciting world of sound equalization now.


